Looking to learn how to use Elementor in WordPress? You are at just the right place.
For a long time, website creation was a domain reserved for only those with extensive coding knowledge. It was a complicated task and hence inaccessible to many.
However, with the Elementor page builder plugin, designing WordPress sites has become more user-friendly. Whether you are creating a blog, a product page, or even a full-fledged online store, this page builder is for everyone.
Elementor empowers users to craft professional-looking websites effortlessly, minus the technical know-how.
Be it creating visually appealing layouts, the need for responsive design, or the desire to incorporate advanced features without coding, Elementor provides a straightforward solution.
In this guide, we help you get started with Elementor. By the end of this post, you will be fully prepared to create websites that stand out and speak to your audience.
What is Elementor?
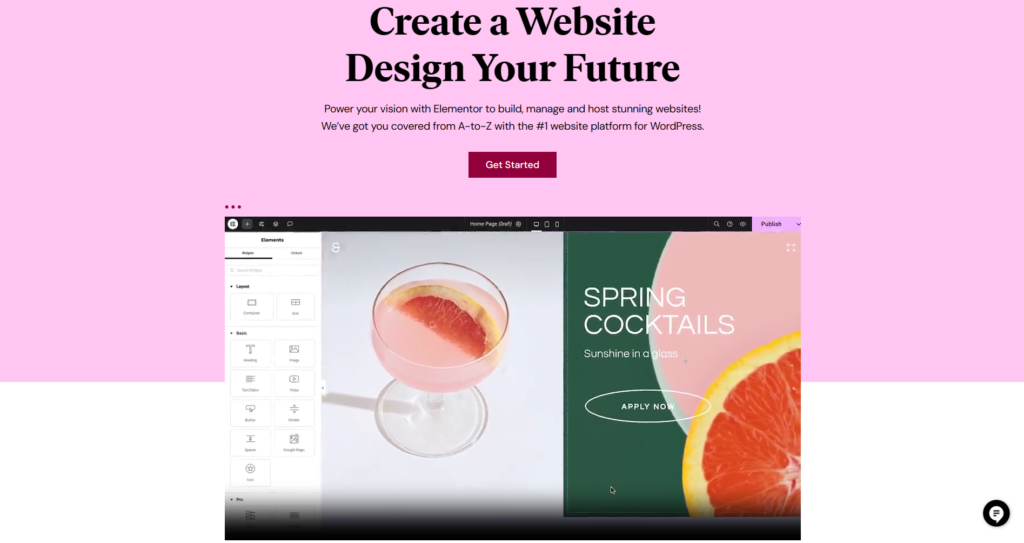
Elementor is a page builder plugin for WordPress. It integrates with the CRM and lets you design web pages and other sections of your site more freely than WordPress alone permits.
Thanks to Elementor’s live visual builder, you get to see exactly how your site will look as you build it. Besides, its drag-and-drop interface lets you add various elements like text, images, buttons, and sliders to your pages, and arrange them with a simple click-and-drag gesture.
It’s like assembling a puzzle, but you have complete control over the layout and appearance of each piece.
In short, Elementor is a tool that helps you create refined pages for your WordPress sites without having to write complex code. It allows you to customize every aspect of your site’s appearance to create a fully-functioning and responsive website.
What are the Benefits of Using the Elementor Page Builder for WordPress?
Embracing Elementor as your page builder can be a strategic move, especially if you’re a beginner website designer.
Here’s why Elementor has become the most popular page builder among WordPress users:
- Effortless Design Without Code: You can create stunning web pages without any coding knowledge. The intuitive drag-and-drop interface simplifies the design process, making it accessible for beginners and efficient for seasoned creators.
- See Changes Instantly: Elementor offers a live editing experience. Instead of switching between the editor mode and the preview, you get to see changes as you make them. This allows for quick adjustments and a seamless design process.
- Ready-to-Use Templates: You can jumpstart your website design with pre-designed templates. These professionally-crafted layouts save time and can even inspire you to create unique page designs.
- Mobile-Responsive Editing: With Elementor, you can ensure that your site looks great on all devices. You can customize your site appearance individually for desktops, tablets, and mobile devices, to guarantee a consistent user experience.
- Diverse Widget Library: Elementor comes packed with a variety of widgets, from basic text blocks to advanced features like carousels. This extensive selection enables you to add rich content and functionalities to your site easily.
- Enhanced Functionality with Addons: Elementor’s ecosystem includes numerous third-party addons, each offering unique features. These addons seamlessly integrate with Elementor and let you add advanced widgets and interactive elements that are beyond Elementor’s default options.
Do you wonder how WordPress differs from Elementor? Here are the 6 key differences between WordPress and Elementor.
Pros and Cons of Using Elementor Page Builder for WordPress
While the Elementor page builder is a popular tool among WordPress users, like any tool, it comes with its own set of pros and cons that you should consider before integrating it into your WordPress site.
Pros of Elementor Page Builder
- User-Friendly Interface: Elementor’s drag-and-drop functionality makes it easy for beginners to design professional-looking websites without any coding knowledge.
- Real-Time Editing: Changes are visible instantly, allowing for a more intuitive design process.
- Responsive Design Control: It offers comprehensive tools to ensure your site looks great on any device, to ensure an enhanced user experience.
- Extensive Widgets and Templates: Elementor provides a wide range of widgets and pre-designed templates for quick and diverse design possibilities.
Cons of Elementor Page Builder
- Learning Curve for Advanced Features: While Elementor is beginner-friendly, there’s a slight learning curve when it comes to mastering its advanced functions. To use its full potential, you must acquire web design and coding skills.
- Possible Plugin Conflicts: As with any WordPress plugin, there’s a risk of conflicts with other plugins you might be using on your site.
- Limited Options with the Free Version: The free version of Elementor is quite comprehensive, but for advanced customization features, you need the Pro version.
How to Use Elementor in WordPress [Step-by-Step]
Now that we have explored what Elementor is, we can discuss how to use it.
Here’s your step-by-step guide to begin your Elementor journey and create stunning web pages.
1. How to Install Elementor in WordPress?
Step 1: Log in to your WordPress admin dashboard.
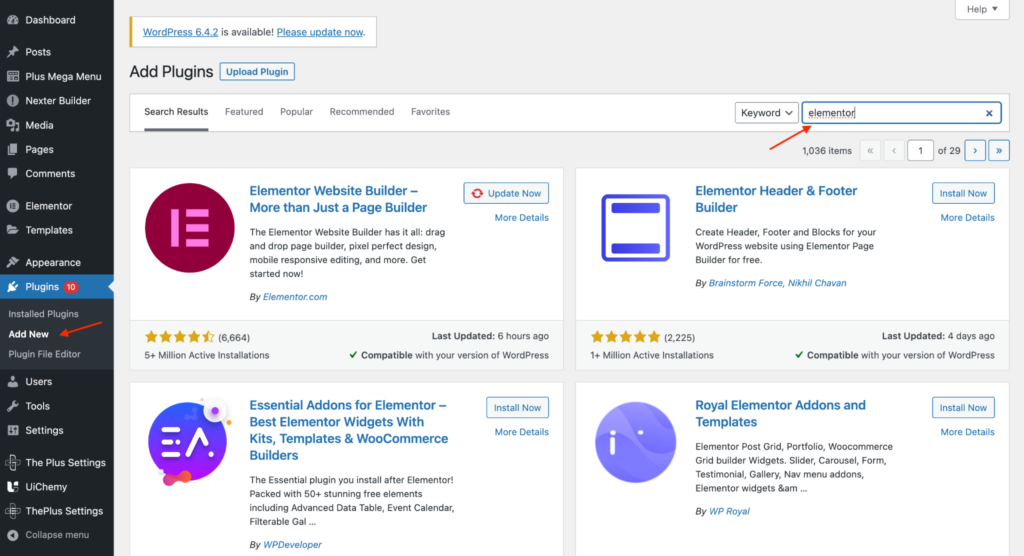
Step 2: Look for the Plugins option on the left menu, click on it, and then select Add New. Search for “Elementor” in the search bar.
Step 3: Click Install Now next to Elementor Website Builder, then hit Activate. This activates Elementor on your site. After adding Elementor to WordPress, you can now use its intuitive and simple interface to create and edit your website.
2. How to Use Elementor Options?
Elementor offers a wide range of options to enhance your website design experience.
This section of our guide will explore the key options available, helping you understand and utilize Elementor’s full potential.
A. Templates, Sections, and Blocks
Templates, sections, and blocks are three fundamental components in Elementor that streamline the web design process.
So, let’s understand how to use Elementor templates, blocks, and sections to create a customizable website design.
I. Templates
Templates in Elementor are comprehensive, pre-designed page layouts that offer a quick way to create a professional-looking page. The default templates include header and footer templates, single posts, single pages, etc.
To add a premade template, select the Templates option from the WordPress menu. Then, click Add New to open the Template Library.
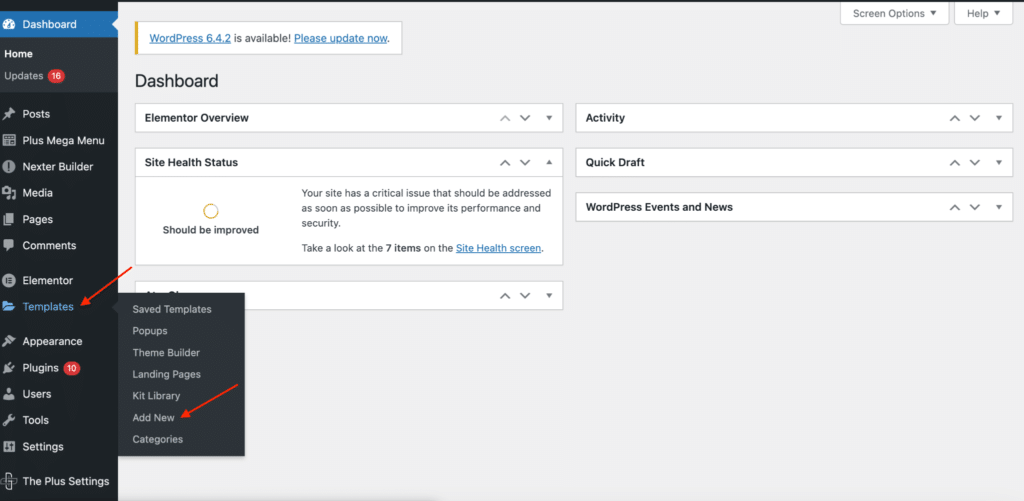
Browse through various categories to find the right template. You can hover over the template, click Preview, and Insert it into your page.
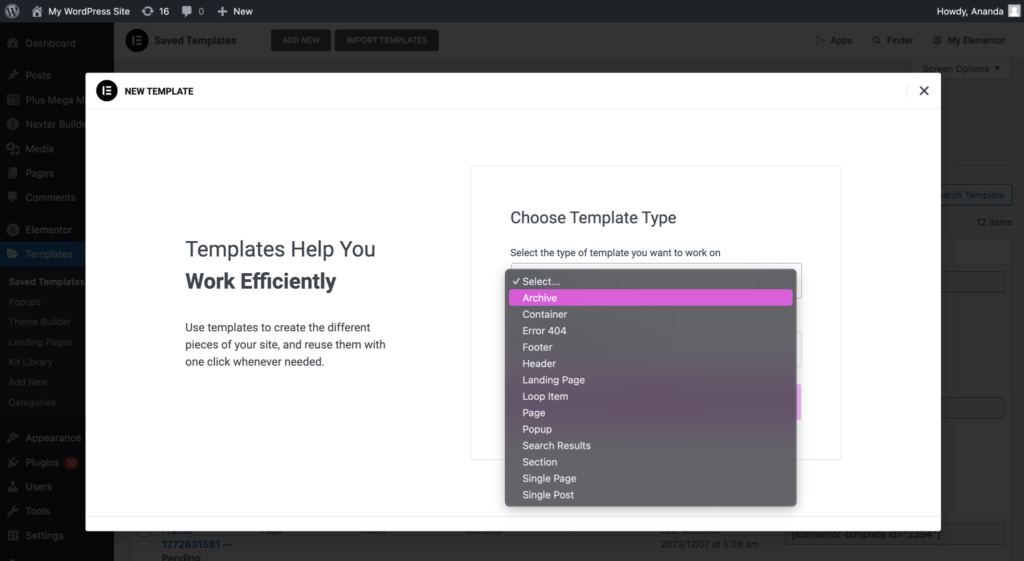
Once inserted, you can click on any element within the template to modify it.
Wish to create a Header within minutes? Here’s a detailed guide on How to Use Elementor Header Templates.
II. Sections
Sections are important because they help you create elaborate content layouts for web pages. They are like containers within a page and house widgets in a specific arrangement.
Click on the + icon in the Elementor editor. You’ll see options for different types of sections, like one column, two columns, etc.
After adding a section, you can divide it into columns by right-clicking and choosing Add New Column or adjusting the width of existing columns.
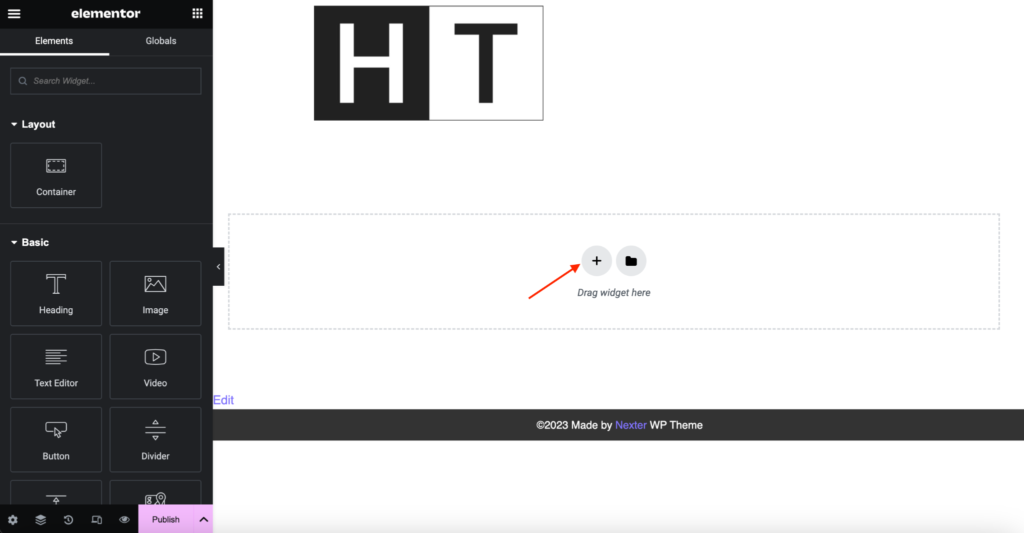
With a section selected, use the panel on the left to style it. You can change the background, padding, margin, and more.
However, with the latest update, Flexbox Containers are an upgrade to the traditional Sections. Want to learn in detail about this? Here’s a comprehensive guide on How to Use Elementor Flexbox Containers.
III. Blocks
Blocks are pre-designed section templates that can be quickly added to a page to enable specific functionalities or to add design elements.
Click the folder icon in the Elementor editor and switch to the Blocks tab. Here, you can browse different block types like Call to Action, Testimonials, etc.
To use a premade block, click Insert and it will be added to your page.
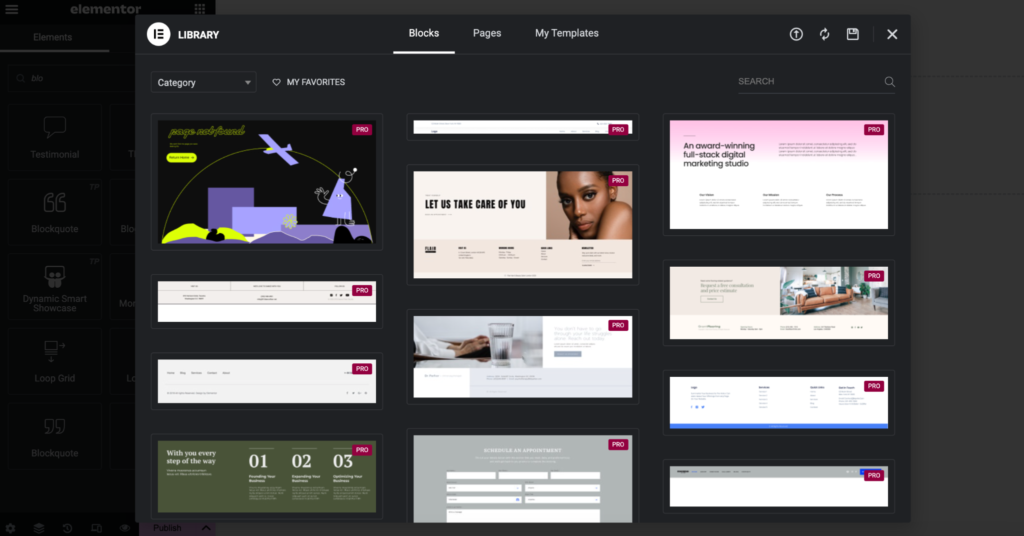
Once inserted, each element within the block can be customized individually. You can change options like text, colors, images, and more to match your overall design.
B. Widgets
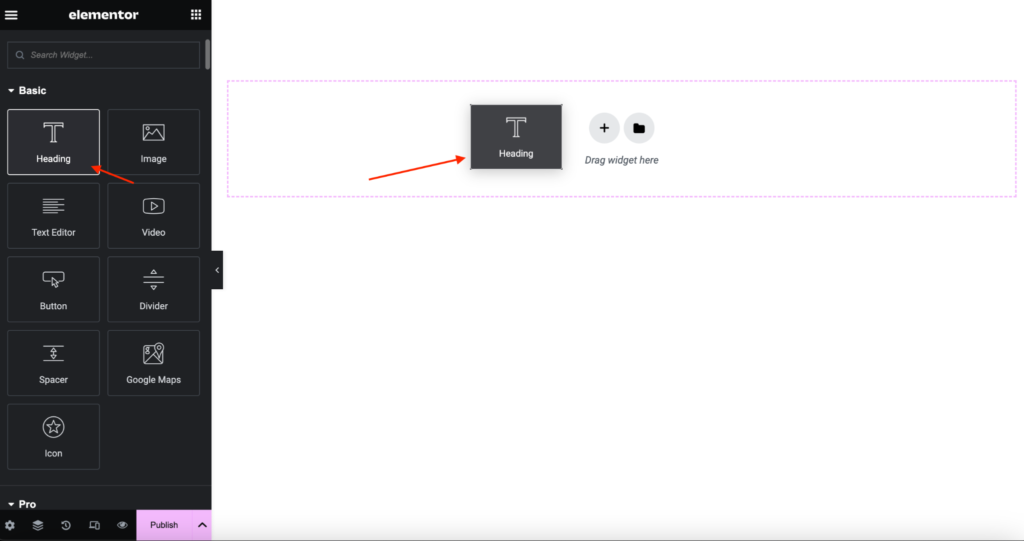
Widgets are the building blocks in Elementor, allowing you to add content and UI elements to your pages. These range from basic elements like text and images to more advanced features like sliders, testimonials, and social media icons.
To add a widget, simply drag it from the Elementor panel and drop it onto your page. You can then customize its appearance, layout, and content according to your needs.
C. Theme Element Customization
Elementor allows you to customize not just the content of your pages, but also the elements of your WordPress theme.
Access the Theme Builder in Elementor by clicking on the hamburger menu in the top left corner of the Elementor panel and selecting Theme Builder.
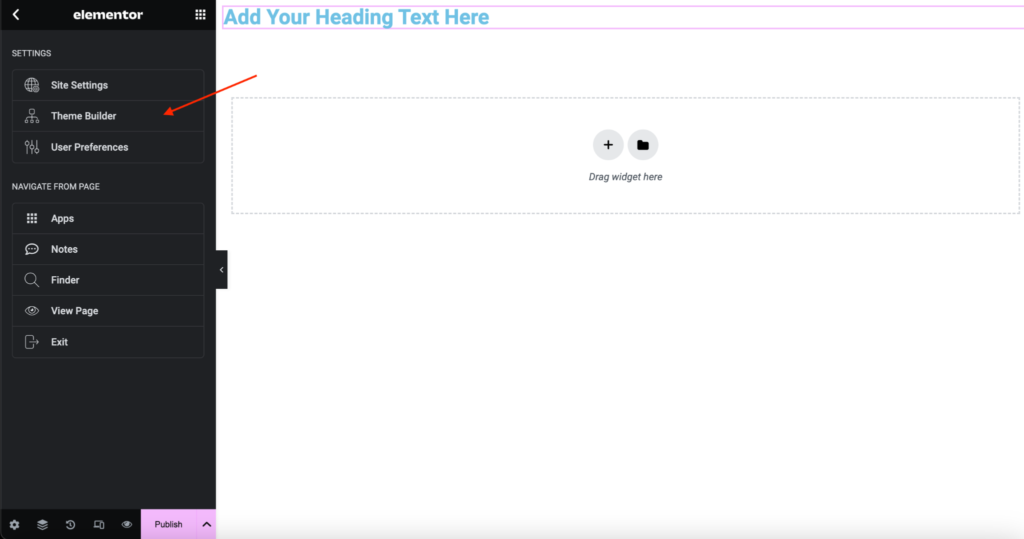
Here, you can design custom headers, footers, and other theme parts. You can either create them from scratch or use pre-designed templates.
Apply your custom theme elements to your entire site or specific pages.
D. Responsive Design Control
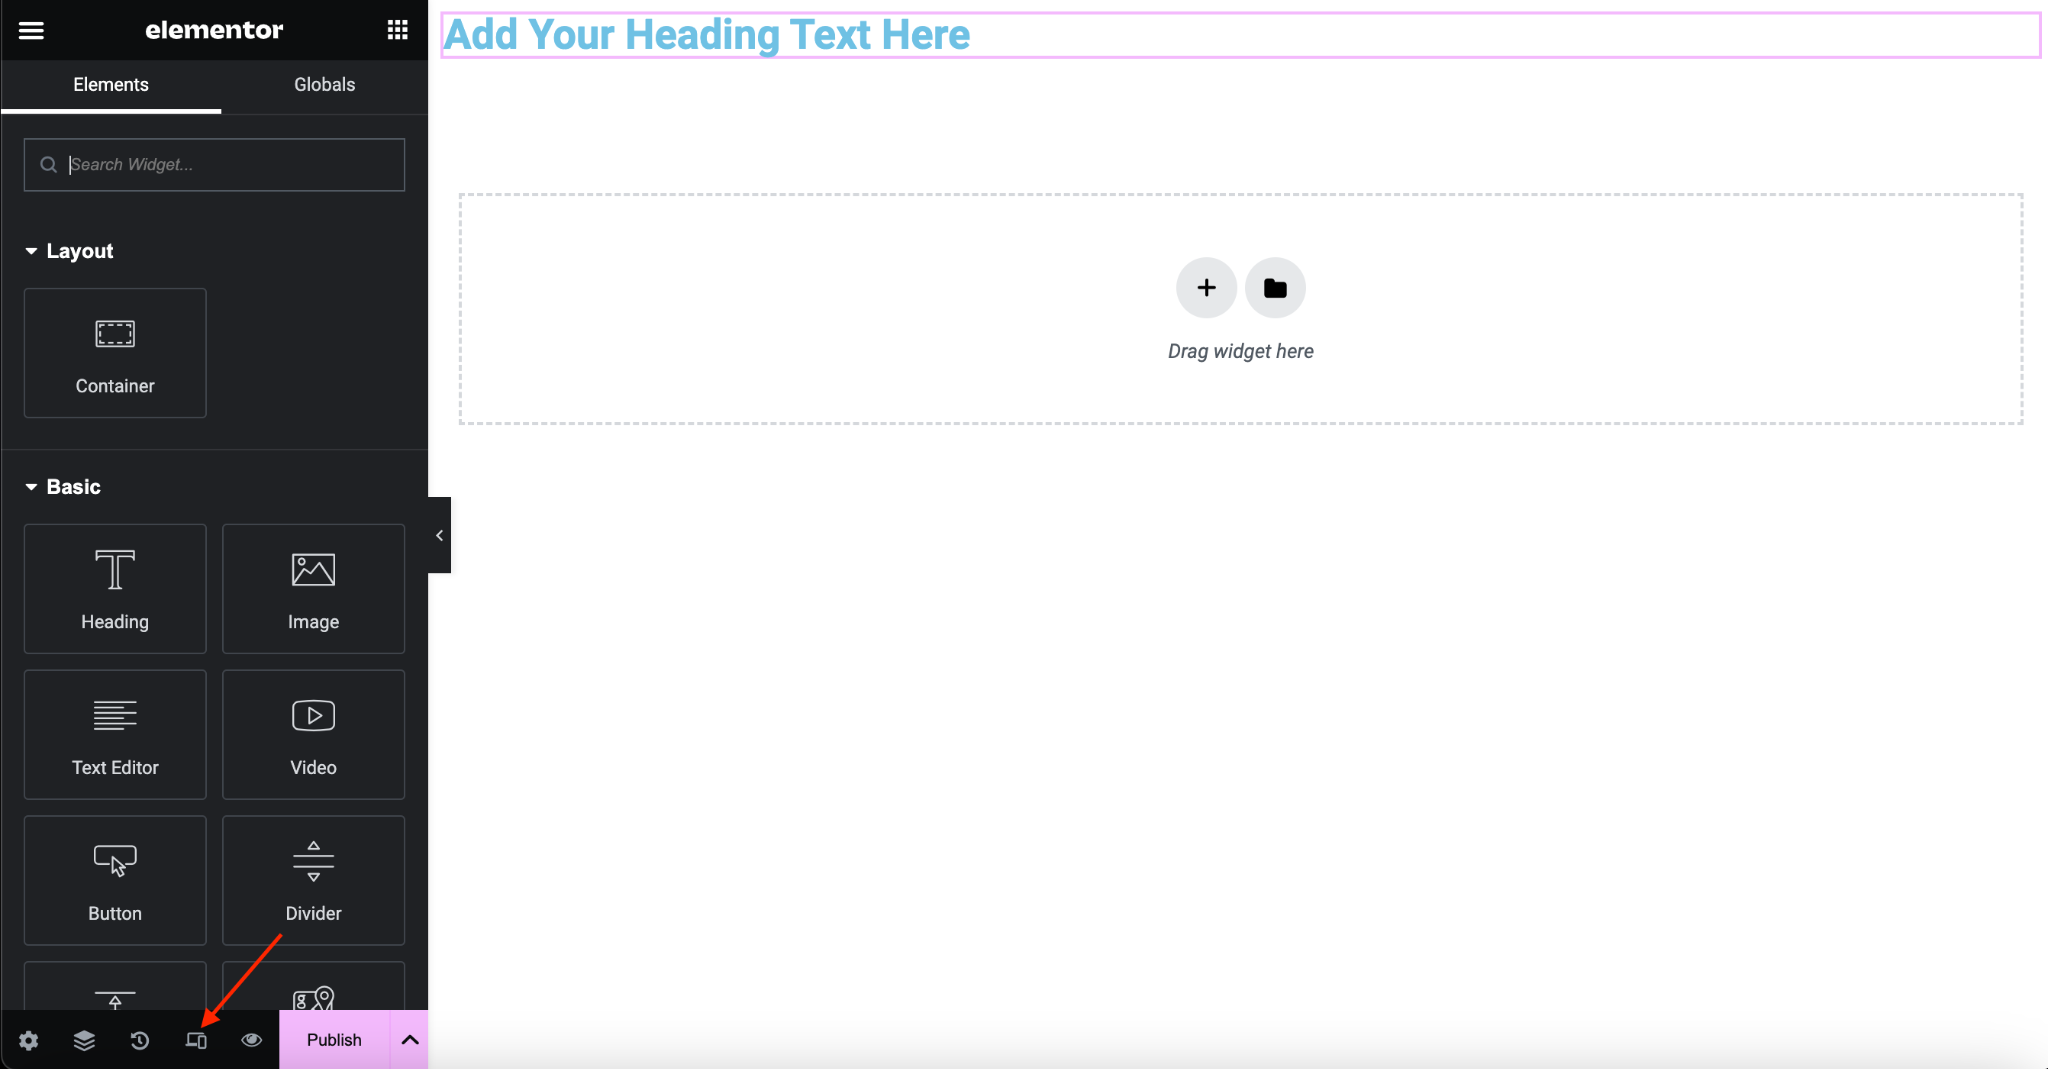
With Elementor, you can ensure your website looks great across all devices. To do this, you can switch between device views using the icons at the bottom of the Elementor panel.
For each device, you can adjust element sizes, spacing, and alignment to ensure optimal display on all screens.
E. Global Settings
Besides editing individual widgets, you can also use Elementor to tweak settings for your entire website. These are important because they help maintain a consistent look across pages.
Access Global Settings by clicking the hamburger menu in the Elementor editor and selecting Site Settings.
Here, you can set global options for fonts, colors, and other styling elements.
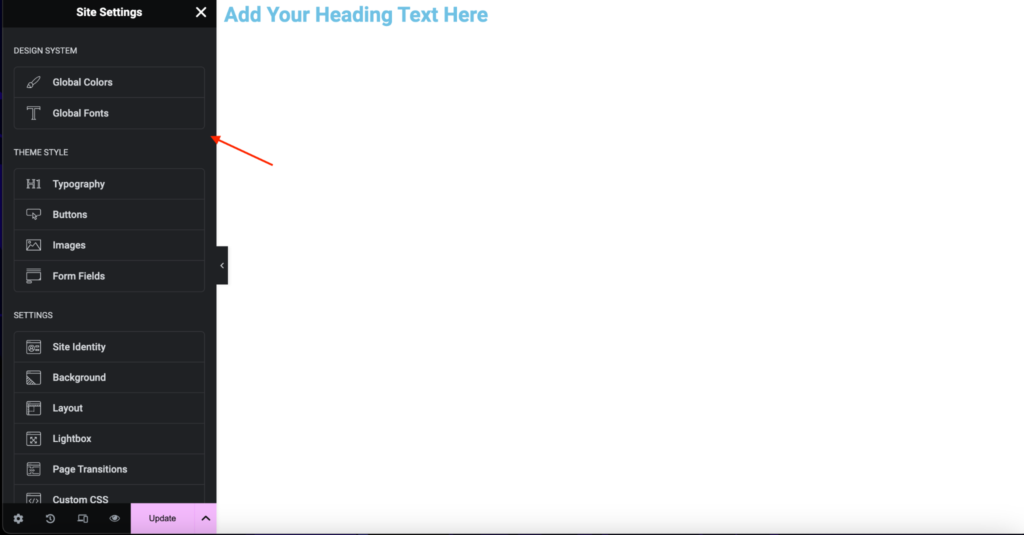
These settings apply to all pages and posts on your site, ensuring design consistency and saving time.
3. How to Use Elementor’s Free Version?
Elementor’s free page builder is a versatile tool that transforms how you build websites. Let’s walk through the steps to use the page builder:
Step 1: In your WordPress dashboard, go to Pages, and choose Add New. Name your page to get started.
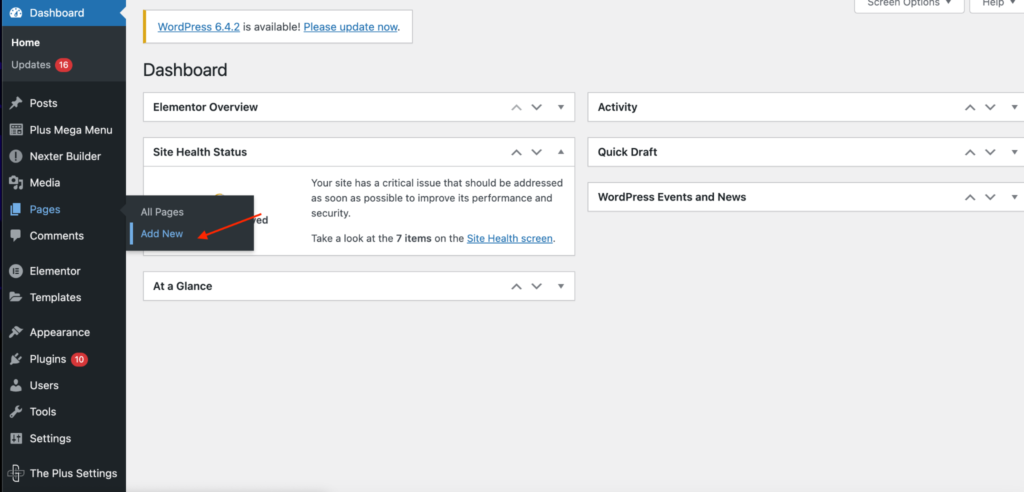
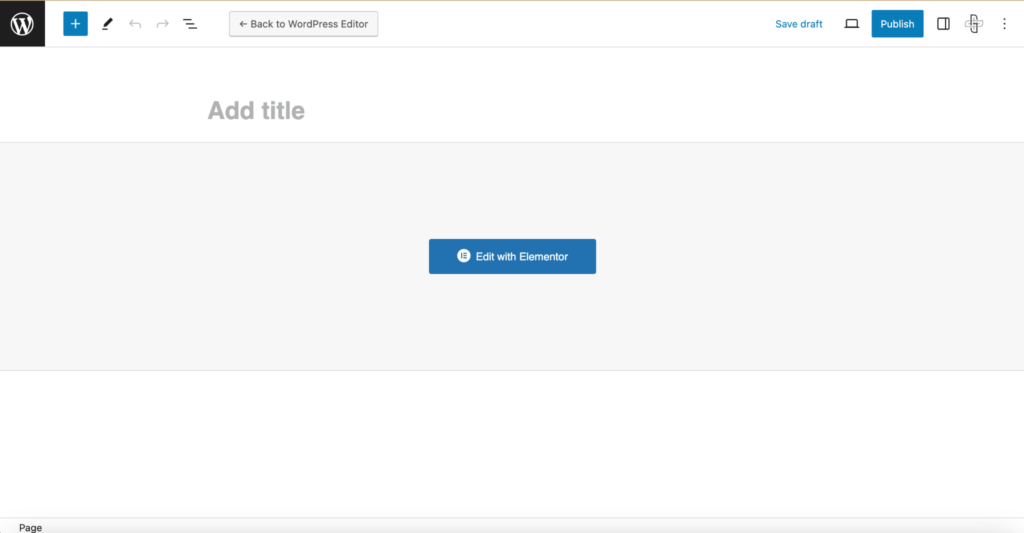
On your new page, you’ll see an Edit with Elementor button. Clicking it opens the Elementor Page Builder.
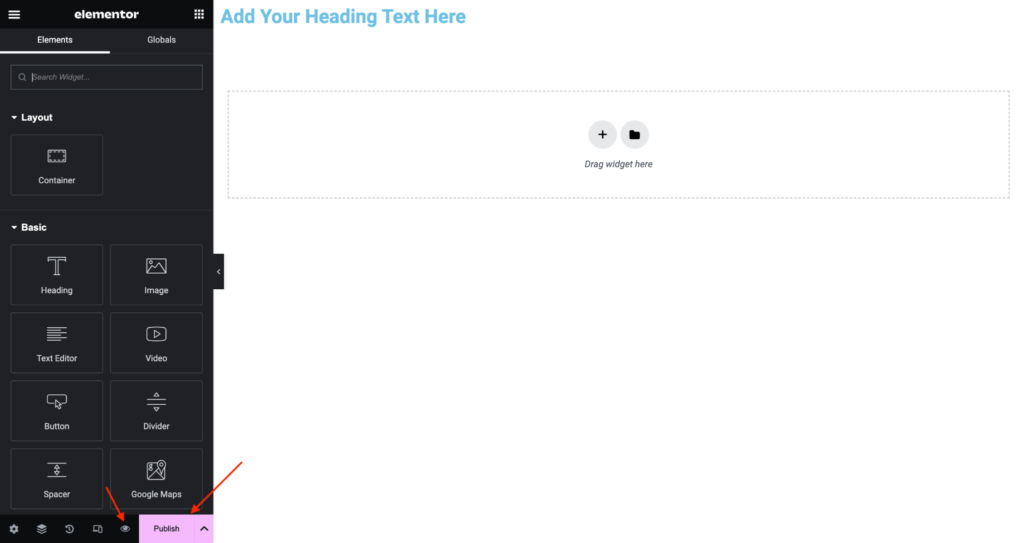
You’ll see two main areas: the canvas where you’ll design your page, and the Elementor panel that houses various widgets and settings.
Step 2: Click the + button to add a new section, selecting the desired column structure. You can drag widgets from the Elementor panel into your sections. Widgets include elements like text, images, and buttons.
Step 3: Each widget and section has customizable settings. You can adjust font sizes, change colors, and add images. Experiment with these settings to see their direct impact on your page.
Step 4: Use the Preview (eye icon) to see your page in action. Make sure to check how it looks on different devices using the Responsive Mode feature.
Step 5: Once satisfied, click Publish to make your page live. If you’re not ready, Save Draft is your go-to.
4. How to Use the Theme Builder by Elementor?
The Elementor Theme Builder is an intuitive tool that lets you customize the overall design of your site.
This includes headers, footers, and other important sections, providing a cohesive look across your website. Let’s dive into how you can use this feature.
Step 1: From your WordPress dashboard, navigate to Templates and select Theme Builder. This brings you to a centralized hub where you can manage all the different theme parts of your website.
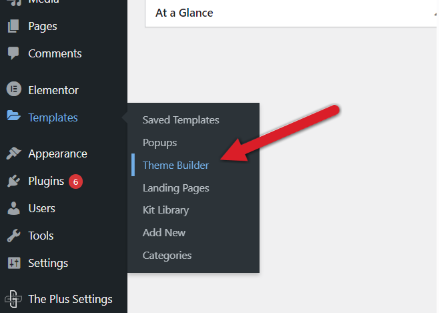
Step 2: The Theme Builder interface is divided into sections like Headers, Footers, and Single Post templates. Familiarize yourself with these to understand where each element appears on your site.
Step 3: To start designing, click on the type of theme part you want to create (e.g., Header). Then, click Add New. You can start from scratch or choose from pre-designed templates.
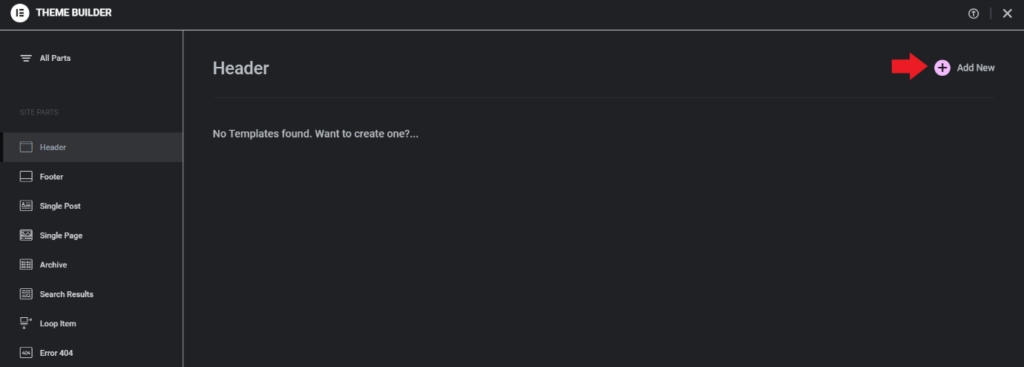
Step 4: Whether you choose a template or start fresh, you’ll be taken to the Elementor editor. Here, you can drag and drop widgets and style them to match your site’s aesthetics.
For example, for a header, you might add your site’s logo, a navigation menu, and social media icons.
Step 5: Once you’re happy with the design, it’s crucial to set conditions to specify where this theme part should appear. Set these conditions to ensure consistency.
Step 6: You can now preview your theme and click Publish to finalize your design.
Looking for attractive themes for your site? Here are the 5 best Elementor themes [with speed test].
5. How to Use Elementor Advanced Features?
Elementor’s advanced features elevate your web design experience, offering a range of tools for detailed customization and creative flexibility.
These features enable you to add sophisticated styling, animations, and more complex functionalities to your WordPress site.
Let’s explore how to make the most of these advanced capabilities:
A. Motion Effects
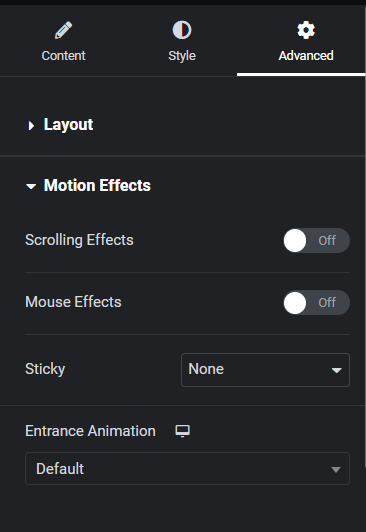
In the settings panel on the left side of the Elementor editor, head over to the Advanced tab. You’ll find the Motion Effects option. Use it to add scrolling effects and animations to widgets and sections.
You can also make UI elements sticky. This is particularly helpful for sections like headers and widgets like menus that stick either to the top or bottom of a page.
B. Transform Widgets
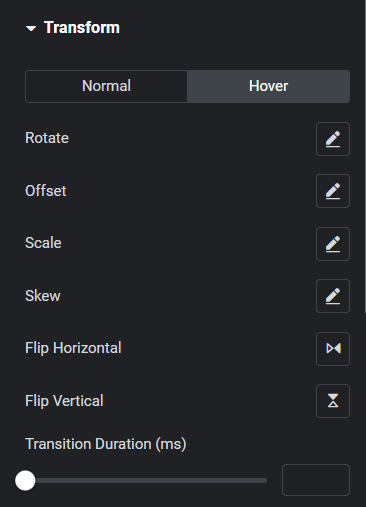
You can transform widgets to change their look and feel when users hover their mouse over them.
This option is also accessible under the Advanced tab in the left panel. You simply have to pick desired transformation options for the widgets’ normal and hover state.
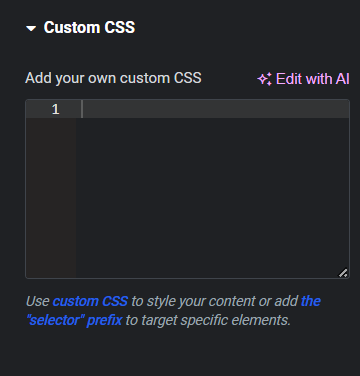
C. Custom CSS
For precise control over your design, Elementor allows you to add custom CSS directly to individual elements.
This is especially useful if you have specific styling in mind that goes beyond the default settings.
The custom CSS option is available under the Advanced tab in the left panel.
D. Role Manager
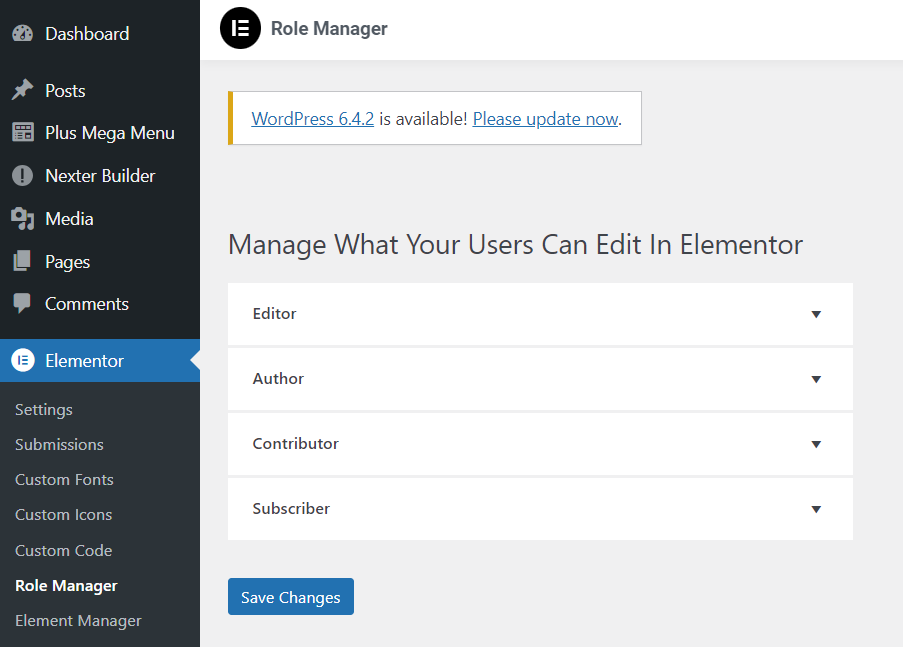
If you’re working with a team, the Role Manager is a vital tool. It lets you control who can edit your site and which aspects of Elementor they can access, ensuring consistency in design and content.
The option is available under the Elementor tab in the WordPress side menu.
6. What is the Difference between Elementor Free vs Elementor Pro
Elementor offers two versions – the free version and the Pro version, each catering to different needs and skill levels in web design.
Understanding the differences between Elementor Free and Elementor Pro is crucial in deciding which version aligns best with your website goals.
Elementor Free
This version is an excellent starting point for beginners and those looking to create basic, yet visually appealing websites. It provides:
- A drag-and-drop editor.
- Access to widgets and templates to design websites on the go.
- Responsive design capabilities, ensuring your site looks good on all devices.
While Elementor Free is feature-rich for a free plugin, it has its limitations, particularly in terms of advanced design options and marketing tools.
Elementor Pro
The Elementor Pro’s version is an extension of the free version, offering more advanced features suitable for professional website designers and businesses.
It includes:
- Advanced widgets like forms, sliders, and WooCommerce elements.
- The Theme Builder allows you to design entire themes, including headers, footers, and archive pages.
- The Popup Builder is an essential tool for creating interactive popups for lead generation, announcements, or promotions.
- A wider range of templates and blocks, providing more design options.
- Dynamic content and custom field integration are crucial for professional-grade websites.
- Role Manager, which is especially useful for teams allows you to control access to the website’s design elements.
You can access the pro features by upgrading to one of Elementor’s premium plans. The pricing plans are as follows:
- Essential Plan – Priced at $59 per year.
- Advanced Plan – Available for $99 per year.
- Expert Plan – Costs $199 per year.
Elementor Free vs. Elementor Pro
| Feature | Elementor Free | Elementor Pro |
|---|---|---|
| Widgets | Basic widgets available | Over 50 advanced widgets |
| Templates | Limited access to templates | Access to over 300 templates |
| Theme Builder | Not available | Full theme-building capability |
| WooCommerce Builder | Basic WooCommerce support | Advanced WooCommerce features |
| Popup Builder | Not included | Integrated popup builder |
Want to learn more about Elementor? Check out the 7 best YouTube channels to learn Elementor.
Why Should You Use Elementor in WordPress?
Opting for Elementor in WordPress is a choice that offers distinct advantages over other page builder plugins. Its unique features and capabilities make it particularly appealing to a wide range of users, from absolute beginners to seasoned web designers.
Elementor’s standout feature is its unparalleled ease of use. The intuitive interface, characterized by a drag-and-drop editor, simplifies the web design process. This allows you to construct and modify your pages visually, without any need for coding knowledge.
While many page builders offer customization, Elementor takes this a step further. It allows for intricate adjustments and fine-tuning of every element on your page, from basic text alignment to advanced animation effects.
Elementor also sets a high standard for responsive design. It provides advanced tools for ensuring your site looks perfect on all devices, a critical requirement in the modern, mobile-centric web landscape.
A responsive design is not just visually appealing, it also boosts your site’s SEO ranking.
Bonus Point: How Do You Enhance Your Elementor Experience?
Elementor, with its versatile and user-friendly interface, opens up a world of possibilities for website design in WordPress.
One of the key features of Elementor is its ability to seamlessly integrate with different addons, enhancing its functionality and offering even greater creative flexibility.
Among these third-party integrations, The Plus Addons for Elementor is a particularly powerful tool, bringing a wealth of additional features to the Elementor page builder.
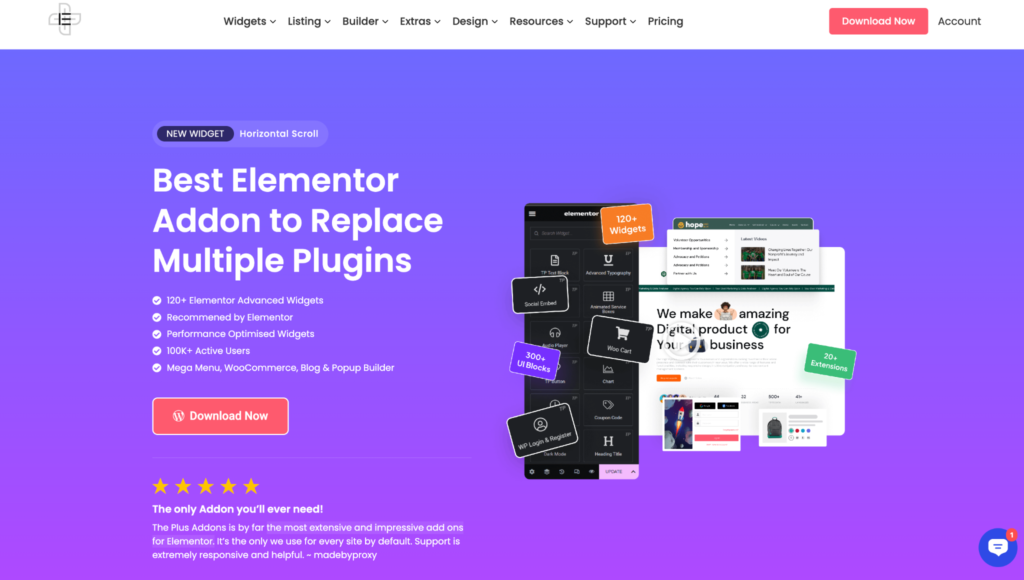
Here are some of the unique features Plus Addons brings to the table:
1. Extensive Widget Library
With The Plus Addons for Elementor, over 120 unique widgets are at your disposal, greatly expanding the types of content and design elements you can include in your pages.
You can now display content in visually appealing layouts such as grids and carousels, perfect for portfolios and blog posts.
Moreover, there are advanced styling options that allow for detailed customization of margins, padding, borders, and backgrounds.
Check out the Complete List of 120+ Widgets and Extensions here. Start building your dream website without coding!
2. E-Commerce Enhancements
Use The Plus Addons for Elementor to boost your online store with specialized widgets designed to enhance the display and functionality of your products.
You can also utilize elements like CTA widgets and form builders that not only attract visitors but also encourage conversions and sales.
3. Advanced Design Features
You can bring your website to life with animations and interactive elements. This helps you build a visual narrative and storytelling element to your website.
These features also undergo continuous updates to make sure you stay ahead of web design trends.
4. Active Support
The Plus Addons for Elementor boasts active and quick support, ensuring a smooth user experience. With a dedicated team providing timely assistance and regular updates, users can effortlessly navigate any challenges.
Additionally, there is an ample amount of support documentation that will guide you at every stage of your web design journey.
This reliable support system is invaluable for both troubleshooting and optimizing the full potential of the addon’s extensive features.

Do you Manage WordPress Websites? Download Our FREE E-Book of 20+ Checklist for WordPress Site Maintenance.
- SAVE MAXIMUM THIS BLACK FRIDAY
Don’t Miss the Mega WordPress
Black Friday Select Deals of 2024.
Wrapping Up
That wraps up this beginner’s guide on how to use Elementor page builder to design your WordPress site.
With these simplified and manageable steps and your understanding of what is Elementor in WordPress, you can now go ahead and create your professional-looking website and upgrade your online presence.
Elementor’s user-friendly interface, coupled with its diverse range of features, sets the stage for creating stunning websites with ease. However, you can enhance your experience with Elementor by choosing the right addons to add advanced features.
The Plus Addons for Elementor is one such option. It adds over 120 Elementor widgets to your design toolkit. With Plus Addons, you can access new dimensions of creative expression and functionality. This Addon supports complex, dynamic, and visually captivating designs.
Check out The Plus Addons for Elementor today to streamline your website design process.
