If you’re using Elementor page builder for your website and find it lagging at times, it could be an indication to clear Elementor cache to optimize the website speed.
Caching is a great way to improve your website’s speed and performance. With caching, all your frequently used Elementor data – from HTML to images is stored in the cache, making it easier to access it every time someone visits your website.
This means fewer requests to the server to access data and faster website loading.
However, caching can also cause inconvenience, often affecting your website’s speed and performance. In fact, in the case of live websites, caching may prevent these sites from displaying the latest changes and updates.
Hence, it becomes important to clear the Elementor cache regularly to improve your website’s experience.
Fortunately, this issue can be resolved easily. In this blog post, we’ll discuss the step-by-step process to clear Elementor cache.
What is Elementor Cache?
Elementor caching is a data storage that helps save the static version of the Elementor website. When a user visits your website, their browser sends several queries to your server to access the database and load the website pages from scratch.
However, all this background processing and data retrieval can be time-consuming, affecting your website speed.
This is where caching is an excellent solution to store the frequently used Elementor website data files on a local drive.
So when a user visits your website, the browser will instantaneously retrieve site data and load the pages from the cached storage, drastically reducing the load time and improving the website’s performance.
Why Should You Clear Elementor Cache?
Although caching is a critical process for improving the overall website experience for your users, there are disadvantages to it as well.
One of the biggest issues is older website content.
With Elementor caching enabled, when you make any changes to the backend of your website or update its content, an older, cached version of your website might appear. This can be harmful to your website experience as well as the brand image.
As a result, clearing Elementor cache regularly can benefit you by resetting the website and helping display an updated, fast-performing website.
Looking to improve your website speed and performance by using cache? Check out the 6 Best Cache Plugins for Elementor to store the cached version of your website for faster loading.
How to Clear Elementor Cache [Step-by-Step]
Here is the step-by-step process to clear the Elementor cache for your WordPress website-
Step 1: Go to Elementor Settings
Elementor uses various cache files to operate, but the ones you want to delete are the global CSS cache and browser cache.
Clearing the global CSS cache from Elementor settings gets the latest version of CSS.
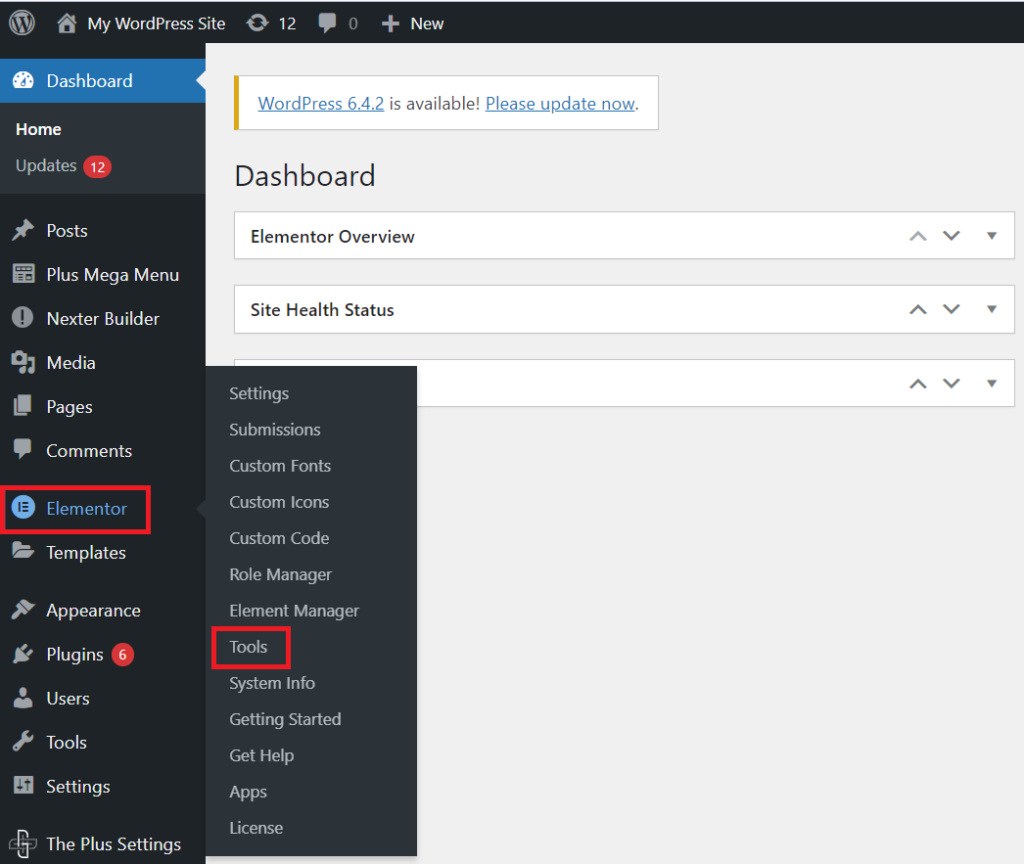
To get started, log in to your WordPress dashboard. Once logged in, navigate to the Elementor settings in the admin menu on the left. Here go to, Elementor > Tools.

Step 2: Clear the Elementor Cache
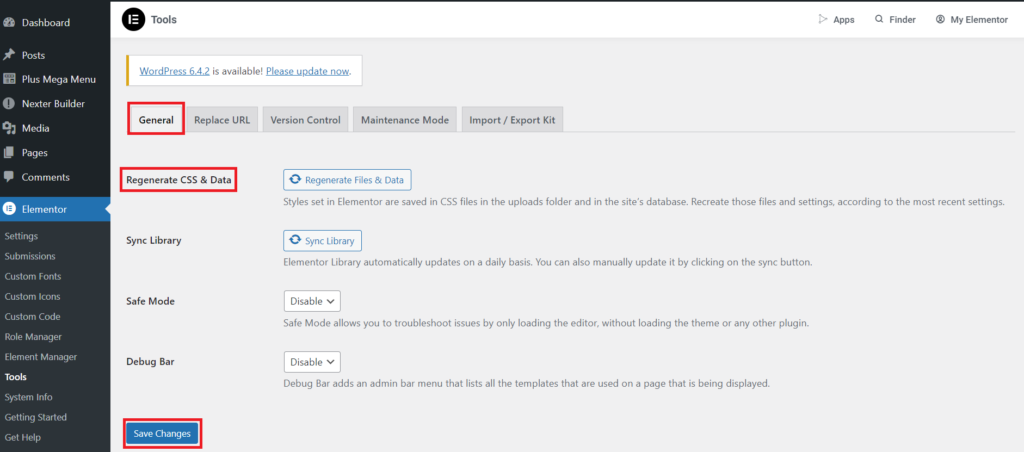
On the following page that appears, you’ll see a section titled Regenerate CSS & Data under the General tab.
Here, click on Regenerate Files & Data. Once it is completed and you see the green check icon, click on Save Changes.
Once done, reload your Elementor website.

This will clear Elementor caching and regenerate all your CSS files used by the Elementor website.
Doing so regularly is a good way to ensure that all the changes you make to the backend are reflected on the front end of your website instantaneously.
Dealing with a slow-loading, bloated website? Explore 25+ Ways to Speed Up Elementor Website Performance and improve your website experience tremendously.
Step 3: Empty Your Browser Cache
In addition to clearing Elementor cache, it is also a good idea to clear your browser cache to optimize your website speed.
This is because the browser cache can also include locally stored or older versions of your website, which can cause issues on your website.
So, it is equally important to clear your browser cache.
Here are the shortcuts for some popular browsers and devices-
- Chrome, Edge, or Firefox for Windows: Ctrl + F5 or Shift + F5 or Ctrl + Shift + R
- Chrome or Firefox for Mac: Shift + Command + R
That’s it. By following these simple steps, you can clear your Elementor cache and display updated content on your website.
Worried about malware affecting your website content and performance? Take a look at the 5 Best WordPress Malware Removal Plugins for a quality website.

Do you Manage WordPress Websites? Download Our FREE E-Book of 20+ Checklist for WordPress Site Maintenance.
- SAVE MAXIMUM THIS BLACK FRIDAY
Don’t Miss the Mega WordPress
Black Friday Select Deals of 2024.
Wrapping Up
While cache storage helps optimize your website for faster loading by easily accessing its content, it can also affect your overall Elementor website experience.
Since cache stores a version of your website and data files to be accessed instantly when a user visits your site, it might display an older version and not display any changes that you might have made recently.
So, it becomes important to clear your Elementor cache regularly to avoid displaying an older version of your website to visitors. The process to do so is extremely simple, and only takes a few minutes to complete.
And if you’re looking to enhance your Elementor website with exciting new features and functions, make it happen with The Plus Addons for Elementor.
Check out the Complete List of 120+ Widgets and Extensions here. Start building your dream website without coding!
This plugin offers access to a wide range of unique widgets to improve your website performance, enhance the design, make navigation easier, offer better visitor experience, and so much more.
Featuring excellent customer support, a clean code, and compatibility with popular themes, The Plus Addons is one of the best tools for Elementor that replaces multiple plugins!


