An image sequence is a series of still images with numbered filenames that come together to create video clips. Interesting right?
But what if you have a video instead of still images and want to convert it into an image sequence? That’s what we’ll be covering today.
Converting a video to an image sequence can be incredibly useful for a variety of projects. It allows you to capture individual frames from a video, create timelapse videos, or enhance your website with interactive visual elements such as image scroll sequence animations.
In this article, we explore the various tools you can use to easily convert videos to image sequences and how to use those images to create an image scroll sequence for your WordPress website.
Let’s begin!
Why Should You Convert Video to Image Sequence?
An image sequence is a series of still images taken from a video. Each frame from the video is turned into an individual image, which can be saved in formats like JPG or PNG.
This method is useful for capturing specific moments and details that might be missed in regular video playback.
Here are a few reasons why converting a video to an image sequence is useful:
- Capture high-quality still images: Grab sharp, detailed images from video footage to use in marketing materials, social media, or graphic design projects.
- To create a time-lapse video: Select key frames from a longer video, compressing time and creating a visually engaging, sped-up sequence.
- Create an image scroll sequence animation: This is the most impactful use case, especially for web design. Image scroll animations allow users to scroll through a series of images that follow the natural flow of the page. As users scroll, each image in the sequence appears to create a smooth and interactive visual experience. This technique can turn passive scrolling into an engaging activity that improves storytelling on your website.
How to Convert Video to Image Sequence (Working Methods)
There are several ways you can convert a video to an image sequence, including online tools or specialized software.
Let’s explore some reliable methods for converting your video into a series of images.
Method 1: Using Online Converter Tool
One of the easiest ways to turn a video into an image sequence is by using an online converter tool. Tools such as onlineconvertor.com allow you to upload your video, convert it, and download the image files in just a few steps.
Here is how it works:
First, select the video you want to convert by clicking on the “Choose File” button. This will allow you to choose a video file from your device.
After selecting your file, click the “Convert” button. The tool will begin uploading your video and processing the conversion.
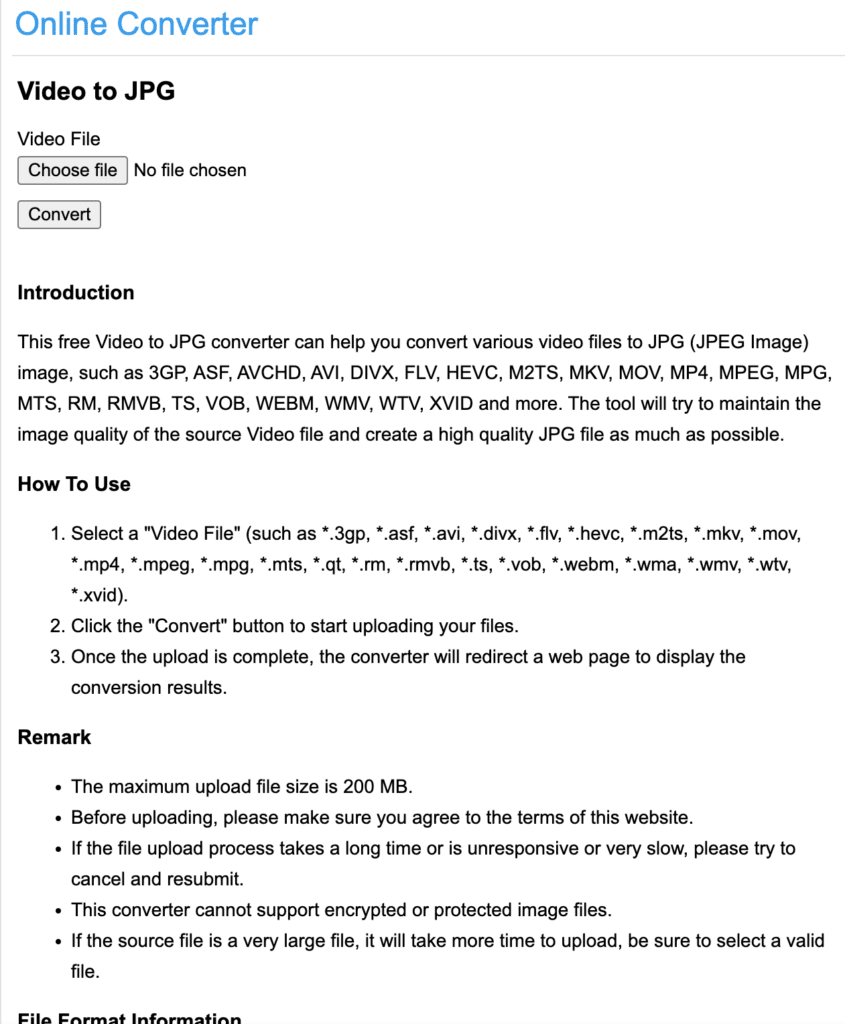
Once the upload and conversion process is complete, you’ll be redirected to a page where you can download your converted image files.
You’ll get the option to download the output files in JPG or PNG format, depending on your preference.
Note: The maximum file size for this online converter tool is 200MB. So make sure your video stays within that size range to use this tool.
Videos can also be a great addition to your website. Here are the 5 Best WordPress Video Player Plugins.
Method 2: Using the Aspose App
If you’re looking for more control over the conversion process, the Aspose app is a great option.
Here’s how you can use the Aspose app to convert a video to an image sequence:
Start by visiting the Aspose app’s video-to-image converter page. Once you’re there, look for the section where you can upload your video file.
You can either drag and drop your video format file or manually upload it by clicking the “Upload your file” button.
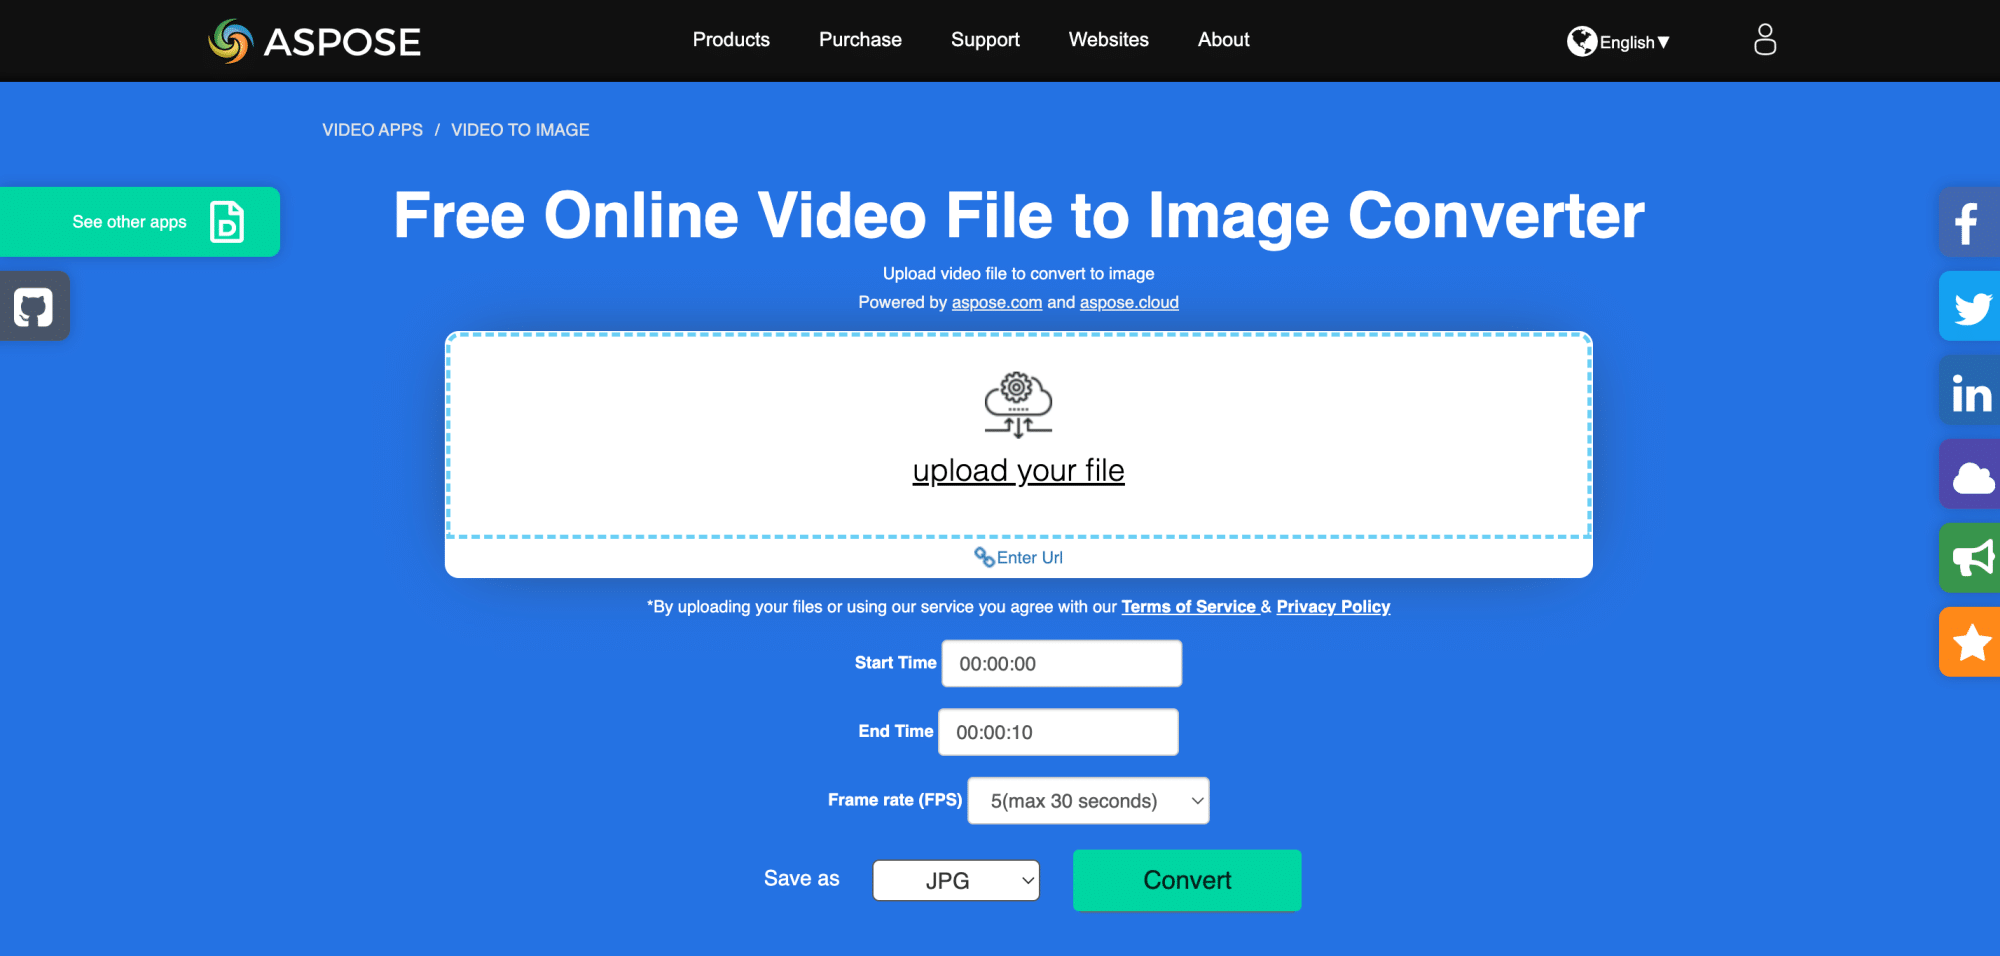
Next, you’ll need to define the time range for the conversion. Enter the start and end time for your video.
The app also lets you control the frame rate, which determines how many images are extracted per second of video.
From the “Save as” dropdown menu, choose the format for your images, either JPG or PNG. Once you’ve set everything up, click the “Convert” button.
After the conversion is complete, a “Download Now” button will appear. Click on it to download a zip file containing all the images.
Extract the zip file to access your image sequence.
Wondering which format to choose for your images? Here is a detailed comparison of JPG vs. PNG.
Method 3: Using Premiere Pro or After Effects
You can also use software such as Adobe Premiere Pro or After Effects to convert video to PNG sequence. To convert video to a sequence of images on Premiere Pro, start by creating a new project.
Now, navigate to File > Import and then select the source video file you want to convert. Drag the video file into the timeline and make any edits that you need to make.
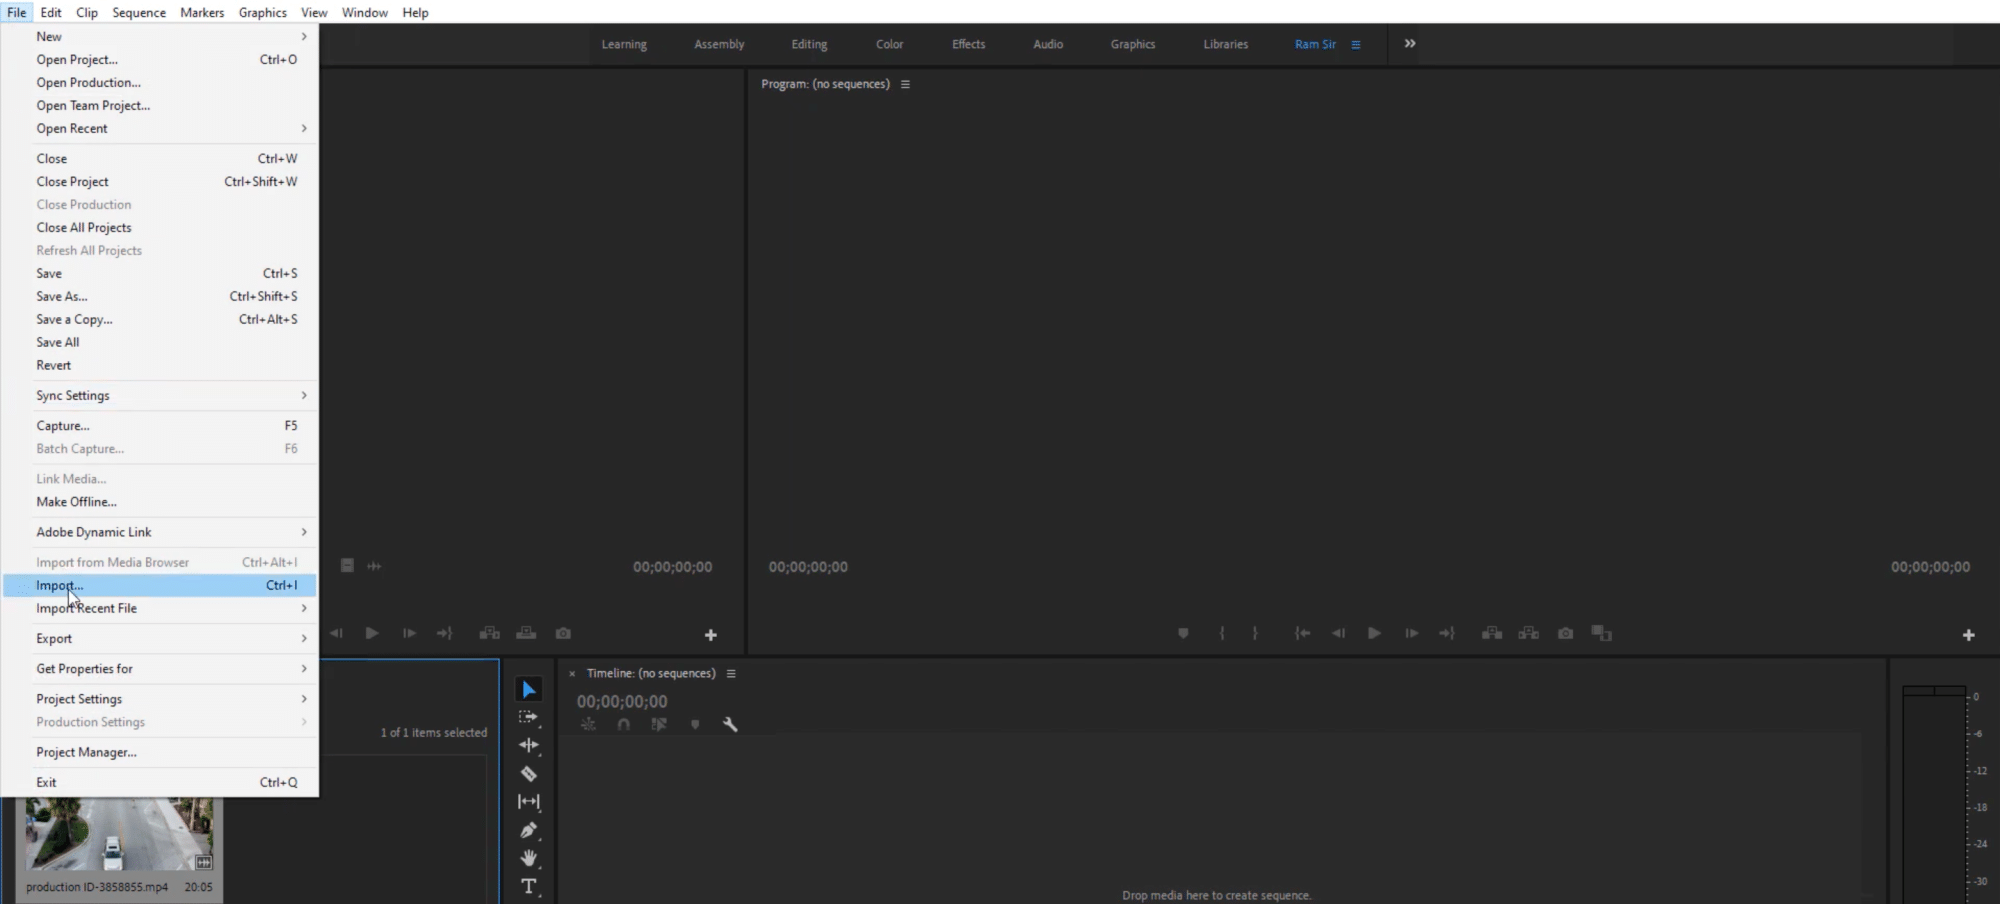
Once you are happy with the final video, click Export > Media.

In the pop-up, select PNG in the Format column and PNG Sequence in the preset column. Select the output folder and click Export to convert the video to image files.
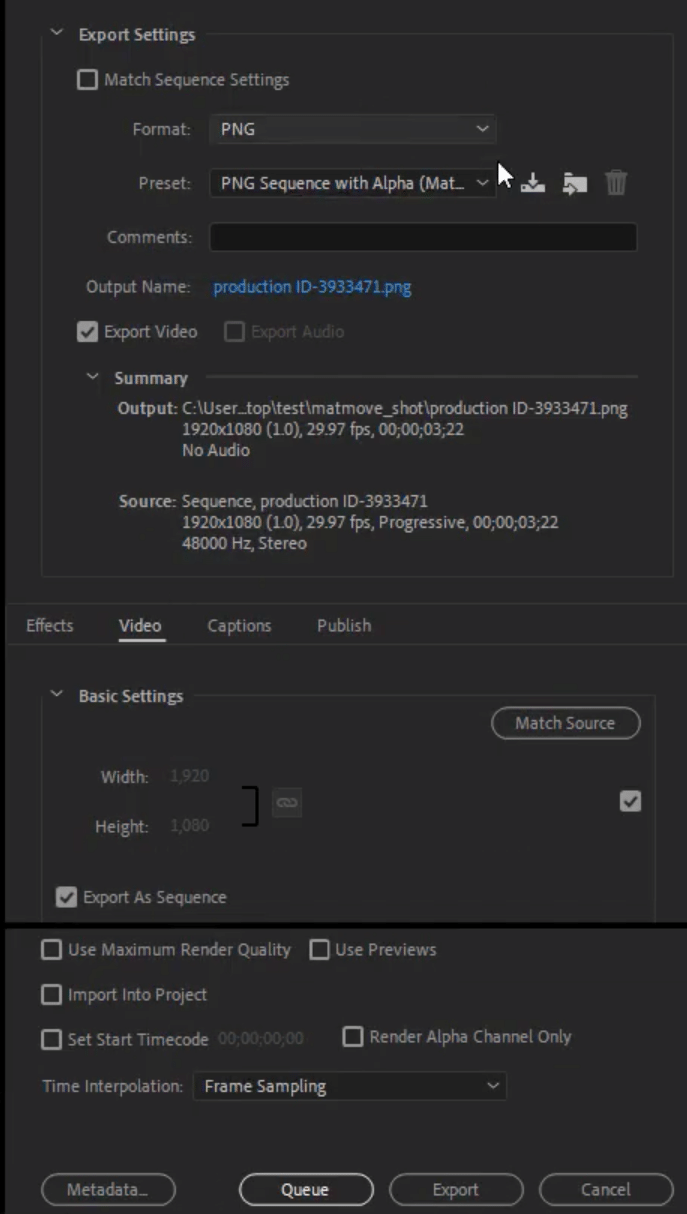
Note: Adobe Premiere Pro and After Effects allow you to choose between frame sizes, select image dimensions and edit frame by frame. While this method gives you maximum control over your video to image conversion process and gives you high-quality PNG images, you would have to purchase the Premiere Pro or After Effects software to use it.
Method 4: Using the ezgif Tool
Ezgif is another online conversion tool that allows you to convert a video to frames of images.
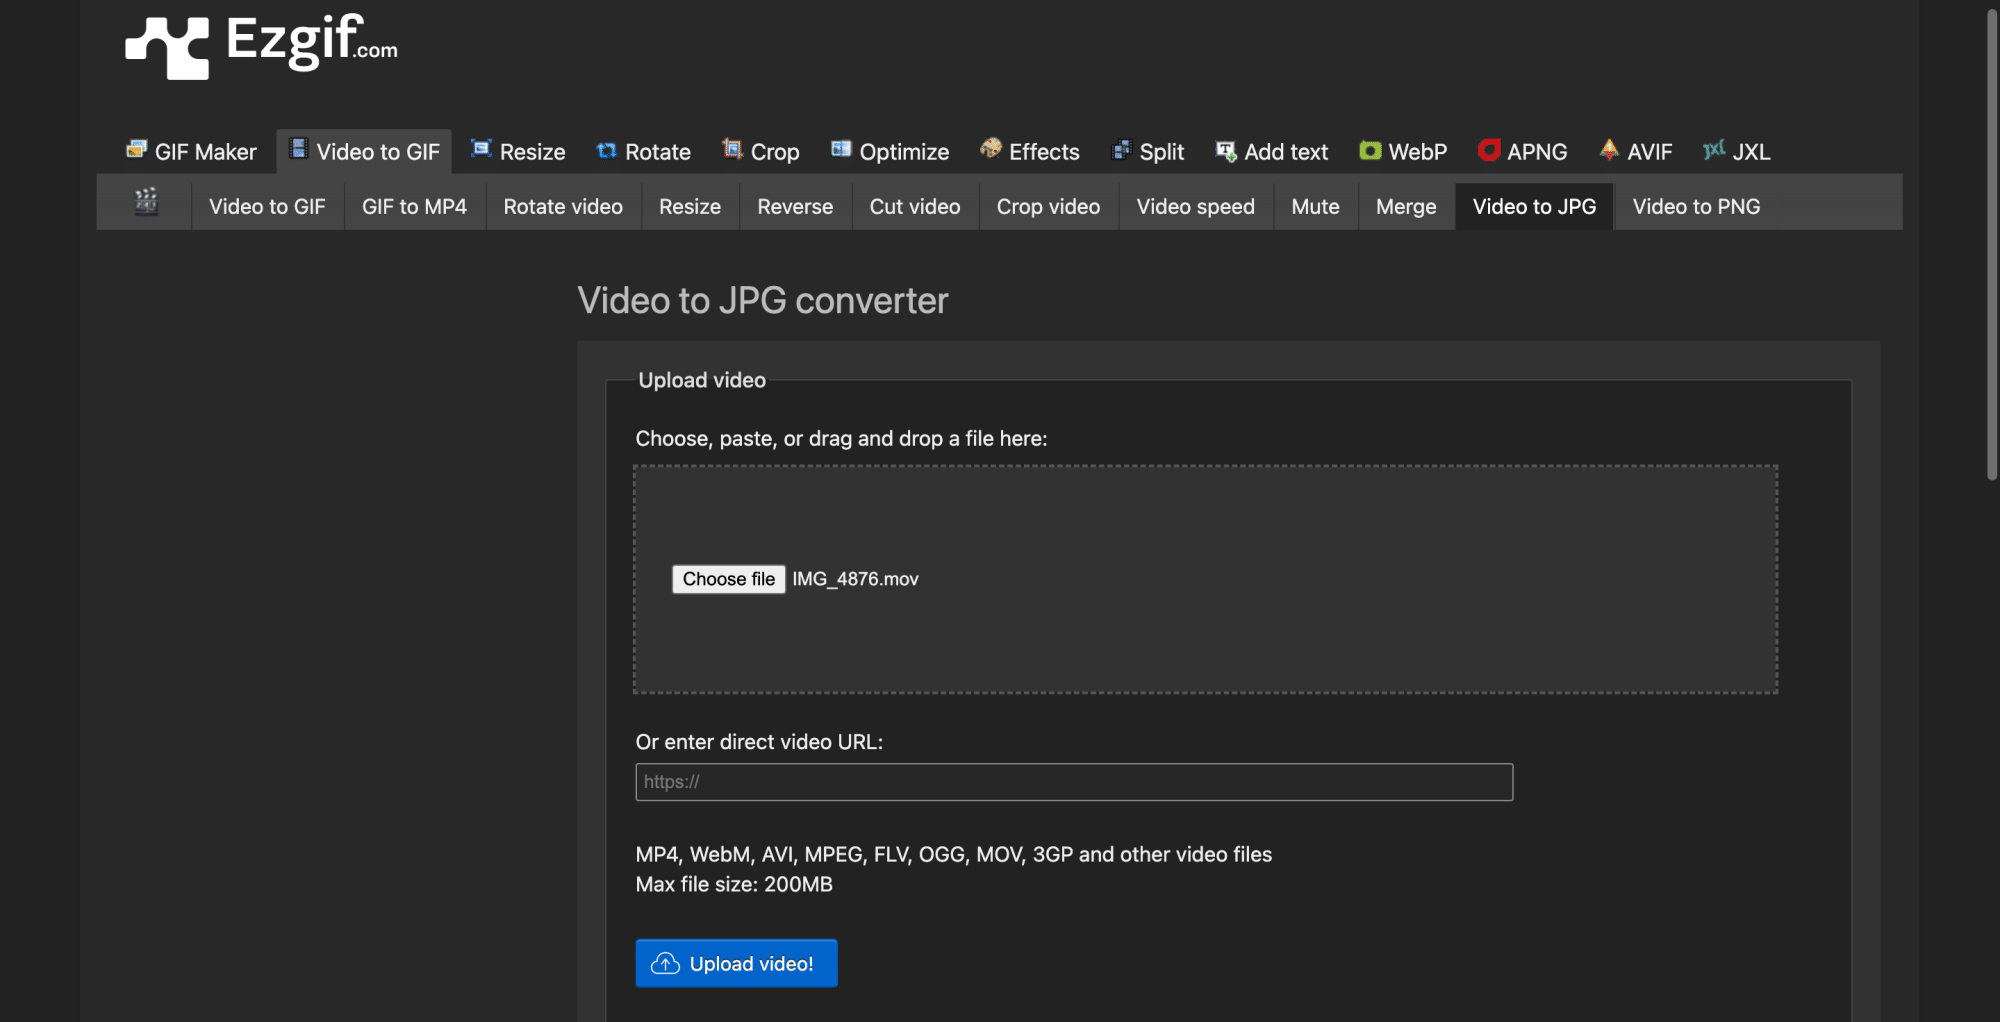
Visit ezgif.com and click “Choose File” to select the file you wish to convert into an image sequence. Ensure the file size is less than 200 MB. Uploading might take a while.
Once your file has been uploaded, you can manually select a start and end time, the images frame rate, and the size. Click “Convert to JPG!” to start the conversion process.
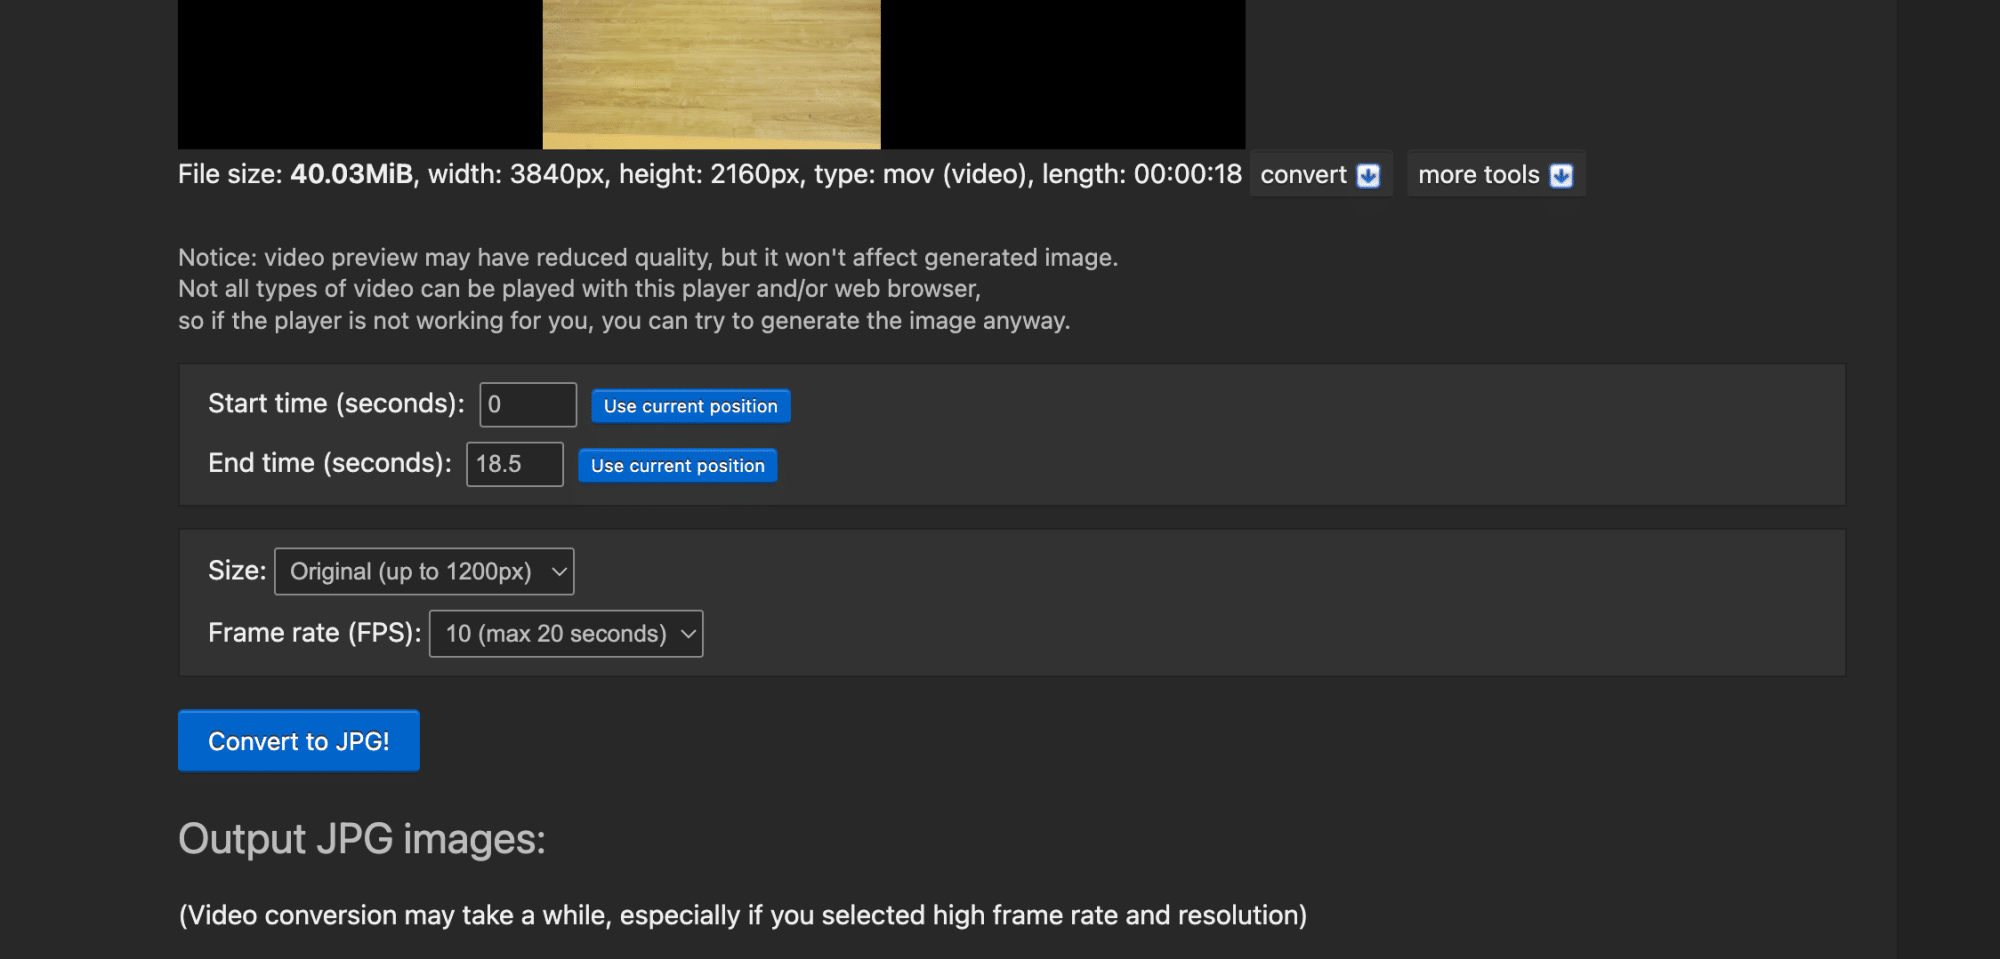
After the conversion process is complete, you will be able to download the results to your computer.
BONUS: How to Convert Images to Optimized WebP?
If you plan to use your image files on your website you may want to convert them into the WebP format.
WebP is a modern image format that is smaller in size than traditional JPG and PNG format and does not compromise on image quality.
Suggested Read: JPG Vs WebP: Should You Use WebP over JPG?
This is especially useful if you are planning to create a scroll sequence on your website as WebP images can give faster loading times owing to their compact nature.
To convert your JPG and PNG images into the WebP format, you can use online tools such as anywebp.com. Visit the website and drag and drop your images.
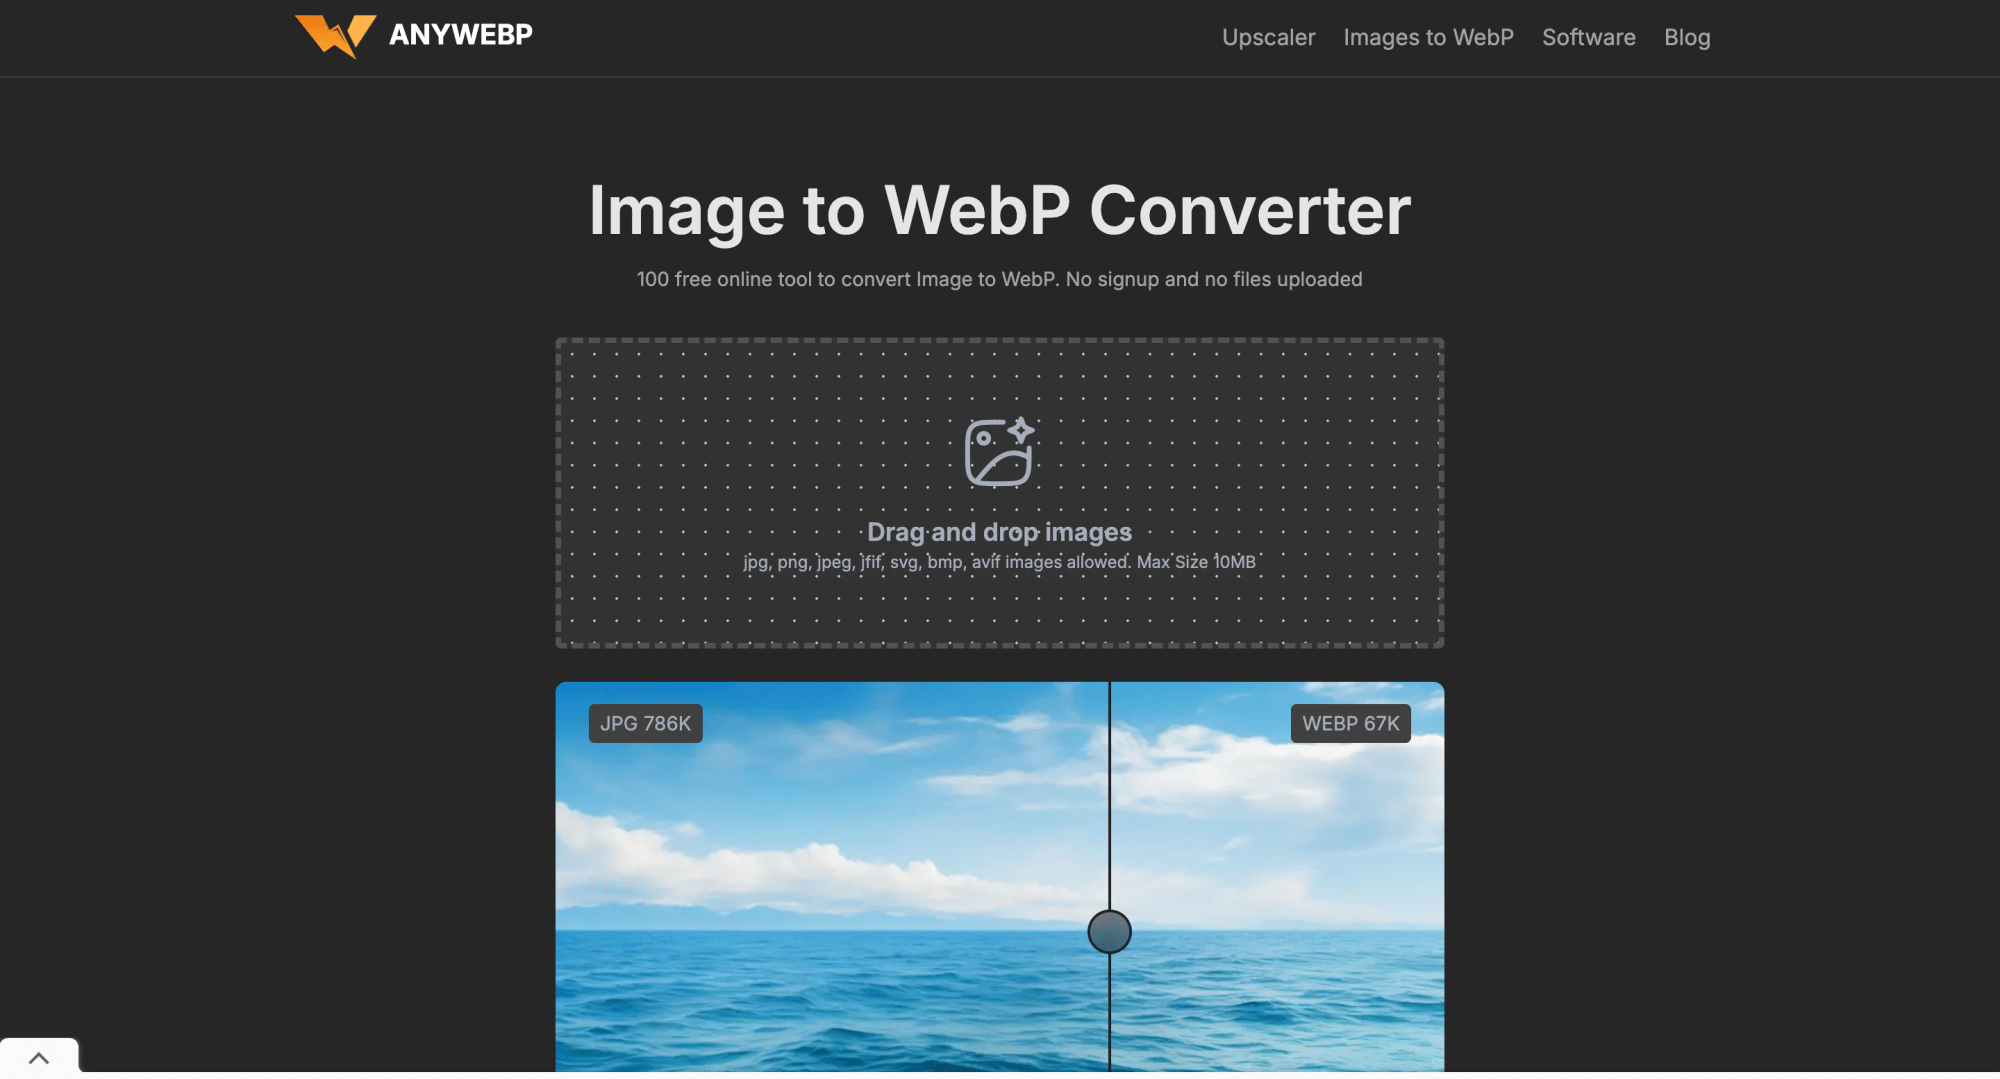
You can choose to resize your images or keep them the same size. Finally, click “Convert” and then download the converted images.
Noticing blurry images on your website? Here is how to fix blurry images in Elementor.
What Next? Use These Images to Create Image Scroll Sequence Animation
Now that you know how to convert video to image sequences, you can use the image frames to create a beautiful image scroll sequence animation for your WordPress website.
An image scroll sequence makes your website more welcoming and engaging to visitors.
The best way to create an image scroll sequence animation is to use the Image Scroll Sequence Widget from The Plus Addons for Elementor. With this widget, you can create aesthetic image sequences without having to write a single line of code.
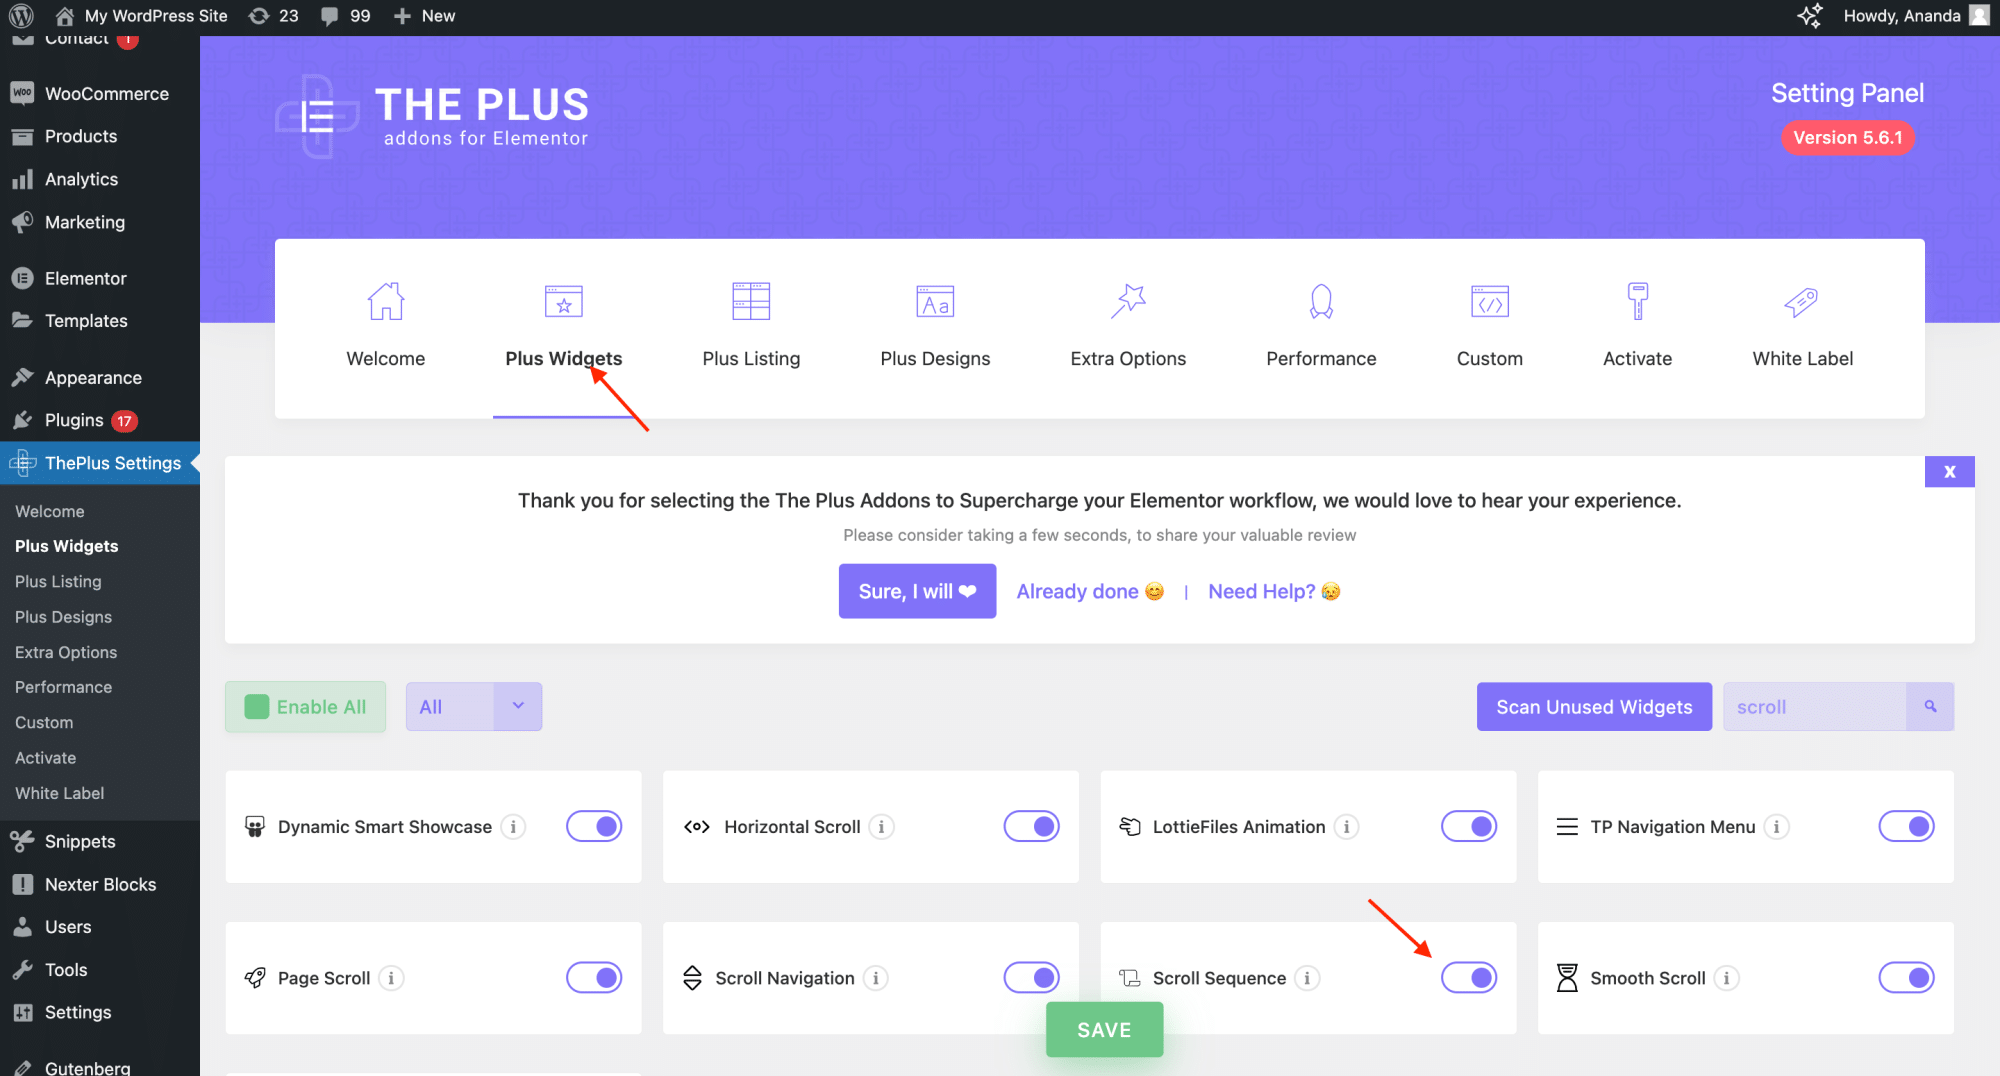
To begin, install and activate The Plus Addons for the Elementor Plugin. Navigate to ThePlus Settings > Plus Widgets from your WordPress dashboard. Find the Scroll Sequence widget, turn on the toggle, and save your settings.
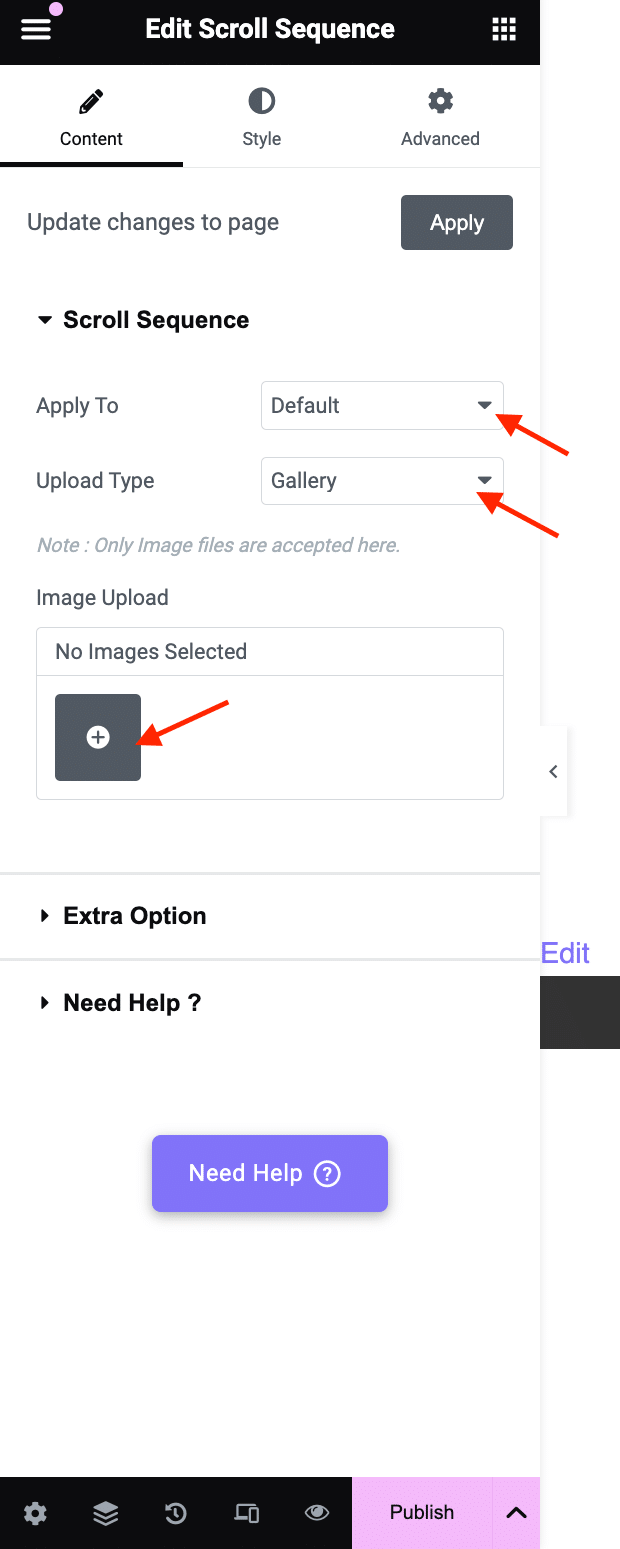
This widget allows you to add image scroll sequences to various locations such as in a default container or sequence, within the body and within an inner column.
In your Elementor editor, create a container and add the Scroll sequence widget there.
- In the side panel, navigate to Scroll Sequence > Apply to. Here select if you want your scroll sequence to appear in the Default Container, Body, or Inner Column.
- Then select the upload type. You can upload from your WordPress gallery or an external URL.
- Lastly, add your images by clicking the + icon. The widget supports JPG, PNG, and WebP formats.
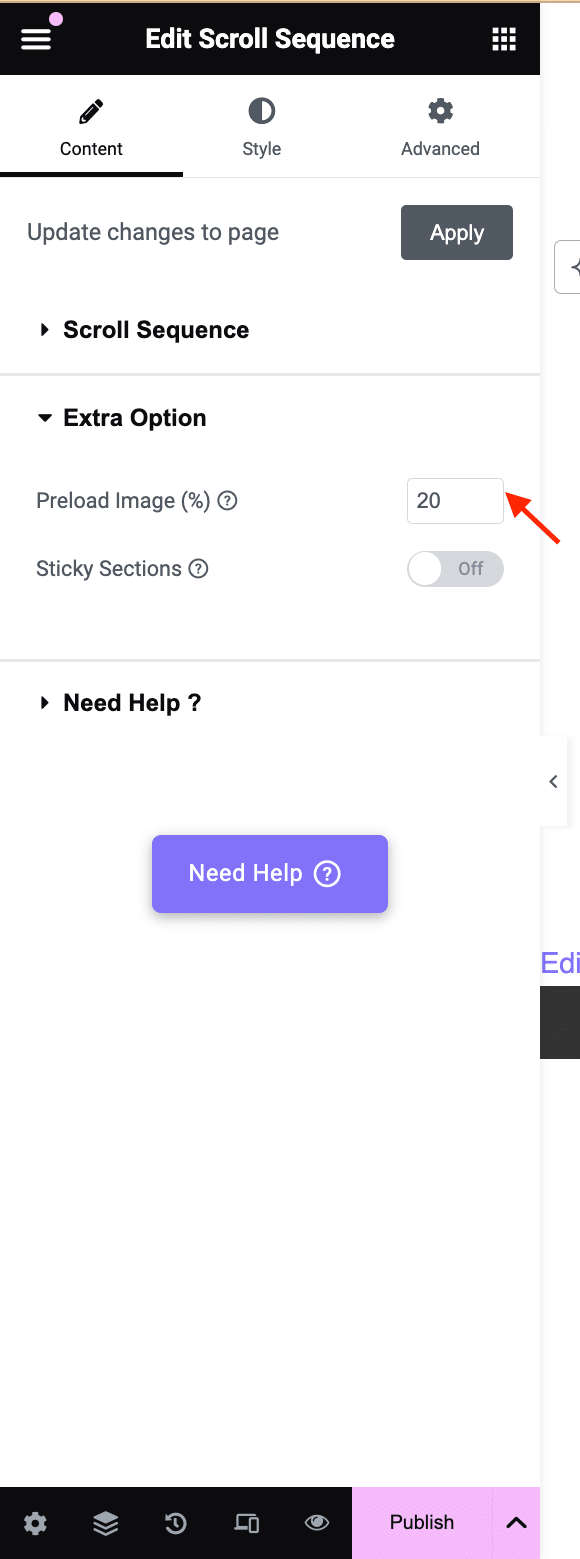
- For more customization, navigate to Extra Options > Preload Image. Select what % of images you want to preload on your website.
- These images will load first when someone accesses your website, and the rest of the images will load subsequently.
- You can also add text over your images using the Sticky Sections option.
Recommended Read: Here’s a detailed resource to help you use the Image Scroll Sequence Widget efficiently.

Do you Manage WordPress Websites? Download Our FREE E-Book of 20+ Checklist for WordPress Site Maintenance.
- SAVE MAXIMUM THIS BLACK FRIDAY
Don’t Miss the Mega WordPress
Black Friday Select Deals of 2024.
Wrapping Up
You can convert video to image sequences for free in just a few minutes using various online converter tools and software solutions. These image sequences allow you to capture moments from video without losing quality.
You can also optimize your image sequence by converting it into the lighter, more modern WebP format.
Once you’ve mastered how to convert videos to image sequence, you can use them to create exceptionally engaging image scroll sequence animations for your website using the Image Scroll Sequence Widget by The Plus Addons for Elementor, a WordPress plugin offering more than 120 Elementor widgets to help enhance the visual appeal and functionality of your website.
Check out the Complete List of 120+ Widgets and Extensions here. Start building your dream website without coding!
These widgets are easy to use and allow you to create beautiful and functional websites without complex coding or compromising speed and security.
