If you want to add custom fonts to Elementor, then you’re at the right spot!
Your website’s typography and font style are some of the most important – and often overlooked – aspects of designing a visually attractive and engaging website.
In addition to 800+ Google fonts for your website, Elementor allows you to add custom fonts to experiment with new styles.
These custom fonts help make your website more attractive and also help boost user engagement, improve readability, and establish a unique image for your brand.
The best part? Adding custom typography on Elementor is an extremely easy and simple process.
In this guide, we’ll take you through the step-by-step process of how to upload fonts to Elementor free and pro.
Let’s begin!
What are Custom Fonts in Elementor?
Custom fonts in Elementor allow you to add self-hosted and Adobe fonts on your Elementor page builder and use them for your website content.
Elementor custom fonts offer an easy way to upload any fonts you want, as well as modify the characteristics of your fonts to create branded font styles for your website.
Moreover, you can also add Adobe fonts to Elementor by integrating Adobe Typekit – sync and use all the Typekit fonts within Elementor.
Here’s how you can easily add Adobe Fonts to website:
That said, it only offers support for five different custom font Elementor formats as below-
- The Web Open Font Format (WOFF): It is one of the most popular and highly recommended font formats supported by most modern browsers.
- The Web Open Font Format (WOFF 2.0): This file supports OpenType and TrueType fonts and offers better compression than WOFF.
- SVG Fonts: SVG or Scalable Vector Graphics is an XML-based vector image format that is used for defining 2D graphic file formats. This format helps easily display SVG glyphs in text, which is especially useful for older versions of the iPhone.
- TrueType Fonts (TTF): It is a font format developed by Microsoft and Apple in the 1980s.
- Embedded OpenType Fonts (EOT): This format supports IE and is designed by Microsoft.
Where do you Download Free Custom Fonts for Elementor?
If you want to add custom typography to Elementor, you can use professionally-designed, premium fonts.
There are plenty of websites available that let you download stunning custom fonts for free, such as
- Google Fonts
- DaFont
- Font Squirrel
- Urbanfonts
- FontSpace
All you need to do to download these custom fonts for your website is to hit Download on the font you like, unzip the folder, and select the suitable font format.
You will have the font ready for upload on WordPress.
Struggling to choose the perfect fonts for your brand? Explore the top 20 Elementor fonts to find the right style for your website.
How to Add Custom Fonts to Elementor [Step-by-Step Methods]
Whether you’re using the free or premium versions of the Elementor, you can easily use custom fonts for your website.
However, the built-in custom fonts feature in Elementor works only for Elementor Pro, and to use custom fonts in the free version, you can use a WordPress plugin or install the Nexter theme.
Let’s go through the methods on how to add font in WordPress Elementor in detail.
Method 1: How to add Custom Fonts to Elementor Pro?
If you’re using Elementor Pro for your website, you have the custom fonts feature built-in.
Here’s how you can activate it and add custom font to Elementor.
Step 1: Add a Custom Font to Elementor
To add custom font to Elementor, go to your WordPress dashboard, and click on Elementor > Custom Fonts > Add New to add a new custom font.
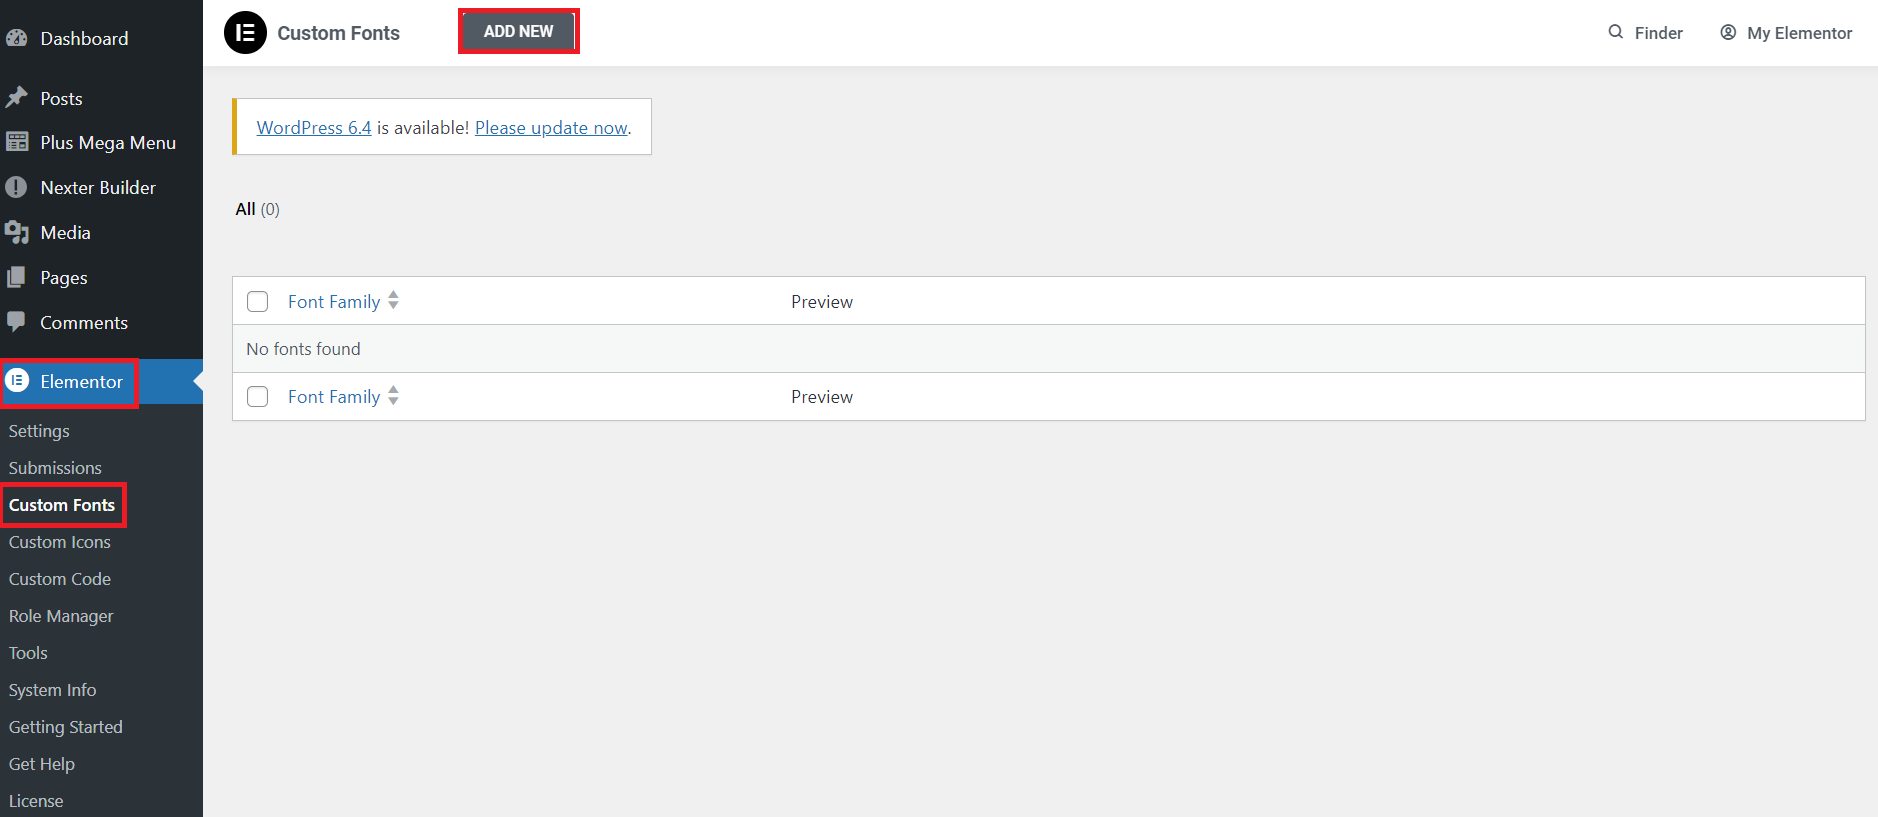
Enter the font family name. You can choose any custom name – here, we’re using Custom Font 1.

Step 2: Add a Font Variation and Upload the Fonts
Next, you would ask how to add font family in WordPress Elementor?
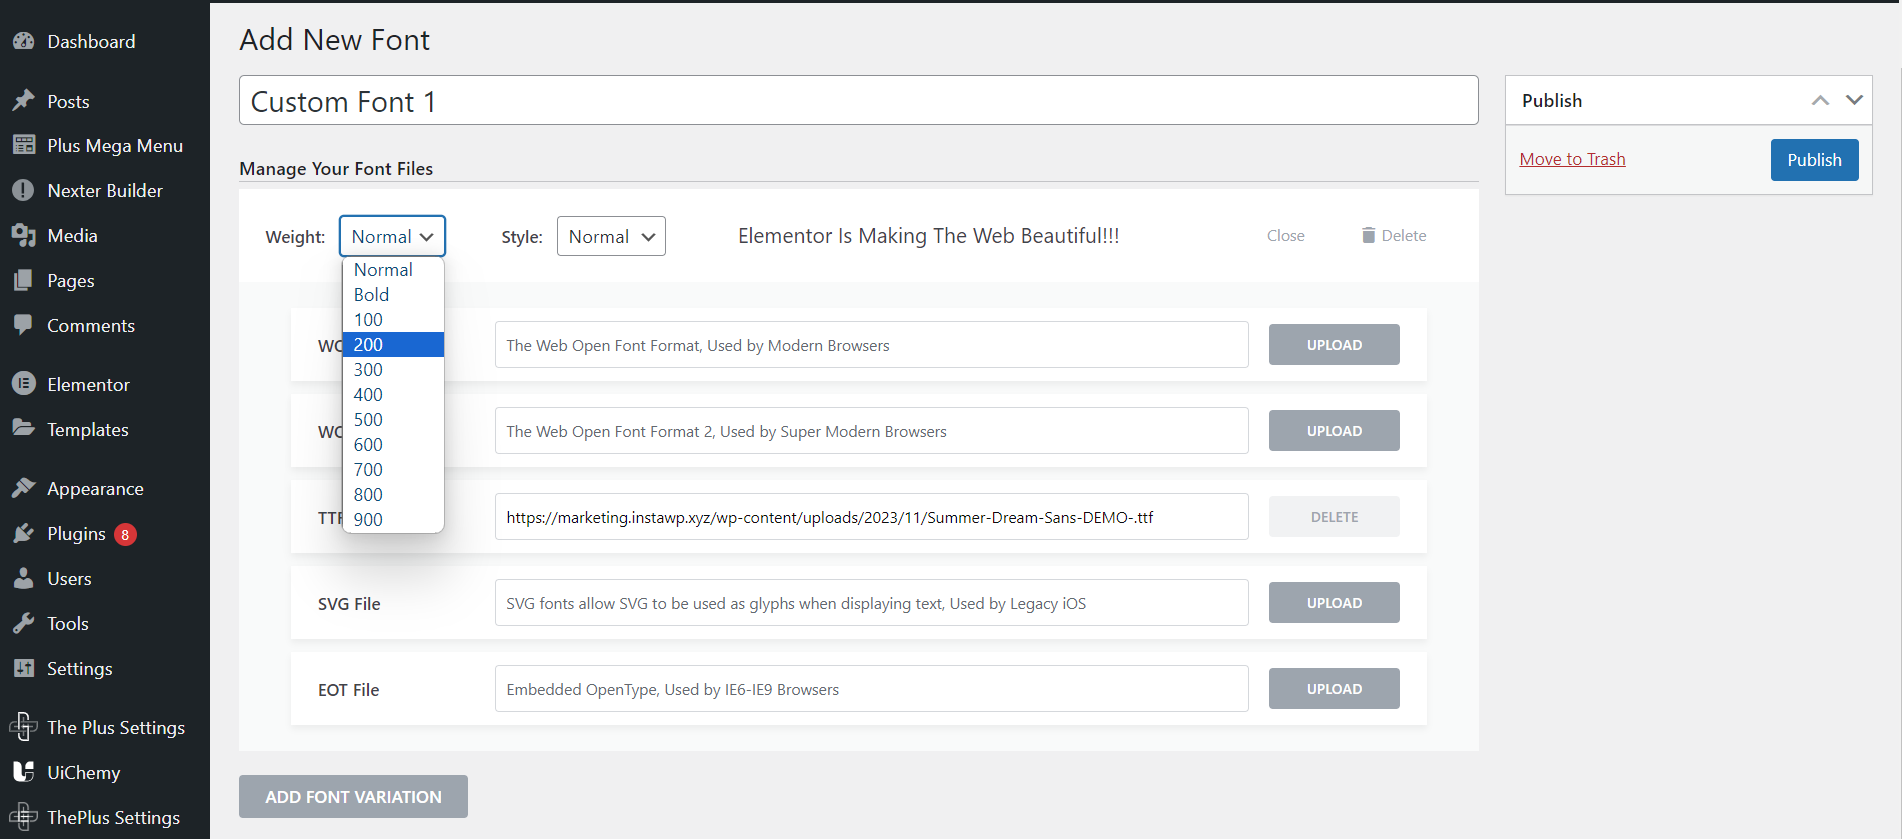
Its easy, click on Add Font Variation to upload your font files and add different variations.
Here, add the font name and upload the font files for different supported formats – WOFF, WOFF2, TTF, SVG, and EOT.
You can download different fonts from various font directories available online.
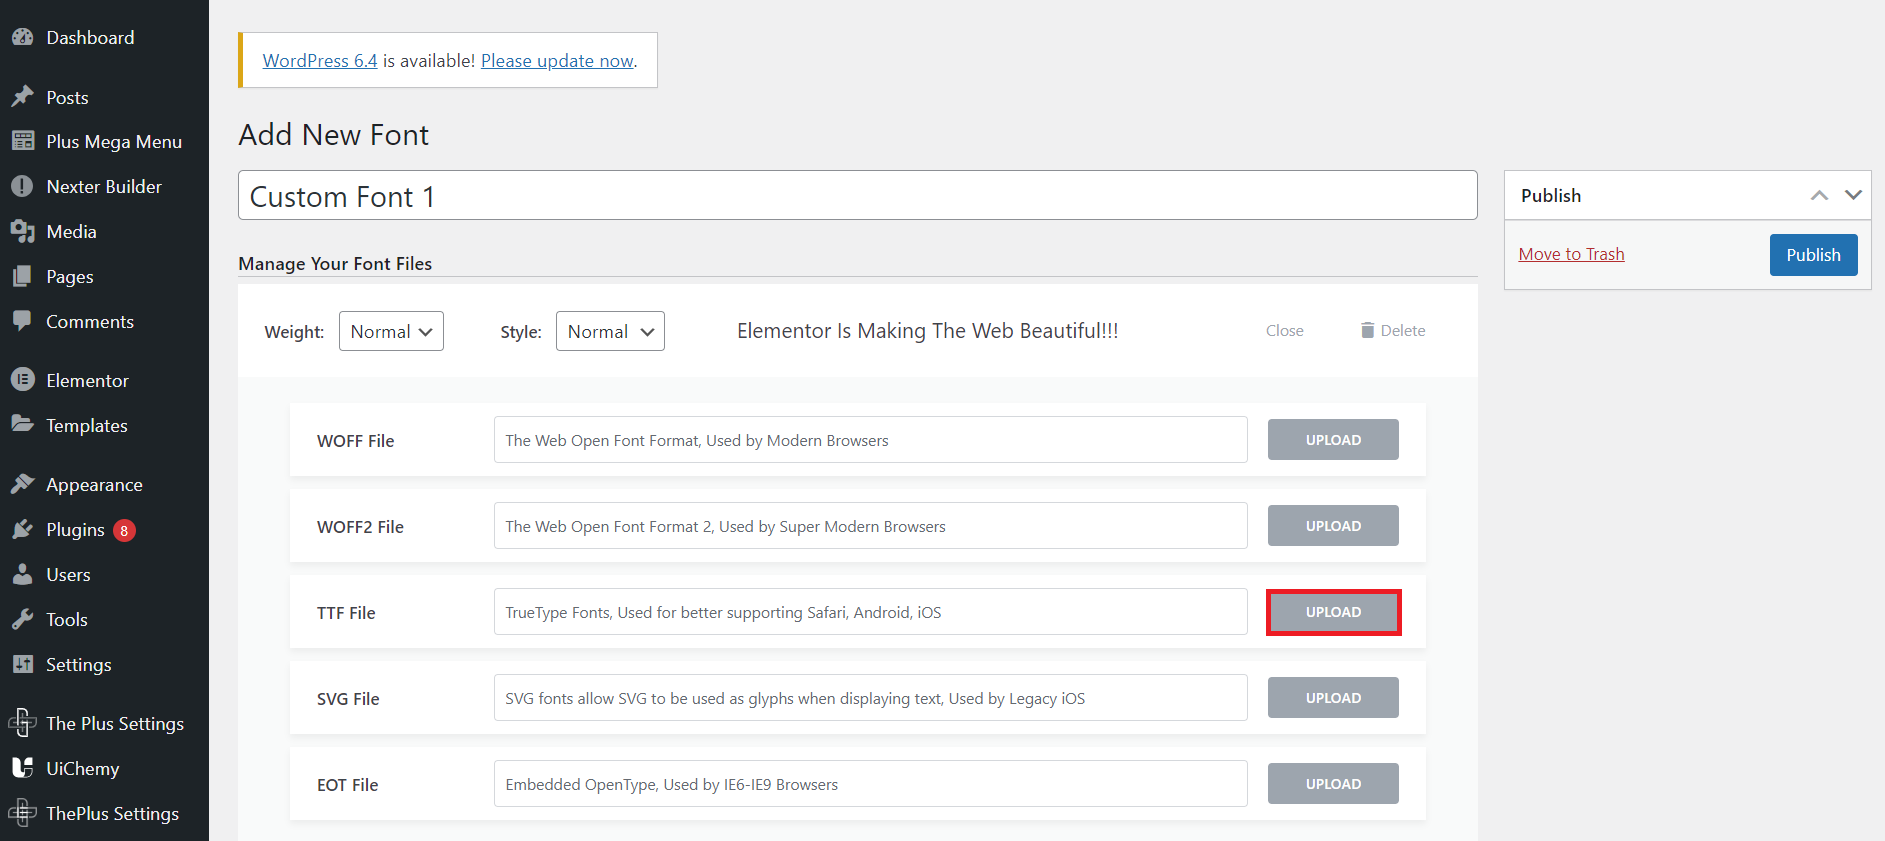
It is recommended to use as many font formats as possible to support a wide range of browsers and create an engaging website experience for all your visitors.
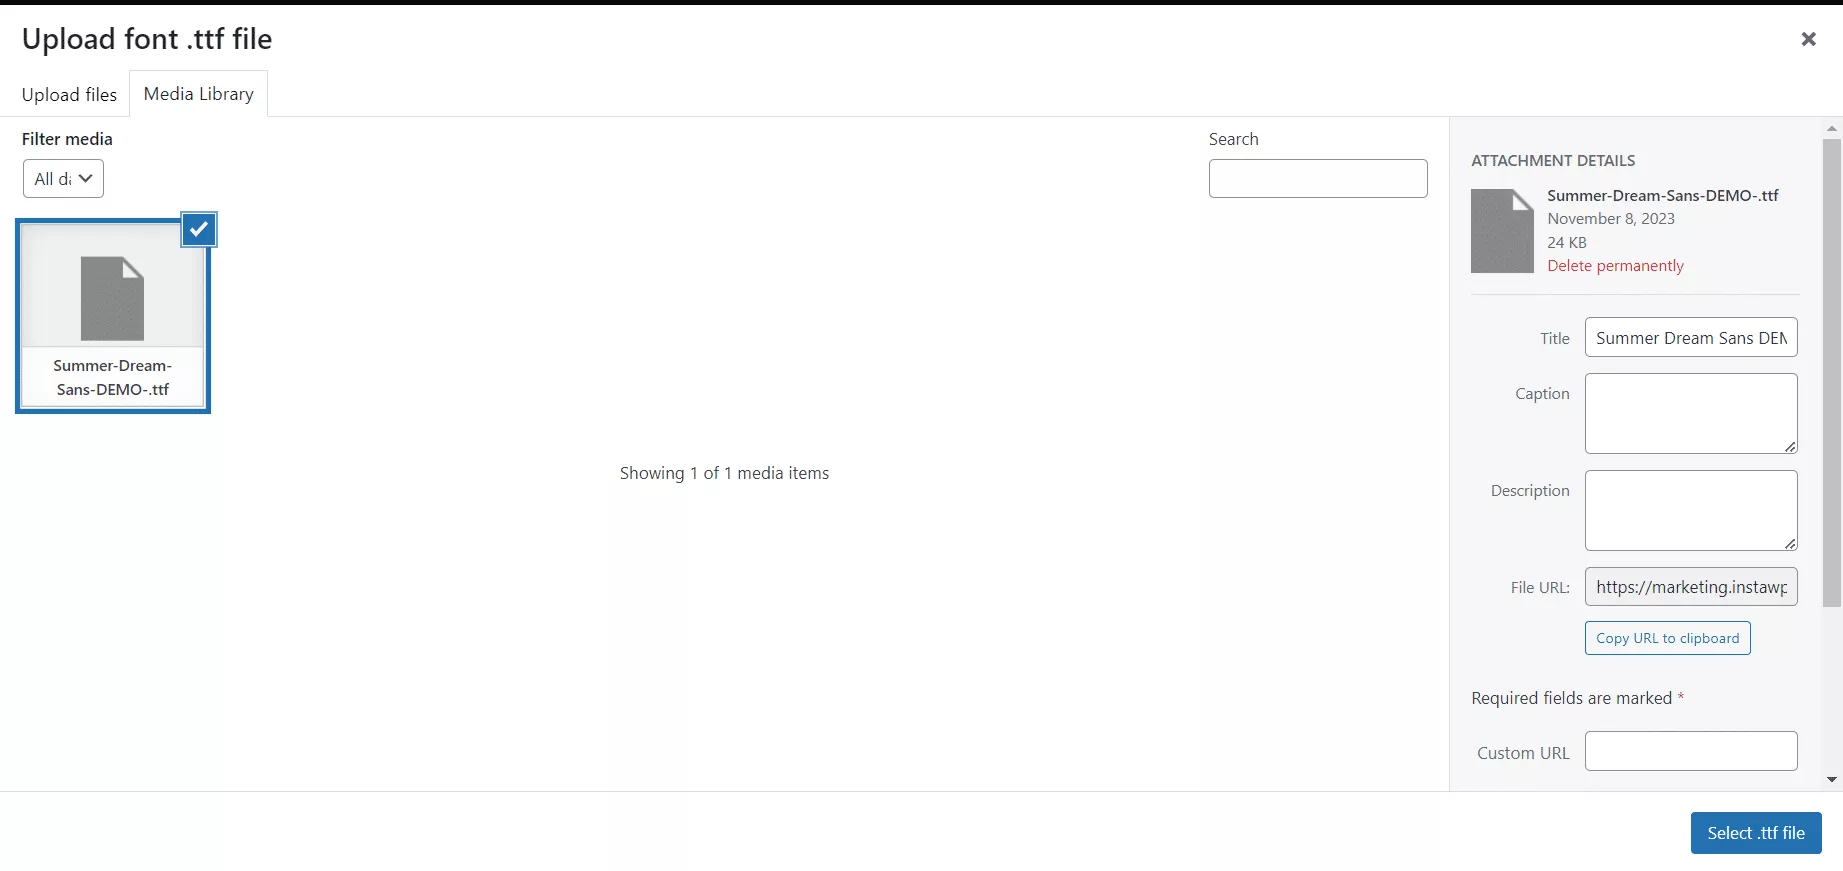
You can also add font variations to a single font by customizing the weight and style of the font.
For all the font formats and variations you’re adding, upload the respective font files individually.
Step 3: Publish the Final Font
Once you’ve uploaded the font file from your media gallery, hit the Publish button.
The font will now be available for use in Elementor.
Step 4: Use the Custom Font on Your Elementor Website
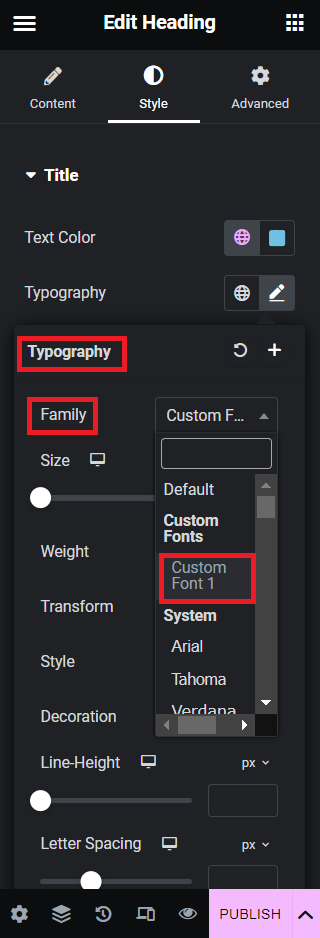
On the Elementor page builder, navigate to the Style section for any text widget. Under Typography settings, select the Elementor custom font you’ve uploaded.
Now, you can explore the other Typography options to customize the font size, style, weight, decoration, and more to align it with your website design.
Method 2: How to add Custom Fonts to Elementor for Free?
Adding custom typography to the free version of Elementor takes a little work as it does not offer the custom font feature for free, and you cannot import them as with Google Fonts.
To upload font to Elementor, you need a plugin or a WordPress theme that supports custom font files.
Fortunately, The Nexter Theme by POSIMYTH Innovations includes a custom font feature.

It is a lightweight theme for your website with various unique features like header and footer builder, advanced theme builder, code snippets, and a custom font upload option.
What’s more, it seamlessly integrates with your Elementor page builder, allowing you to use these custom fonts effortlessly.
Here’s how to add custom fonts to Elementor with the Nexter extension.
Step 1: Install the Nexter Theme and Extension
To use custom fonts, you need to install the Nexter theme and extension for free from the WordPress library.
Go to your WordPress dashboard and navigate Appearance > Theme > Add New.
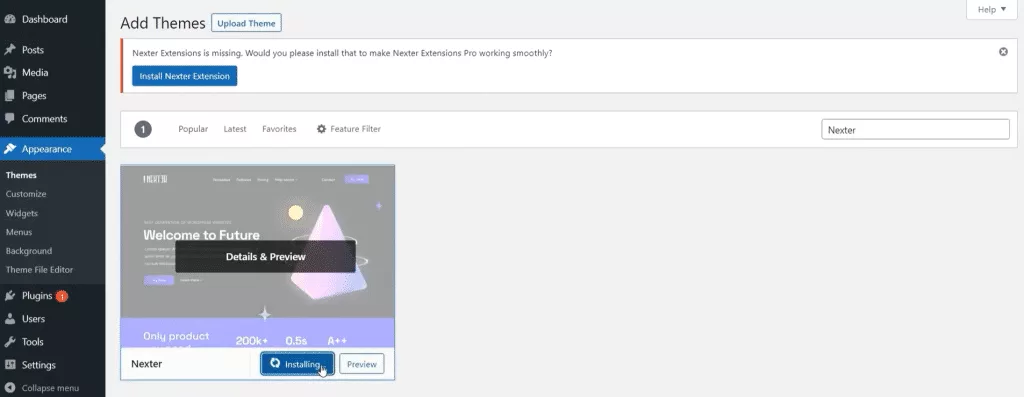
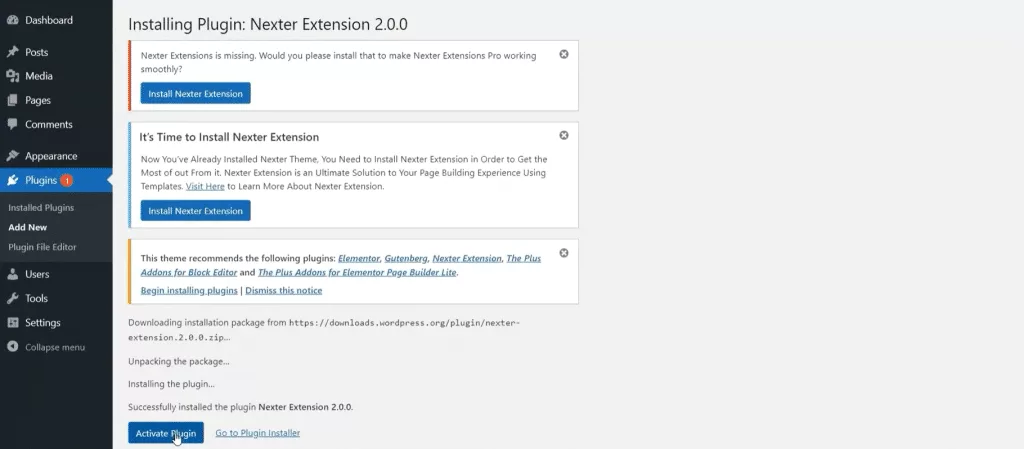
Search for the Nexter theme and install it. Next, click on Install Nexter Extension and then Activate Plugin.
Step 2: Enable the Custom Font Feature from the Settings
If you’re a visual learner, here’s a quick tutorial:
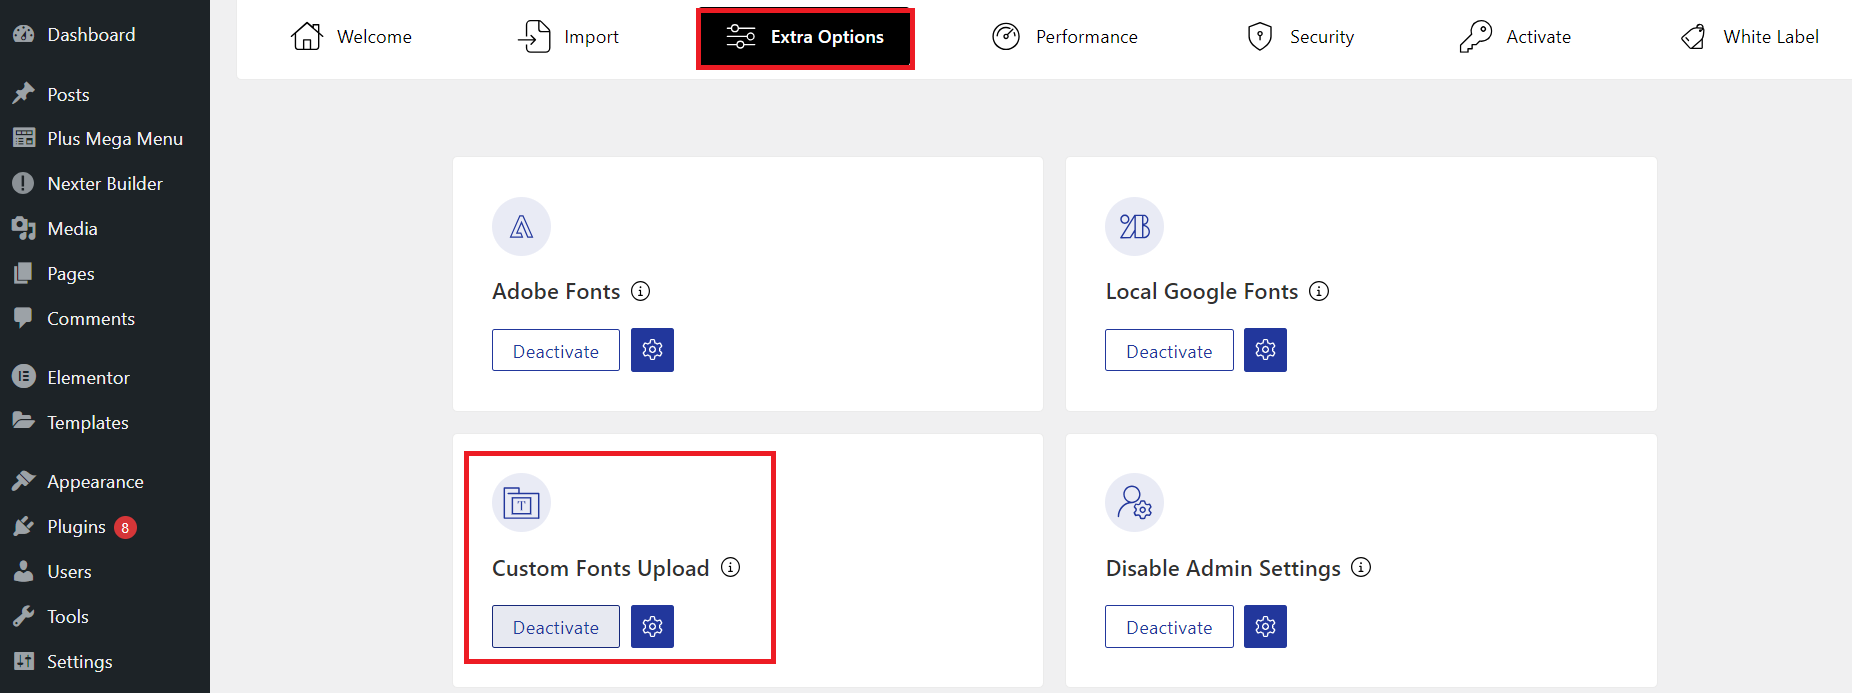
Once the theme is activated, go to Appearance > Nexter Settings > Extra Options on your WordPress dashboard.
Here, look for the Custom Font Upload option and enable it.
Step 3: Download Your Custom Font Files
In this step, you must source the custom font files from any free font catalog website like dafont.com.
Dafont.com features an extensive collection of beautiful fonts you can download for your website for free.
Surf the website to find a font that aligns with your design and brand image; hit Download and a zip file will be downloaded to your system.

Step 4: Upload the Custom Font on WordPress
Head to the Nexter Settings page and click the settings icon under the Custom Font Upload option to import your font.
You can upload a single font file at a time with the Simple Font Upload or multiple variations of your font, like bold, italic, or semi-bold, together with the Variable Font Upload option.
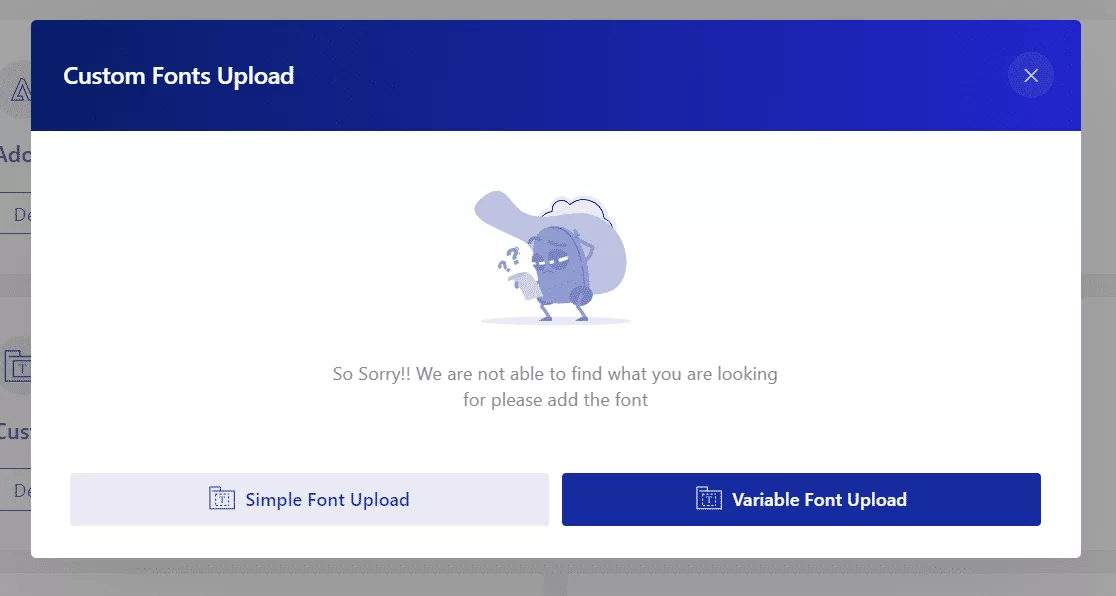
Here, click on simple font upload. Enter the font name, upload the font file from your system, select the variation, and click on Save Font.
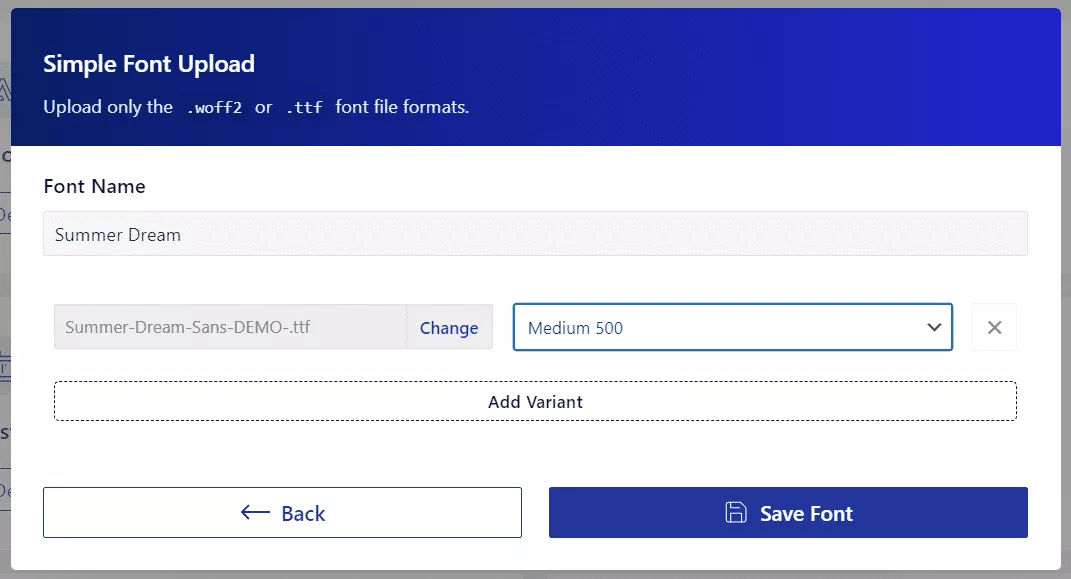
This will add the custom font to your WordPress, which you can use on your Elementor website.
Step 5: Use Custom Font on Your Website
To use the custom typography for your website, head to the Elementor page you’re editing. Navigate to Style > Typography.
Pick the custom font you added earlier to use for your website content.
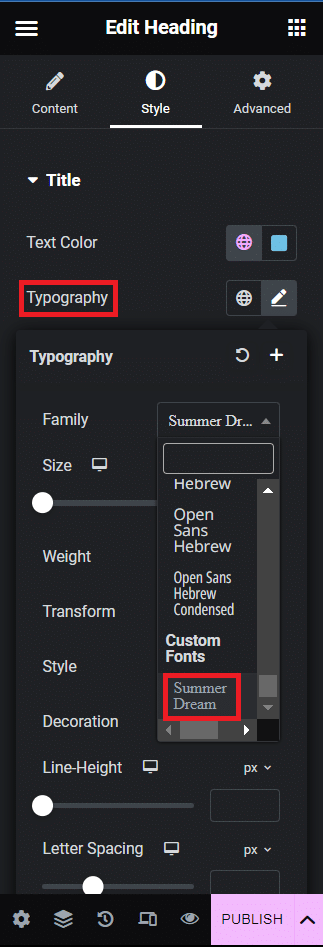
With Elementor, you also have the flexibility to customize the font settings, including size, space, style, letter height, and more.
And that’s it. Now you know how to add a font to Elementor website for free with the Nexter theme by following these five simple steps.
Also Read: Searching for an Elementor theme optimized for speed, performance, and responsiveness? Explore the 5 Best Elementor Themes with Speed Test for a high-quality website.
Wrapping Up
As you can see, adding and using custom fonts on Elementor is quick and simple.
With Elementor Pro, you can use the built-in custom fonts feature to add new fonts to your website.
Or, if you’re using the free version, download and install the Nexter Theme for free to use its custom font functionality and add interactive fonts.
This highly responsive theme makes it easier to upload custom fonts and customize them to match your brand image. Just follow the simple steps mentioned in this article to make your website content stand out with stunning fonts.
And if you’re looking to enhance the functionality of your Elementor page builder, check out The Plus Addons for Elementor – a complete toolkit featuring 120+ unique addons for Elementor.
This is an all-in-one plugin with many excellent functions to customize website design, create listings, build a WooCommerce store, and more.
Unlock numerous impressive features with the premium version for just $39/year. You can also check out the lifetime plan if you wish to pay once.


