


Do you want to stop Google from indexing certain pages? Learn how to hide WordPress pages from Google in a few easy steps.
There are many reasons you may not want certain pages showing up in Google’s search results. These pages might have user-role specific content, work in progress pages, or sensitive information.
If Google crawls these pages, it could expose private content, hurt SEO, or impact user experience. It’s best to block Google from accessing such pages, which is what we’ll cover here.
In this guide, we’ll walk you through beginner-friendly methods to hide WordPress pages from Google.
You’ll learn about meta tags, password protection, maintenance mode, and more.
Let’s get started!
What Does it Mean to Hide WordPress Pages from Google?
Hiding a WordPress page from Google means preventing it from being indexed and displayed in search engine results.
Google uses automated bots, or “crawlers”, to read and index pages on your website.
Unless you set specific rules, these bots will index everything they can find. How does Google index them after crawling?
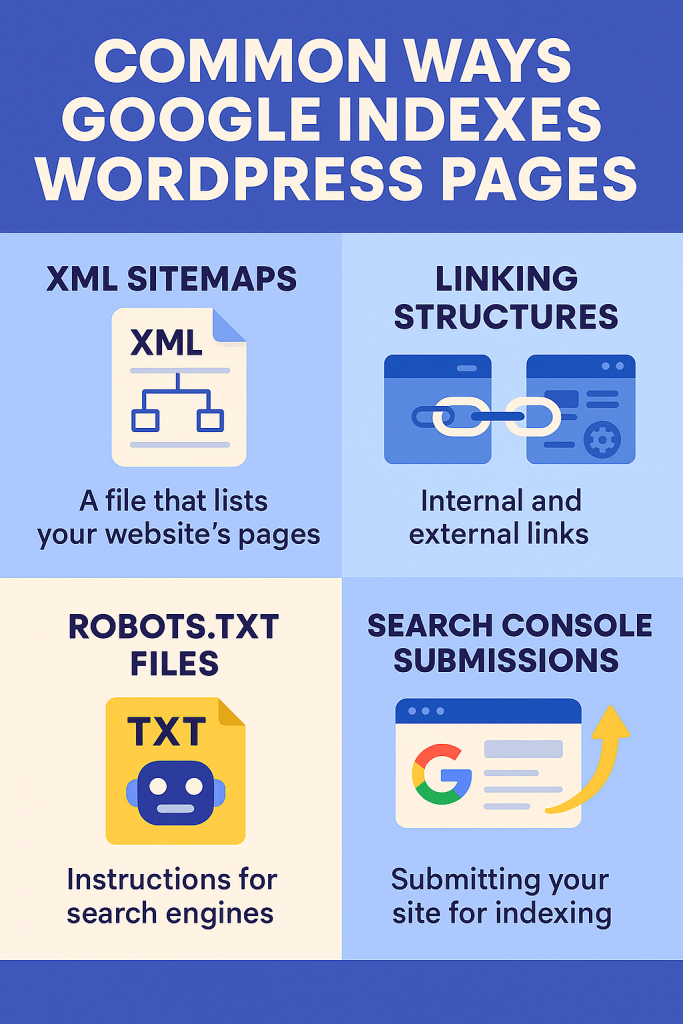
Common Ways Google Indexes WordPress Pages
Google Search uses crawling, indexing, and serving search results to display search content through search engine bots. It uses URL discovery to crawl existing pages on the web, including pages and posts on WordPress.
Indexing works in the following ways:
- XML Sitemaps
An XML sitemap is a file that lists all the essential pages on your website. It helps Google find and understand your content more easily.
- Linking Structures
Google uses internal links between your blog posts to crawl your site. A clear structure helps search engines discover and index more of your content. External links from other websites, known as backlinks, also help Google find your pages.
- Robots.txt Files
This file tells search engines which parts of your website they can or cannot crawl.
- Search Console Submissions
The Google Search Console lets you submit your site and individual pages for indexing. It’s a direct way to tell Google about your content.
Although extremely helpful for content visibility, this indexing can sometimes work against you, especially if there is content on your WordPress site that you want to protect.
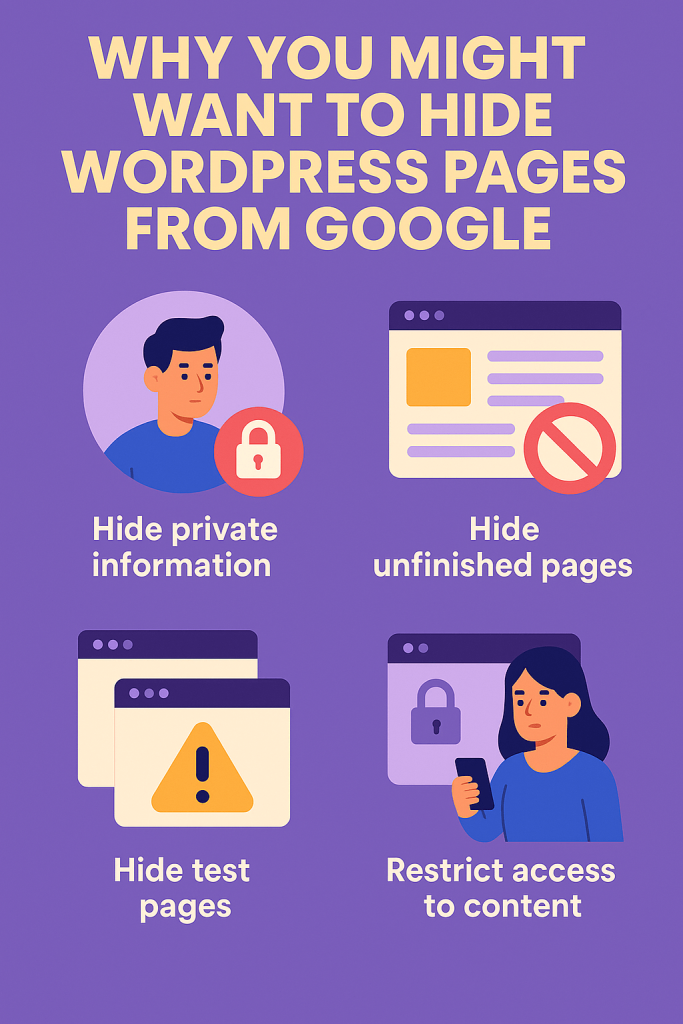
Why You Might Want to Hide WordPress Pages from Google?
Let’s look at why you might want to hide some pages from being listed on Google.
- You might want to hide private information like account details, profile details, or some documents, from search engines and unwanted users
- You might want to hide certain pages, like a new landing page, that is not yet ready for public view.
- You may be building new website sections or performing A/B testing and do not want them to be indexed on Google.
- You may want to restrict access to client-specific or subscriber-only content.
Not only are these important for your website’s privacy; it’s likely that coming across them in a Google search may not be helpful for potential users either.
Quick Methods to Hide WordPress Pages from Google
Now that you understand why you should consider hiding WordPress pages from Google, let’s look at some easy-to-implement ways to make it happen.
Method 1: Using Noindex Meta Tags to Hide WordPress Pages
Noindex tags are special HTML meta tags that instruct search engines not to index the page. It is easy to implement this method using a plugin, like AIOSEO or Yoast SEO.
Let’s see how.
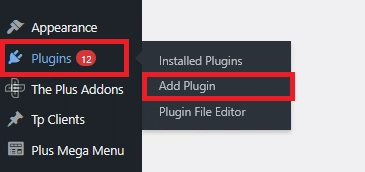
Step 1: Install Relevant Plugin
Install a relevant plugin. For this example, we will work with AIOSEO. From your WordPress dashboard, navigate to Plugins > Add Plugin.
Search for AIOSEO in the search bar.
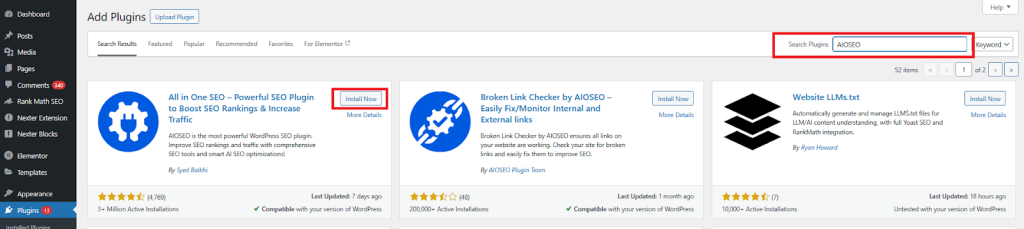
Install and activate the plugin.
Step 2: Find Indexing Option
Open the WordPress post or page that you want to hide from Google search results.
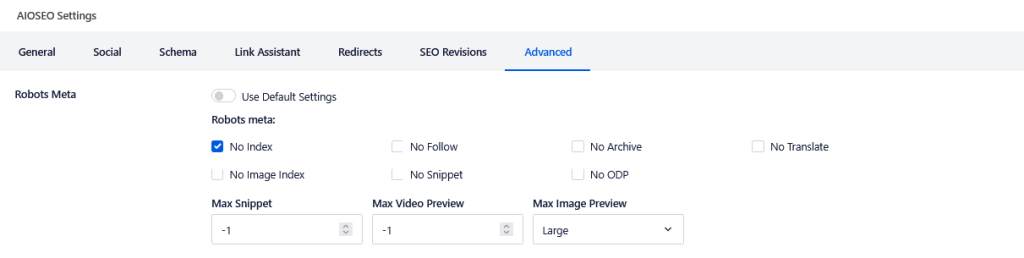
At the bottom of the page, you will find the “AIOSEO Settings” footer. Click the “Advanced Tab”.

Step 3: Change Indexing
Here, you will find a toggle for “Robots Meta”. Turn it off.
Next, select the “No Index” option. With this, your page will be hidden from Google search results.
This method ensures search engines will skip over the page when crawling your site. Remember that the page should not be blocked by a robots.txt file already, in order for the noindex method to work.
This is because crawlers should have access to the page in order to register the noindex tag.
Confused which SEO plugin to opt for? Here’s a comparison of the 5 Best Free SEO Plugins for WordPress you can consider.
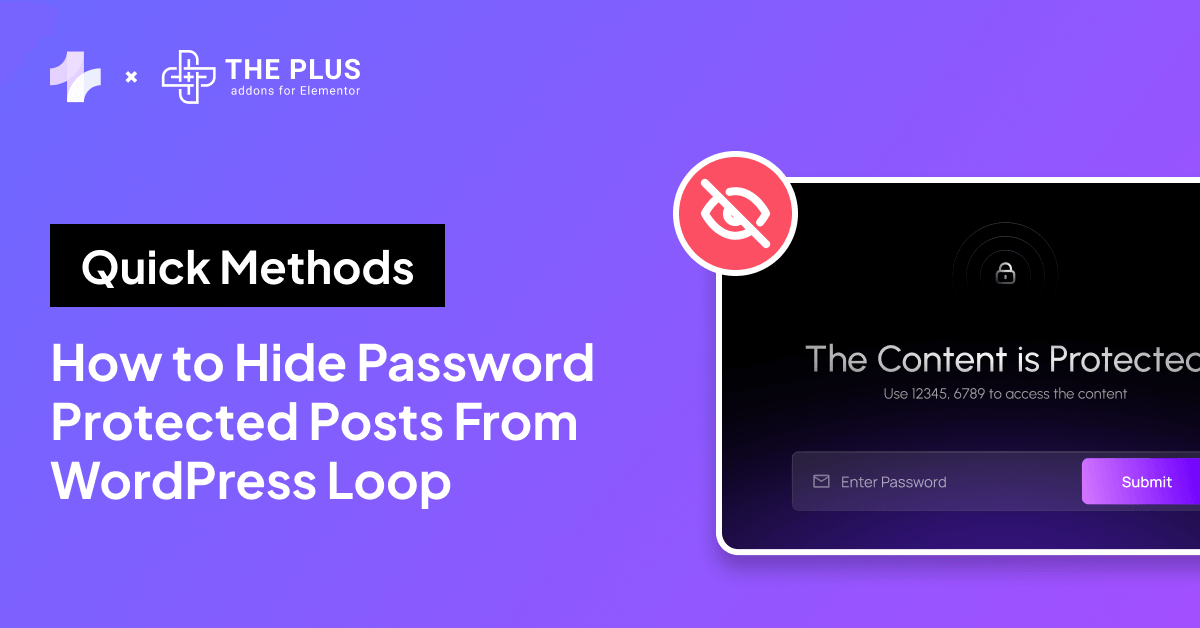
Method 2: Password Protect WordPress Pages
Next, let’s explore password protection, which blocks both users and search engines.
There are two ways to do this. The first is through changing visibility within Gutenberg itself and the second through the Elementor editor.
Let’s take a look at both options.
Option 1: Gutenberg
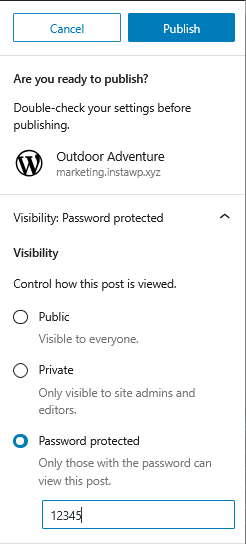
Open your WordPress page or post. When you click the “Publish” button to the top right of the screen, you will find a dropdown tab for “Visibility“.
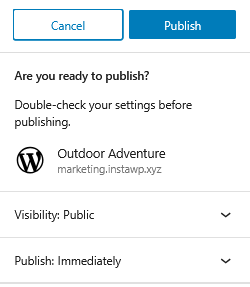
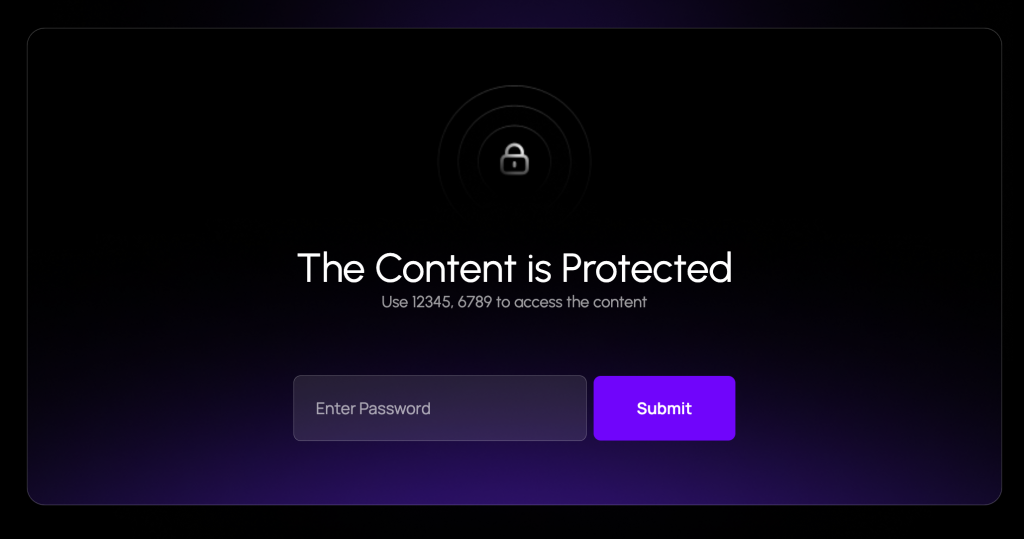
Here, pick the button for “Password protected”, and set the password in the text field below. This will enable password protection for your content.
Choose a strong password to properly protect your posts and prevent unauthorized access.
Want to learn how to customize password protected pages in WordPress? The Plus Addons has you covered with this guide.
Option 2: Protected Content Widget by The Plus Addons
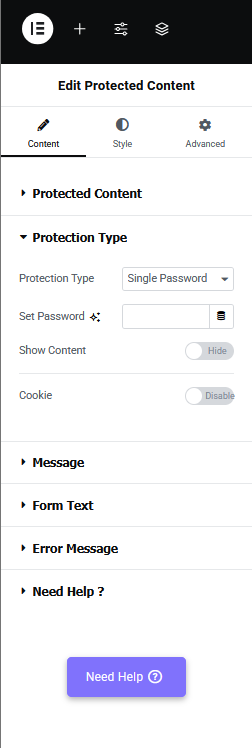
For Elementor users, the Protected Content widget by The Plus Addons for Elementor can make this even easier and more secure by offering multiple options: single password content protection, password protected content lock, and user role based content visibility.
With this widget you can:
- Protected a full Elementor template or a selected text.
- Protect pages based on user role or single/multi password mode.
- Edit the form text.
- Customize the error message.
- Customize every aspect of your protected content page.
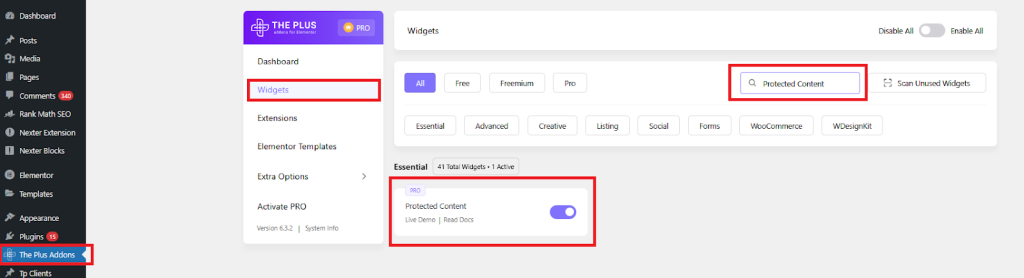
First, install and activate The Plus Addons for Elementor plugin.
Then, you can view the status of the widget by navigating to The Plus Addons > Widgets and searching for “Protected Content” within the search bar. Make sure the toggle is on.
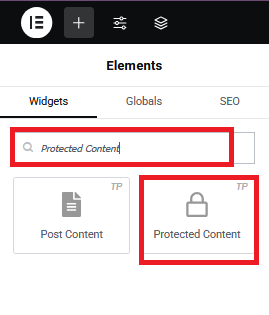
Now, head over to the page that you want to hide from view. Search for “Protected Content” in the search bar to the left of your screen.
Add the right widget to your page.
In the “Protection Type” tab, you can choose between single and multiple password protection, set the password, and change cookie settings.
With this, your content is password protected. To explore more on the functionality of the widget, check out the docs here.
Need a simple, follow-along video for using the widget? Watch now:

Method 3: Using Robots.txt to Block WordPress Pages from Google Crawlers
Another method to hide WordPress pages from Google is to edit your robots.txt file.
Robots.txt is a configuration file that tells search engines which pages or folders to avoid crawling. You can access it from the root directory of your website.
However, AIOSEO can be used for this method, too.
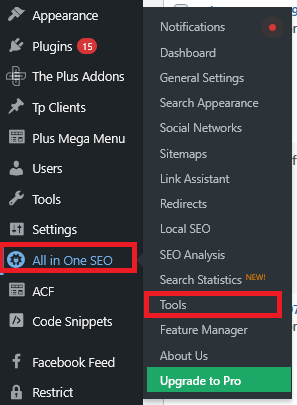
Step 1: Open robots.txt settings
From your WordPress homepage, navigate to All in One SEO > Tools.
Step 2: Add Custom robots.txt Rule
On this page, Robots.txt Editor, enable custom robots.txt by turning the toggle switch on.
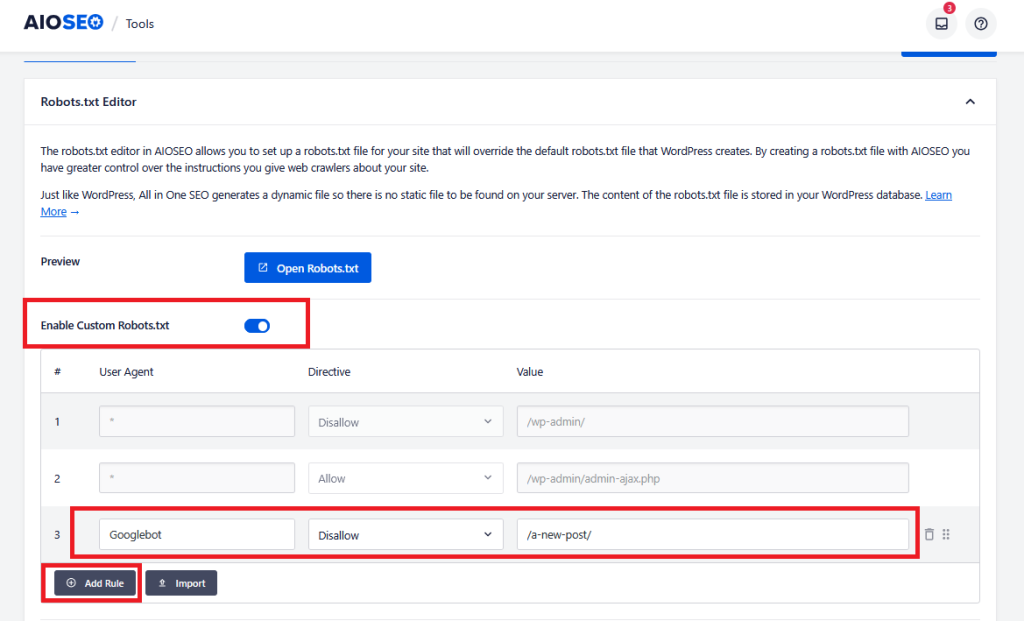
Add rules and fill in three key details: User Agent, Directive, and Value.
User Agent refers to the bot you want to restrict. Directive will allow or disallow permissions for the User Agent.
Finally, Value refers to the address of the page to be hidden.
Once added, click on “Save Changes” to the top of your screen.
You can also access and edit the robots.txt file manually, using an FTP client or the WordPress hosting cPanel. This requires more technical knowledge, without which it’s possible to harm your site’s SEO.
Another thing to remember is that the robots.txt file is publicly visible, which means that anyone looking at it knows the pages you are choosing to hide.
Concerned about the security of your WordPress website? Find out about 5 free tools to scan WordPress for vulnerabilities.
Method 4: Enable Maintenance Mode to Temporarily Hide Pages
If you’re only hiding your site temporarily, Nexter theme’s Maintenance Mode is a great option.
Maintenance Mode hides your site or pages from both visitors and search engines.
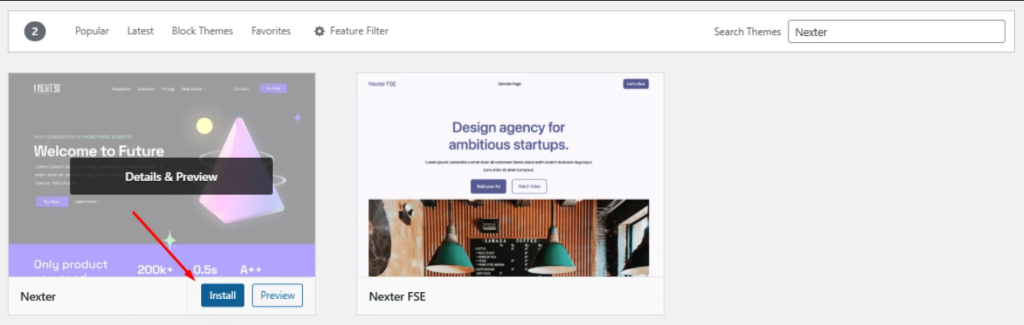
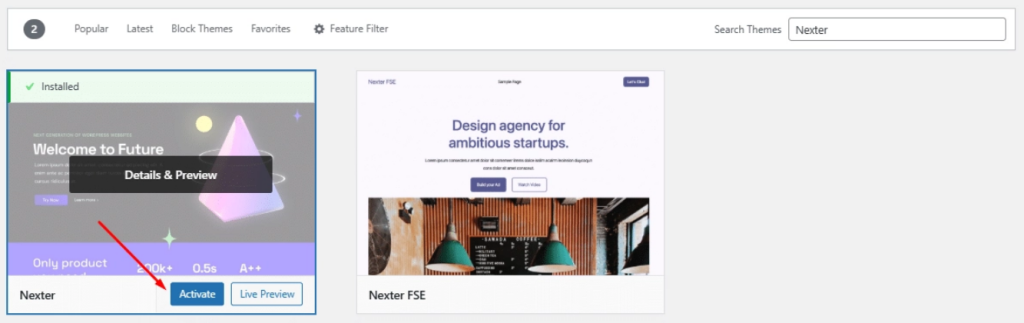
Start by getting the Nexter Theme, which is available with a multitude of premium features, including 90+ Gutenberg blocks, over a thousand WordPress templates, and of course, the Maintenance Mode.
Navigate to Appearance > Themes, and search for “Nexter“. Click the “Install” and then “Activate” the theme to apply it to your website.
When using the Nexter Theme, setting up the Maintenance Mode becomes quite easy.
Step 1: Find “Maintenance Mode”
From your WordPress dashboard, go to Appearance > Customize.
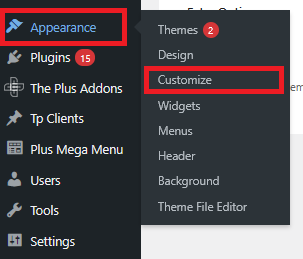
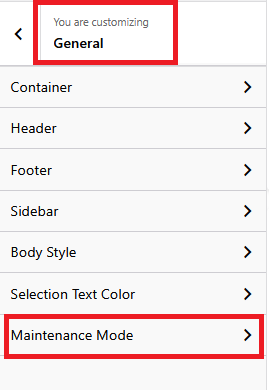
In the Customizer, navigate to General > Maintenance Mode.
Step 2: Enable “Maintenance Mode.”
Turn on the toggle switch next to the “Enable Maintenance Mode” option.
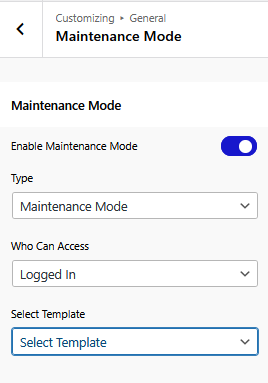
Step 3: Customize and Publish
Now, you can change whether you are displaying “Maintenance Mode” or “Coming Soon” messages, who can still access the website, and what template you want to use.
Once customized, click the publish button at the top of the page. Site visitors will see a maintenance message instead of your regular site content now.
For a video tutorial, learn how to make free maintenance mode page in WordPress by watching this YouTube video:

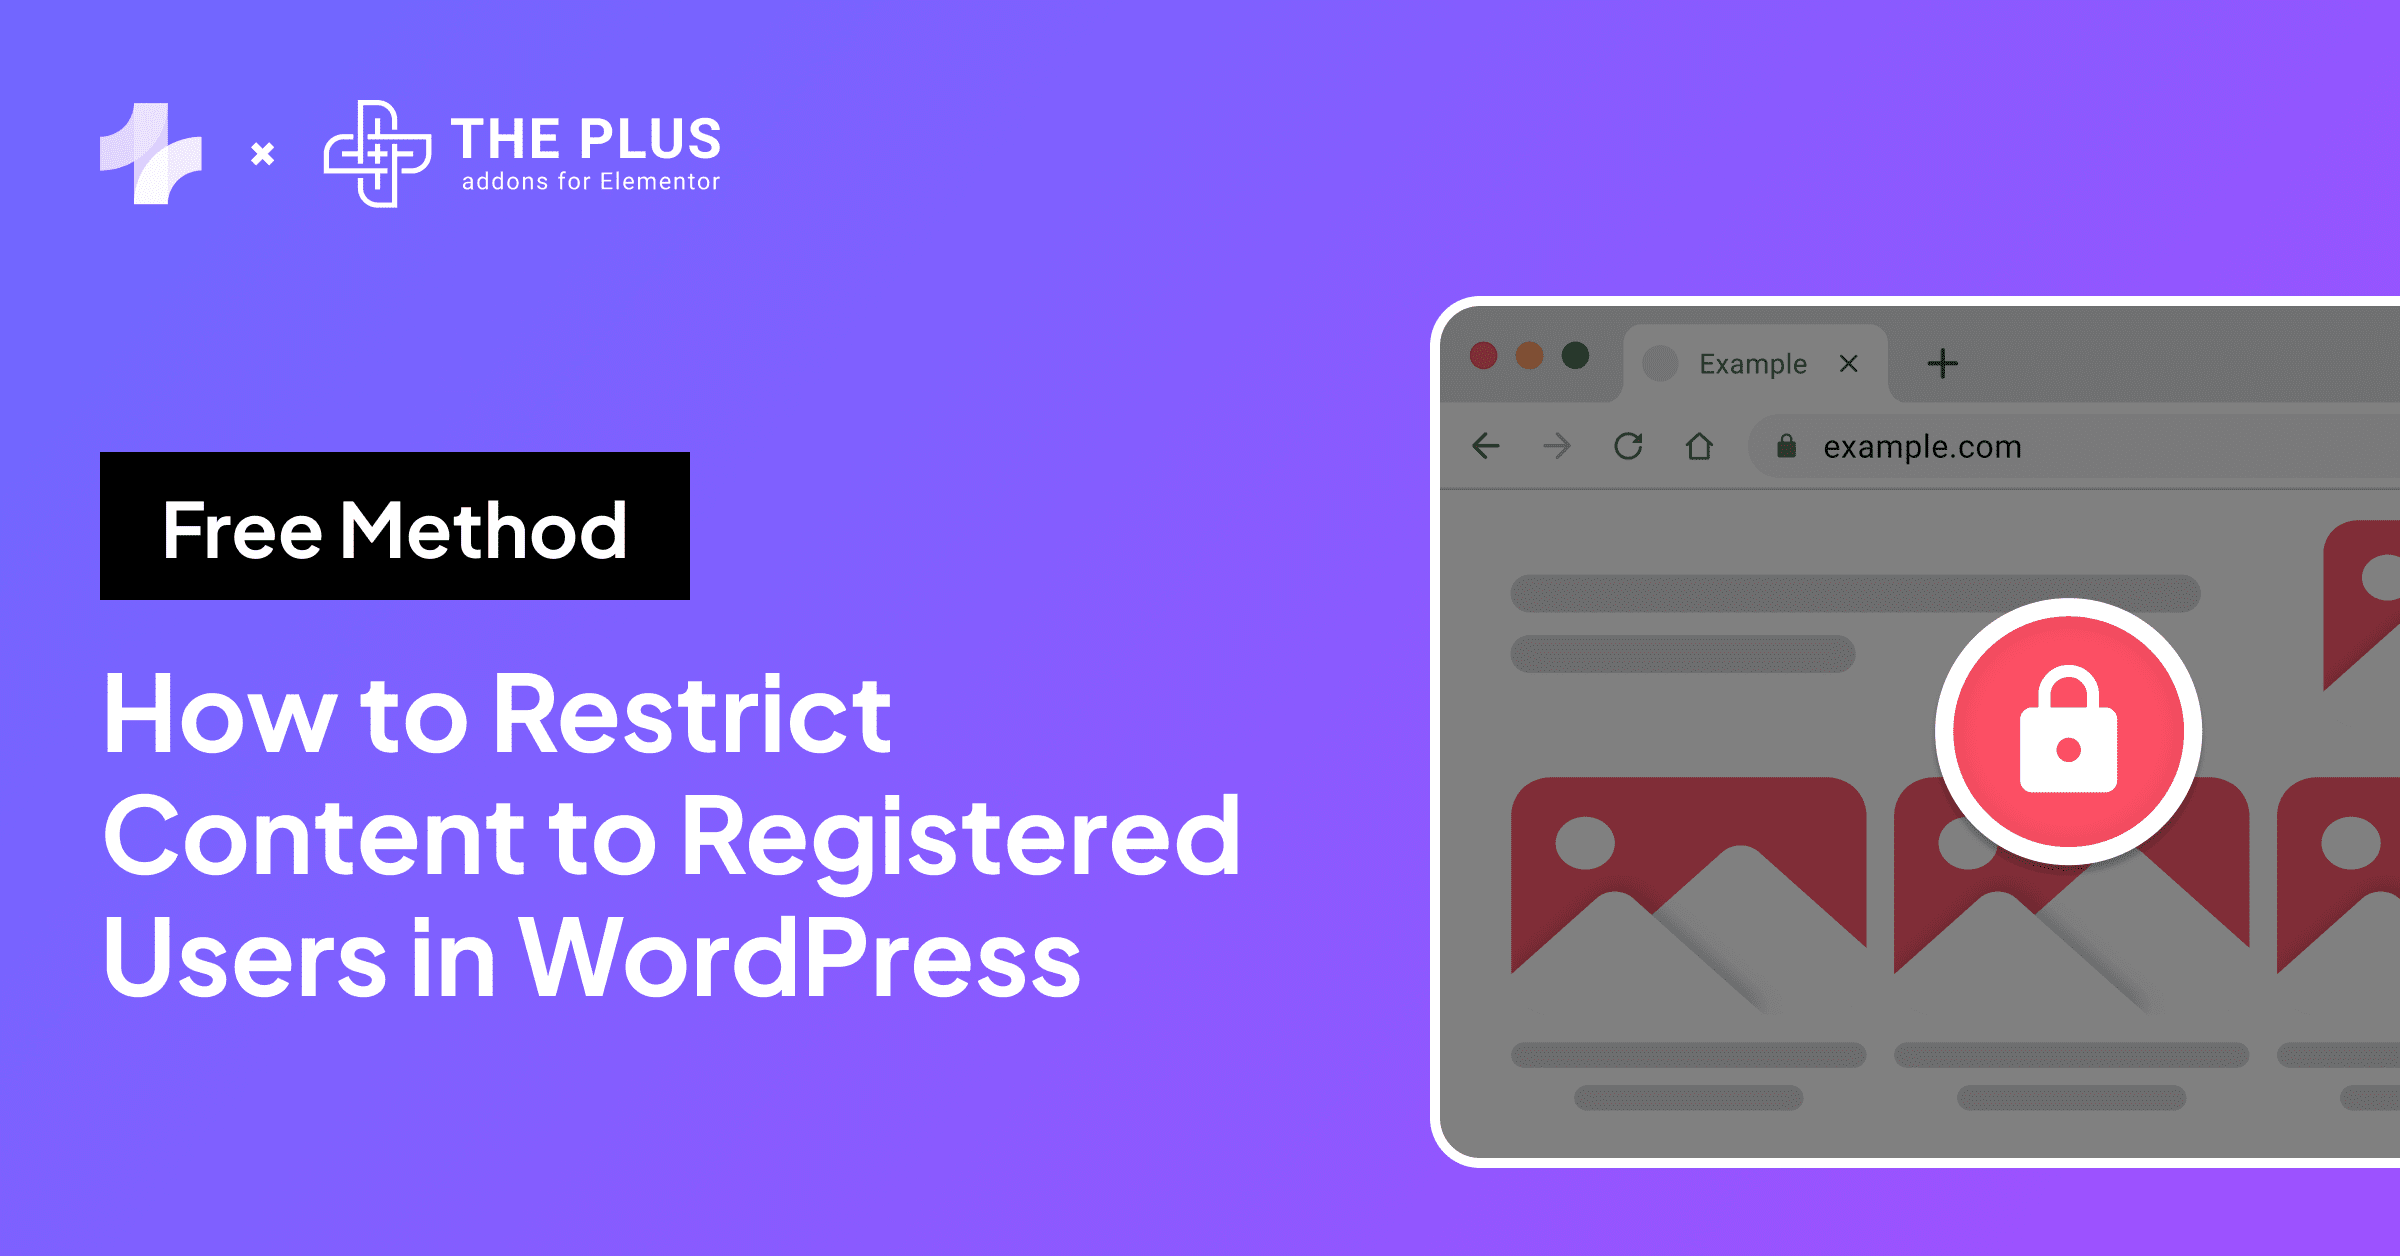
Method 5: Private and Draft Page Visibility Settings in WordPress
Let’s look at how WordPress lets you control visibility without plugins.
WordPress lets you mark pages as Private or save them as Drafts to prevent sensitive content from being visible or indexed.
Step 1: Edit the page
Open the published page or post in the Gutenberg editor. Click the settings option to the top right of the screen, or use the shortcut “Ctrl+Shift+,”.
Step 2: Change Visibility Status
In the sidebar, open Status and Visibility options. Select “Private” or “Draft” as per your preference.
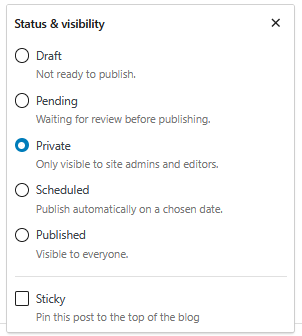
Save your changes by clicking the “Save” button to the top right of your screen. Private pages will only be viewable for logged-in admins and editors.
How to Verify That WordPress Pages Are Hidden from Google
Once you’ve applied one or more of the above methods, it’s important to make sure that the pages are actually hidden.
After you apply one of the methods above, verify whether your page is indexed on Google by trying the following –
- Using the Google Search Console:
Use the URL Inspection Tool to check index status. You can find out more about this tool from here.
- Searching Directly on Google:
Search for “site:yourdomain.com/you-page-name” directly on Google to see if the page still shows.
- Try an SEO Plugin
Plugins like Rank Math will tell you whether a page is indexed on Google or not.
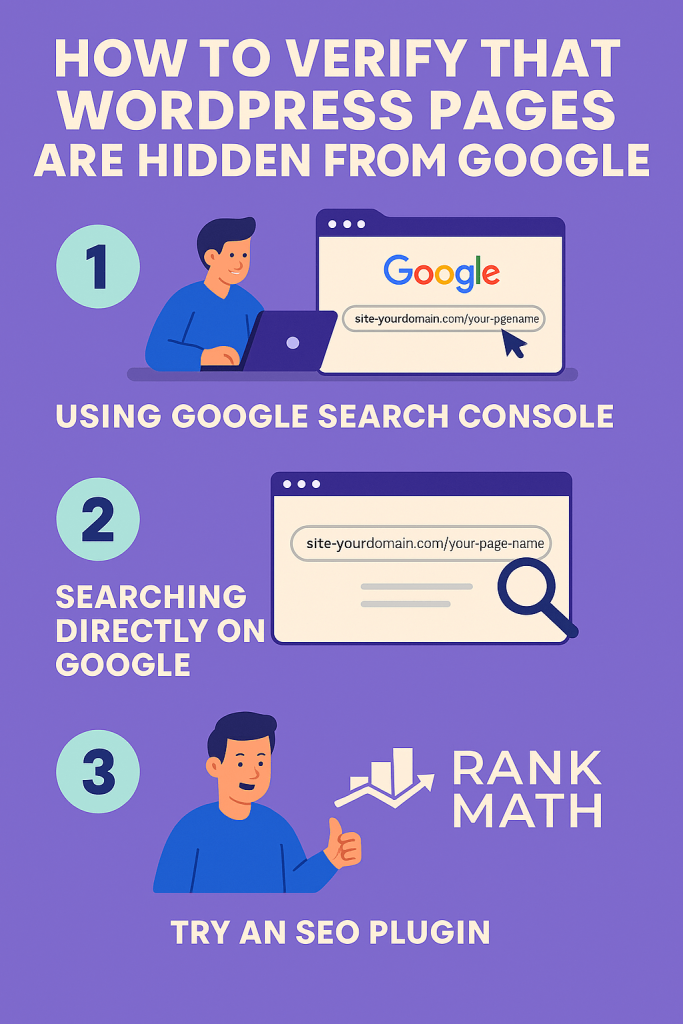
These methods will make sure that your WordPress page does not appear on Google, but verifying on your end is necessary due diligence.
Wrapping Up
Learning how to hide WordPress pages from Google helps you manage SEO, protect privacy, and control what content gets indexed. In this guide, we covered several working methods that you can follow for removing a WordPress page from Google.
If you’re looking for a flexible and powerful way to manage protected content, the Protected Content widget by The Plus Addons for Elementor is an excellent choice.
It’s one of over 120 widgets included in The Plus Addons that help you build better WordPress sites.
Nexter Theme’s Maintenance Mode feature lets you temporarily hide pages during development.
Together, these tools give you the control you need to fine-tune your website’s visibility, but they are only a part of the bigger picture.
With the complete Plus Addons suite, you get complete freedom to design and customize your website, no code required.