If you are a WordPress user, you may have encountered an issue where you see the error: “Allowed Memory Size Exhausted”. This issue is caused by the PHP memory limit, which restricts the amount of memory that WordPress can use.
However, there are several ways to increase WordPress PHP memory limit, Which allows your website to run smoothly and efficiently.
Understanding the PHP Memory Limit in WordPress is crucial to addressing memory issues on your website. The PHP memory limit is a server-side setting that determines the maximum amount of memory a PHP script can use.
In WordPress, this limit is set by default to 40MB, but it can be increased depending on your website’s needs. Identifying Memory Limit Issues is the first step in resolving these issues, as it allows you to assess the severity of the problem and determine the best course of action.
Key Takeaways
- Understanding PHP Memory Limit in WordPress is crucial to solving memory issues.
- Increasing the PHP memory limit can be done by editing WordPress files or utilizing server and hosting settings.
- If memory issues persist, upgrading your hosting plan or optimizing your WordPress site may be necessary.
Understanding PHP Memory Limit in WordPress
If you’re encountering errors like “Fatal error: Allowed memory size of XXXX bytes exhausted” while editing your WordPress website, it could be due to the WordPress PHP memory limit.
PHP memory limit is the maximum amount of memory that PHP scripts are allowed to use on a server. When you run a WordPress website, it requires a certain amount of memory to function properly.
If the website exceeds the PHP memory limit, it will result in errors and crashes.

Several factors can cause the PHP memory limit to be exceeded, such as using poor-quality plugins, running large scripts, or having a lot of media content on your website.
To identify if you are facing a WordPress memory limit error, use the Site Health tool available in the WordPress dashboard.
This tool can help you identify issues with your website, including memory limit issues. It can also provide you with recommendations on how to fix the issues.
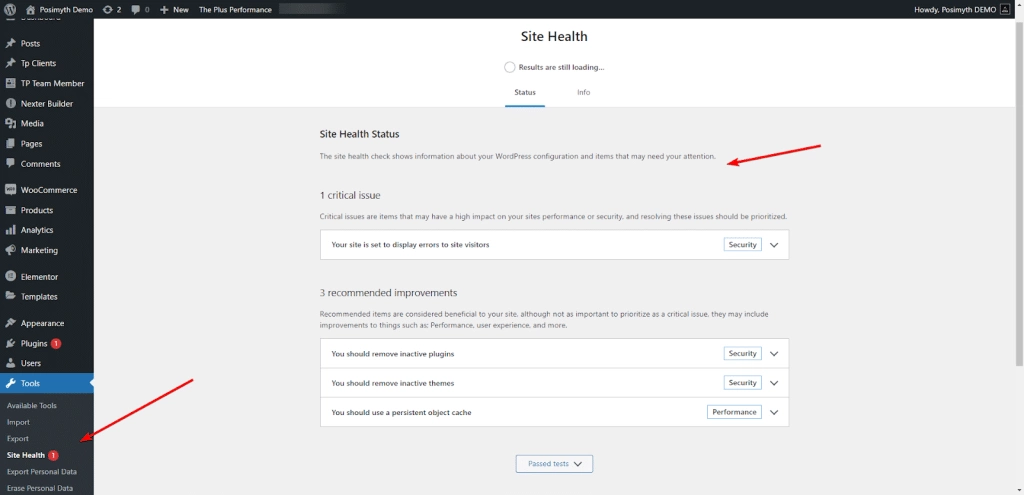
To avoid these errors, it’s important to understand how to increase memory limit WordPress.
How to Increase PHP Memory Limit in WordPress?
Increasing the PHP memory limit is another way to fix memory limit issues. Methods to increase the PHP memory limit in WordPress:
- Increasing PHP Memory Limit via wp-config.php
- Adjusting PHP Memory Limit via .htaccess
- Modifying PHP Memory Limit via php.ini
- Utilizing Server and Hosting Settings
It is recommended to increase the memory limit to at least 256MB to ensure that your website can handle larger scripts and media content.
Method 1: Increasing PHP Memory Limit via wp-config.php
One of the easiest ways to increase the WordPress PHP memory limit is by editing the wp-config.php file. This file is located in the root directory of your WordPress installation.
Before making any changes to this file, it is recommended that you create a backup copy.
To increase wp memory limit, you will need to add the following line of code to the wp-config.php file:
define( 'WP_MEMORY_LIMIT', '256M' );

define('WP_MAX_MEMORY_LIMIT', '256M');
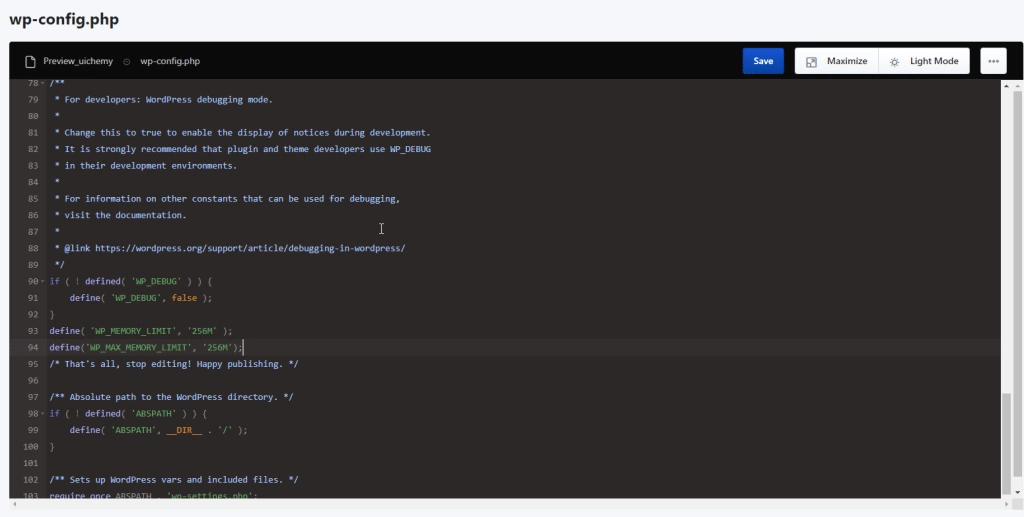
This code sets the PHP memory limit to 256 megabytes. You can increase or decrease this value as needed. For instance, if you want to increase it to 512m, then you’ll have to use this code – define( ‘wp_memory_limit’, ‘512m’ );
It is important to note that this method may not work on all hosting environments. If you are unable to increase the PHP memory limit via the wp-config.php file, you may need to contact your hosting provider for assistance.
Method 2: Adjusting PHP Memory Limit via .htaccess
If you want to increase the PHP memory limit for your WordPress site, you can do so by editing the .htaccess file.
The .htaccess file is a configuration file that controls how your website behaves on the server. You can use it to modify various settings, including the Elementor memory limit.
To adjust the .htaccess memory limit, follow these steps:
- Connect to your website using an FTP client like FileZilla.
- Locate the .htaccess file in the root directory of your website.
- Download a copy of the .htaccess file to your computer as a backup.
- Open the .htaccess file in a text editor.
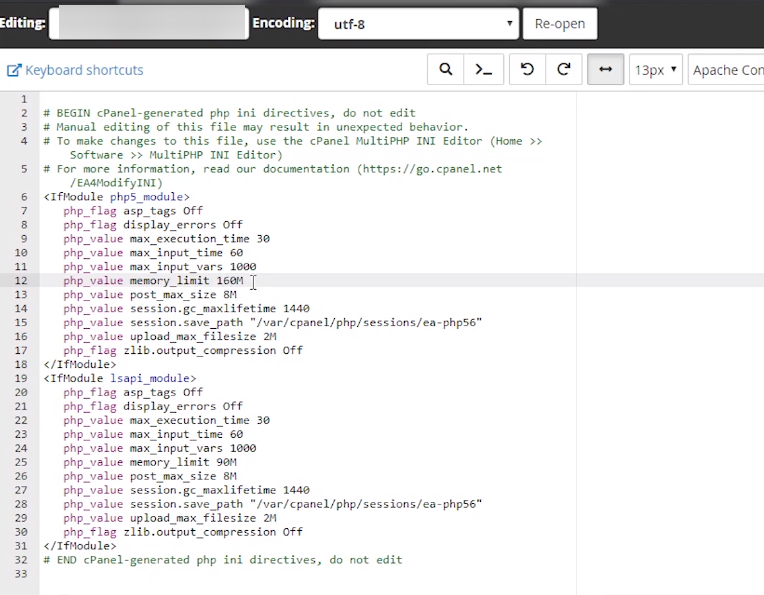
Add the following line of code to the file:
php_value memory_limit 256M
- Replace “256M” with the desired memory limit. You can set it to any value that your hosting provider allows.
- Save the .htaccess file and upload it to your website.
Once you have made these changes, the PHP memory limit for your WordPress site will be increased. You can check the current memory limit by installing a plugin like WP Memory Usage.
It is important to note that not all hosting providers allow you to modify the PHP memory limit via .htaccess. If you are not sure whether your hosting provider allows it, you should contact their support team for assistance.
In addition, modifying the PHP memory limit via .htaccess may not work for all scripts. Some scripts may override the memory limit set in .htaccess, so you may need to modify the memory limit in the script itself.
Overall, adjusting the PHP memory limit via .htaccess is a simple and effective way to increase the memory limit for your WordPress site. It can help improve the performance of your site and prevent memory-related errors.
Are you facing issues while loading GIFs on your website? Check out this detailed blog on How to Fix WordPress GIF Not Playing for proven solutions.
Method 3: Modifying PHP Memory Limit via php.ini
If you want to increase the PHP memory limit for your WordPress website, you can modify the php.ini file. The php.ini file is a configuration file for PHP that contains various settings, including the memory limit.
Here’s how you can modify the PHP memory limit via php.ini:
- Locate the php.ini file: The location of the php.ini file varies depending on your server configuration. You can find the location of the php.ini file by creating a PHP file with the following code:
<?php phpinfo(); ?>
- Upload the file to your server and access it via your web browser. Look for the “Loaded Configuration File” section to find the location of the php.ini file.
- Open the php.ini file: Once you have located the php.ini file, open it in a text editor.
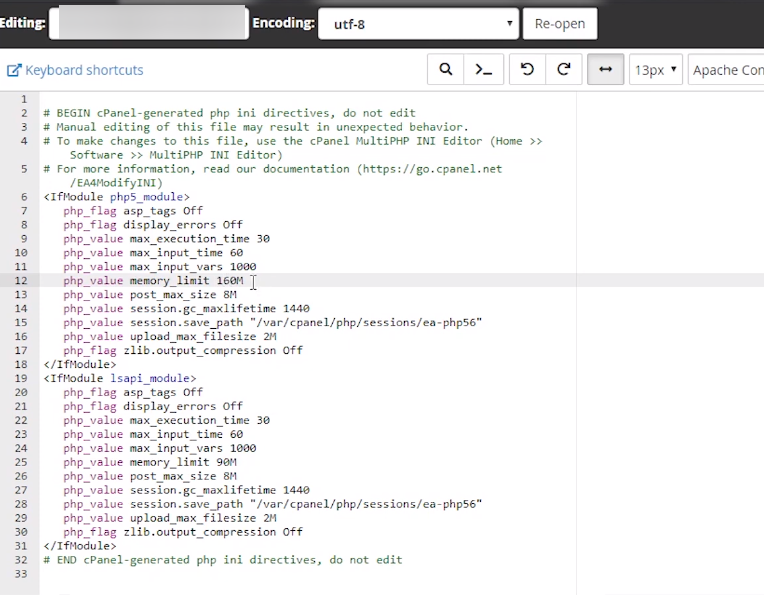
- Find the memory_limit setting: Use your text editor’s search function to find the memory_limit setting in the php.ini file.
Increase the memory limit: Change the value of memory_limit to the desired memory limit. For example, if you want to increase the memory limit to 256MB, change the value to:
memory_limit = 256M
- Save the php.ini file: Save the changes to the php.ini file and upload it to your server.
- Verify the new memory limit: To verify that the new memory limit has been applied, create a PHP file with the following code:
<?php phpinfo(); ?>
- Upload the file to your server and access it via your web browser. Look for the “memory_limit” setting to verify that the new memory limit has been applied.
Remember that modifying the php.ini file may not work on all hosting environments. If you are unable to modify the php.ini file, you can try increasing the memory limit via other methods, such as modifying the .htaccess file or using a plugin.
Method 4: Utilizing Server and Hosting Panel Settings
If you are using shared hosting, your hosting provider may have set a limit on how much memory you can use. However, some hosting providers allow you to increase your PHP memory limit through their control panel or by contacting their support team.
If you can access cPanel, use the MultiPHP INI Editor to increase your PHP memory limit.
Navigate to the “Software” section and click “MultiPHP INI Editor.” From there, select the domain you want to modify and adjust the memory limit value to your desired limit.
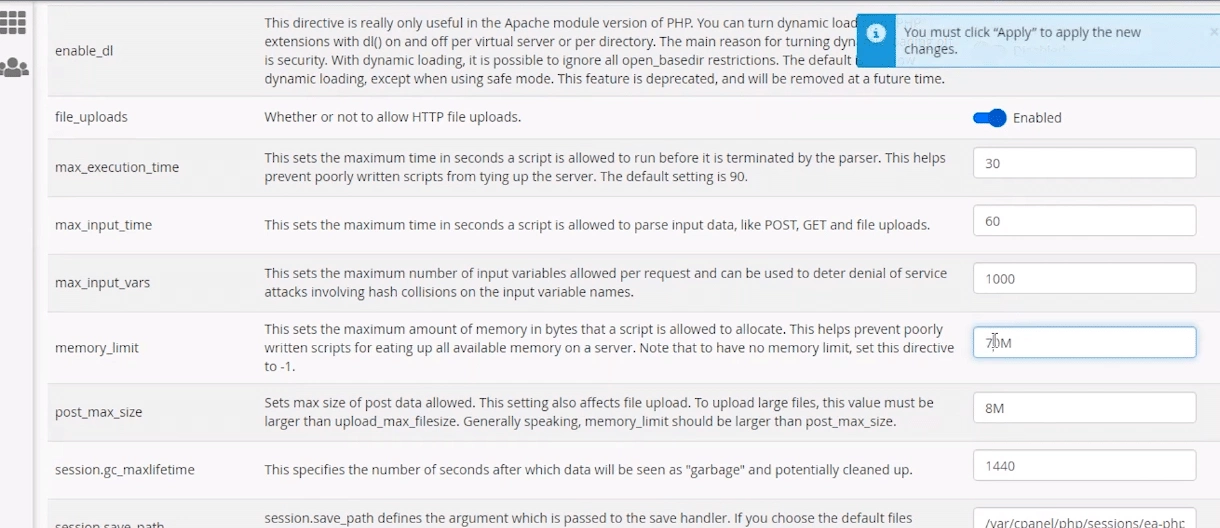
If you are on a shared hosting plan and do not have access to cPanel, you can try contacting your hosting provider’s support team to request an increase in your PHP memory limit. Some hosting providers may be willing to increase your limit upon request.
If you are on a dedicated server or have root access to your server, you can adjust the memory_limit value in your php.ini file.
However, it is important to note that making changes to your server settings can be risky and should only be done by experienced users.
Overall, utilizing server and hosting settings can be an effective way to increase your PHP memory limit.
Whether you have access to cPanel or need to contact your hosting provider’s support team, there are options available to help you increase your limit and improve the performance of your WordPress site.
If you’re an Elementor user and are facing panel loading issues, then we recommend you check our 20+ ways to fix loading Elementor panels.
How to verify if the PHP Memory Limit has been Increased or Not?
If you’ve recently increased your PHP memory limit, you’ll want to verify that the change has taken effect. Here’s how to do it using the Site Health Server Info method:
- Log in to your WordPress dashboard and go to the Site Health section.
- Click on the Info tab.
- Scroll to the Server section and look for the PHP Memory Limit setting.
- If the value has increased to the amount you set, the change has taken effect.
- If the value has not increased, then the change may not have been saved correctly. Double-check your steps and try again.
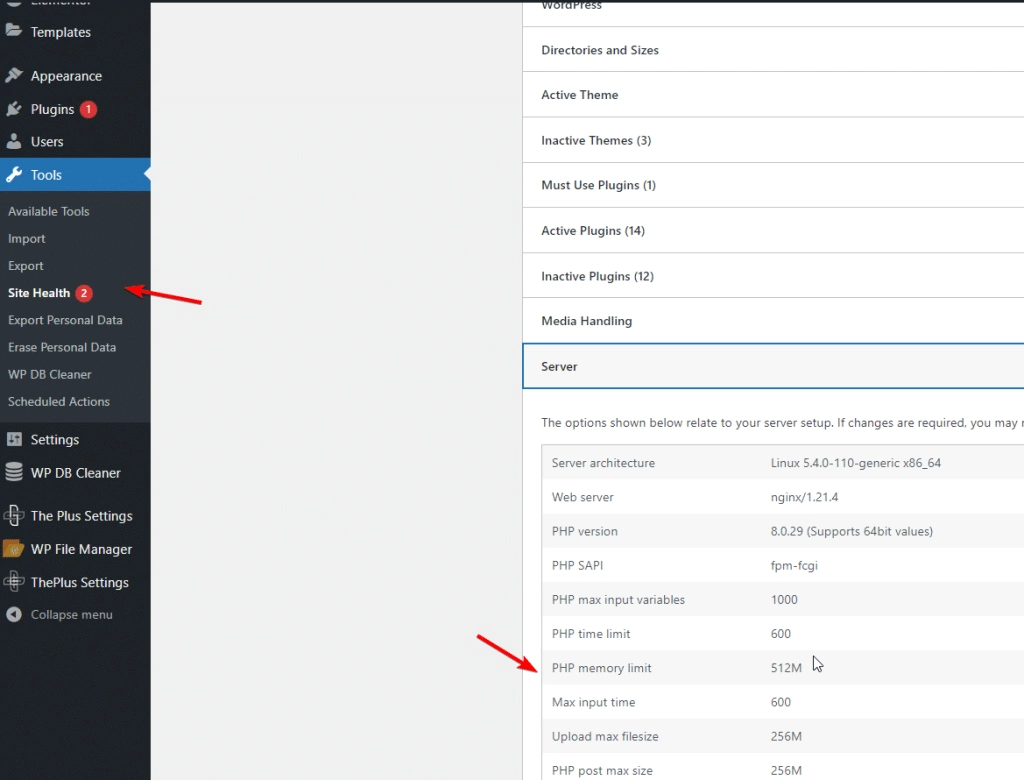
By using the Site Health Server Info method, you can quickly and easily verify whether or not your PHP memory limit has been increased. This is an important step to take if you’re experiencing issues with your site’s performance, as increasing the memory limit can help to alleviate these problems.
Do you want to integrate your Gutenberg blocks into the Elementor page builder? Check this step-by-step tutorial on How to Display Gutenberg Block in Elementor.
Still Dealing with Persistent Memory Limit Issues?
If you have tried all the methods to increase your WordPress PHP memory limit and are still experiencing issues, it might be time to consider upgrading your hosting plan. Upgrading your hosting plan can give you access to more RAM and resources, which can help resolve the memory limit error.
Before upgrading, you need to determine the current hosting plan you are using. If you are on a shared hosting plan, you might be limited in terms of the amount of RAM and resources you can access. Upgrading to a higher hosting plan can give you more resources to work with.
To upgrade your hosting plan, you need to contact your hosting provider. Most hosting providers offer different hosting plans with varying resources and features. You can choose a plan that suits your needs and budget.
When upgrading your hosting plan, make sure to consider the amount of RAM you need. RAM is a crucial factor in determining the performance of your website. The more RAM you have, the faster your website will load.
Once you have upgraded your hosting plan, you must update your hosting account details. Your hosting provider will provide you with new login details to access your hosting account. Make sure to update your website’s settings to reflect the changes.
Further Read: Want to create a single page website easily? Check this step-by-step guide on How to Create One Page Navigation in Elementor.
FAQs about How to Increase WordPress PHP Memory Limit
How to check WordPress memory limit?
How to increase PHP memory limit in WordPress Godaddy?
Log in to your GoDaddy account and go to your cPanel dashboard.
Click on the Select PHP version option.
Click on the Switch To PHP Options button.
Find the memory_limit option and increase it to the desired amount.
Click on the Save button to apply the changes.
How do I increase PHP memory limit in WordPress?
Edit the wp-config.php file and add the following line of code: define(‘WP_MEMORY_LIMIT’, ‘256M’);
Edit the .htaccess file and add the following line of code: php_value memory_limit 256M;
Edit the php.ini file and change the memory_limit value to the desired amount.
How to increase the memory limit in PHP code?
ini_set(‘memory_limit’, ‘256M’);
This will set the memory limit to 256MB.
How to fix maximum upload and PHP memory limit issues in WordPress?
Increase the PHP memory limit using one of the methods mentioned above.
Increase the maximum upload file size limit by editing the .htaccess file or using a plugin like Increase Maximum Upload File Size.
Use an image optimization plugin to reduce the file size of your images.
How do I increase the memory limit to 512MB in WordPress?
define(‘WP_MEMORY_LIMIT’, ‘512M’);
This will set the memory limit to 512MB.


