If you’re looking to make Elementor columns, sections, and Flexbox containers clickable for free, then you’re in the right place.
The Plus Addons for Elementor offers a simple and effective solution to this problem with its Wrapper Link feature. With this feature, you can easily add custom links to any Elementor element, including columns, sections, and containers.
In this article, we’ll discuss how you can add custom links to your columns, sections, and containers for free through a step-by-step approach.
Key Takeaways
- The Plus Addons for Elementor offers a free solution to make your Elementor columns, sections, and containers clickable.
- Understanding Elementor and its components is crucial to making the most of this powerful page builder.
- To add custom links to your Elementor elements, make sure you have the latest version of Elementor and The Plus Addons for Elementor installed, and use the Plus Extras: Wrapper Link feature.
Why Should You Make Elementor Columns, Sections and Containers Clickable?
Making Elementor columns, sections, and containers clickable can significantly enhance user experience and improve website interactivity.
By making these elements clickable, you can create more intuitive navigation for your website visitors. This can lead to increased engagement and a higher likelihood of users interacting with key content, such as calls to action or important information.
Clickable columns, sections, and containers also provide a seamless way to direct users to specific pages or sections within your website.
This can be particularly useful for guiding visitors through a sales funnel or highlighting important features of your products or services.
Elementor have introduced Flexbox containers as an upgrade to the sections. Check this Ultimate Guide on How to Use Elementor Flexbox Container.
How to Make Elementor Columns, Sections & Containers Clickable [with Custom Links]
In this section, we will discuss the steps on how you can make Elementor columns, sections, and container clickable for free:
- Create a New Page on WordPress
- Edit with Elementor
- Add Some Elements to Your Container
- Edit the Container to make it Clickable
- Test it Live
Now lets take a look at each step in detail.
1. Create a New Page on WordPress
Add a new page from WordPress dashboard by navigating from Pages > Add New; or edit an existing page from All Pages.
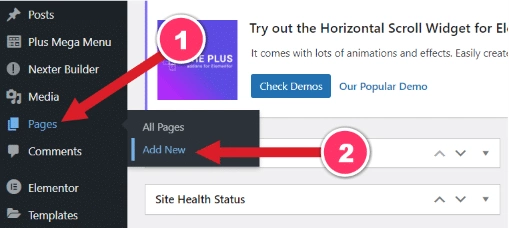
Next, add a title for this page and click on the “Edit with Elementor” button.
2. Edit with Elementor

Looking to create a single page website with better dot or icon navigations? Here’s a quick guide on How to Create One Page Navigation in Elementor.
3. Add Some Elements to Your Container
Now, you need to add some elements to your container. For demonstration in this guide, we have added a heading, image, text editor and a button.
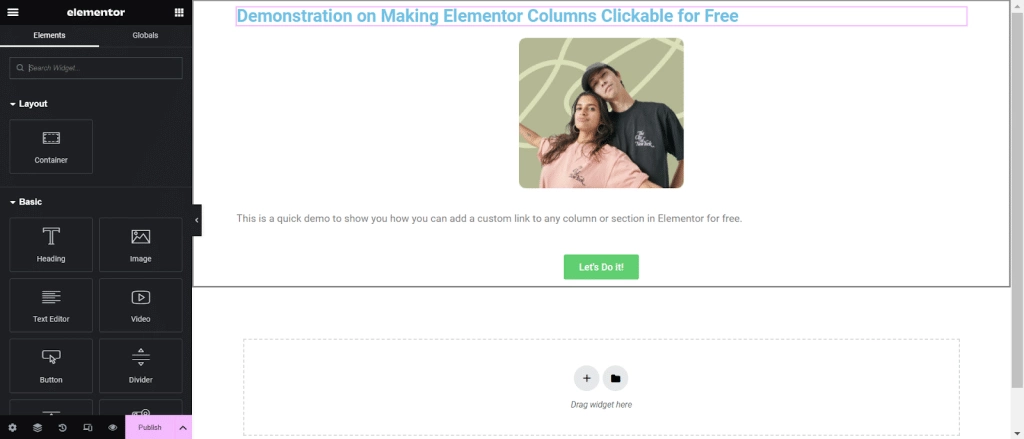
4. Edit the Container to make it Clickable
In order to make the container clickable, you need to edit it. Click on the six dots as shown in the below image to edit your container.
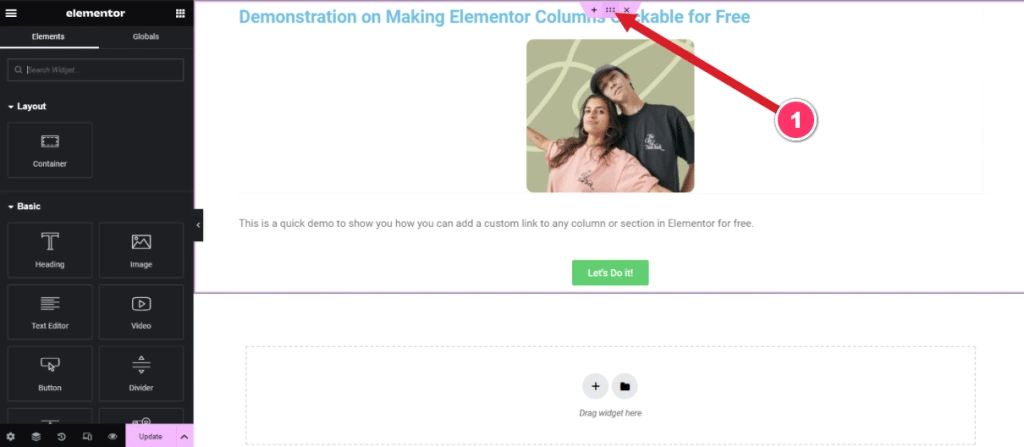
Next, go to the Advanced tab in the left side editor and scroll down to the Plus Extras : Wrapper Link area. Turn the Wrapper Link toggle to Yes and add the link which you wish to add to the container.
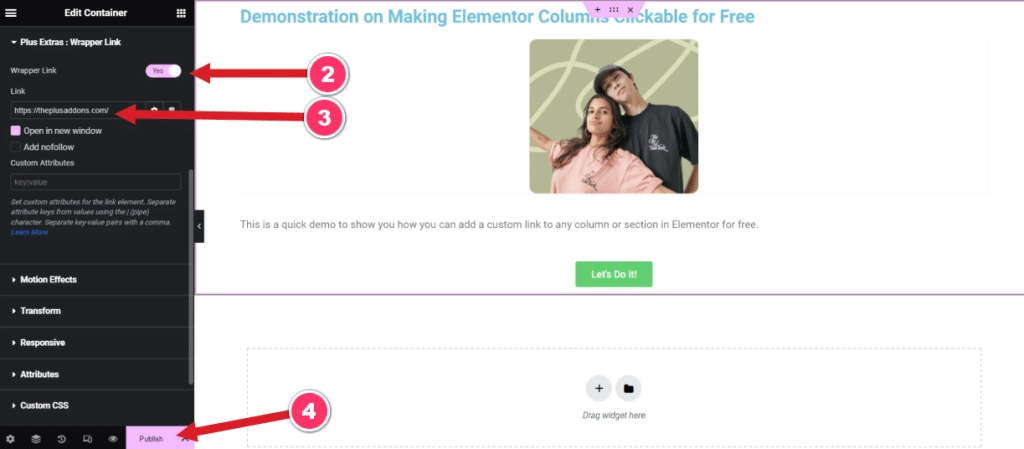
Once done, click on Publish.
5. Test it Live
Now your Elementor container is clickable, you can test it after it is published.
Follow the above same steps for individual columns as well as sections to make them clickable by adding a custom link.
How to Troubleshoot Issues While Making Elementor Columns, Sections & Containers Clickable?
Here are some common issues that might arise and how to fix them:
- The link is not clickable: If the link is not clickable, check if you have added a valid URL to the link field. Also, make sure that the “Enable Link” option is turned on in the Wrapper Link settings. If the issue persists, try disabling other plugins and clearing your browser cache.
- The link opens in a new tab even when “Open in Same Tab” option is selected: This issue might occur due to a conflict with other plugins or themes. Try disabling other plugins and switching to a cleaner WordPress theme like Nexter to see if the issue persists.
Here’s how you can add Custom CSS in Elementor for Free [4 Methods].
Wrapping Up
That wraps up our quick guide on how you can add a custom link to any Elementor column, section or a container for free using the Wrapper Link feature by The Plus Addons for Elementor.
Since you’re an Elementor user, we would highly recommend you to use The Plus Addons for Elementor; this all-in-one plugin offers 120+ Elementor widgets that will help enhance the functionality of your Elementor editor.
Further Read: Did you know you can hide Elementor sections on button clicks? Here’s How To Show or Hide Elementor Sections on Click.
FAQs on Making Elementor Columns, Sections & Containers Clickable
What steps are required to enable clickable containers in Elementor using The Plus Addons?
Install and activate The Plus Addons for Elementor.
Edit the section or container in Elementor.
Go to the Advanced tab and look for the Plus Extras: Wrapper Link option.
Enable the Wrapper Link option and add the URL you want to link to.
Save your changes and preview the page to see the clickable container in action.
