A critical aspect of operating a WordPress website is having a secure WordPress login.
Given how millions of websites use WordPress, its popularity often makes it a prime target of web attacks and security issues.
As a result, your website can be prone to hacking attempts or unauthorized access, which can seriously affect the website’s functionality and performance, put your visitors’ information at risk, and even impact your business reputation and revenue.
So, You need to secure your website and should start from the most common entry point, often exploited by attackers- your WordPress login page.
In this article, we’ll discuss various methods to secure WordPress login pages.
What is a WordPress Login Page?
A WordPress Login Page is a gateway where users authenticate their credentials to access the WordPress dashboard and manage website content.
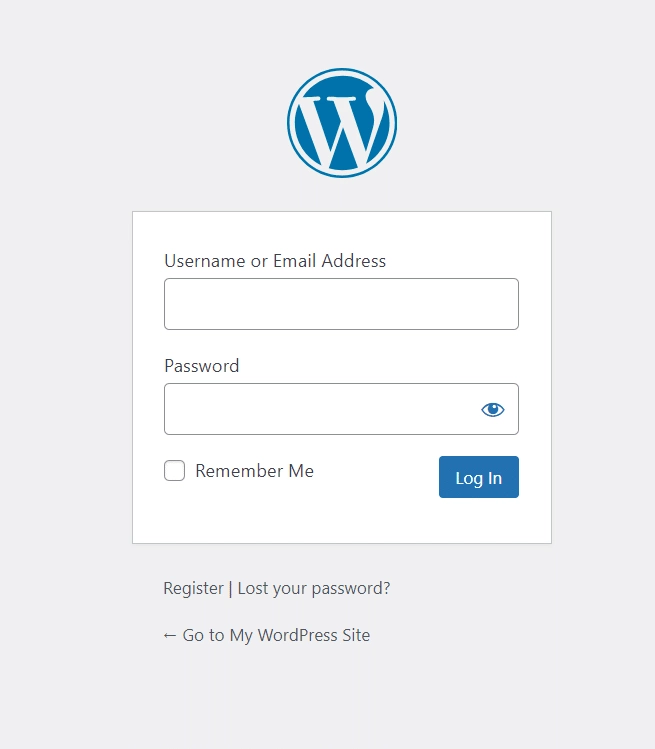
The WordPress login page is common to all websites. It has the same default location, which includes your website domain followed by /wp-admin/ or /wp-login.php.
While the WordPress login page is typically secure, it is still unsafe from outside attacks. For one, certain aspects of the login page are highly predictable, such as the login page URL, adding to its vulnerability.
This makes it easier for the hackers to target a website. Next, WordPress allows unlimited login attempts, making it easier for hackers to bypass WordPress password-protected pages.
However, with the right tools and additional security features, you can easily protect your WordPress wp-login and your website.
Why Should You Secure a WordPress Login Page?
Being a popular CMS platform makes WordPress quite vulnerable to malicious attacks and unauthorized access by hackers. Not to mention, it is a predictable platform, so hackers are familiar with its interface and security features.
They can figure out if a website is outdated and might breach the existing security measures to access the website.
This can not only affect your website performance and functionality but also grant the hackers access to your critical data, hampering your business credibility.
The repercussions can be serious – from monetary loss to impact on your online reputation.
Worried about security threats and malware attacks on your website? Check out the 5 Best Malware Removal Plugins for Virus Protection for your website.
How to Secure WordPress Login Page [Proven Methods]
A few simple methods can help you tighten your website security login and prevent WordPress forced login by hackers.
Let’s discuss them in detail.
1. Change WordPress Admin Login URL
The WordPress admin login URL is a common entry point for hackers to your website.
By default, the URL for logging into WordPress websites is your website domain followed by wp-login.php or wp-admin, making it vulnerable due to its predictability.
To ensure login protection for the admin page, consider manually changing the login URL by gaining FTP access to your website or an even easier alternative is to use a plugin such as the Nexter Extension.
So make sure to install this plugin before proceeding with the steps.
If you’re a visual learner, check this quick tutorial:
Once done, follow these steps to change your admin login URL-
- On your WordPress dashboard, go to Appearance > Nexter Settings > Security
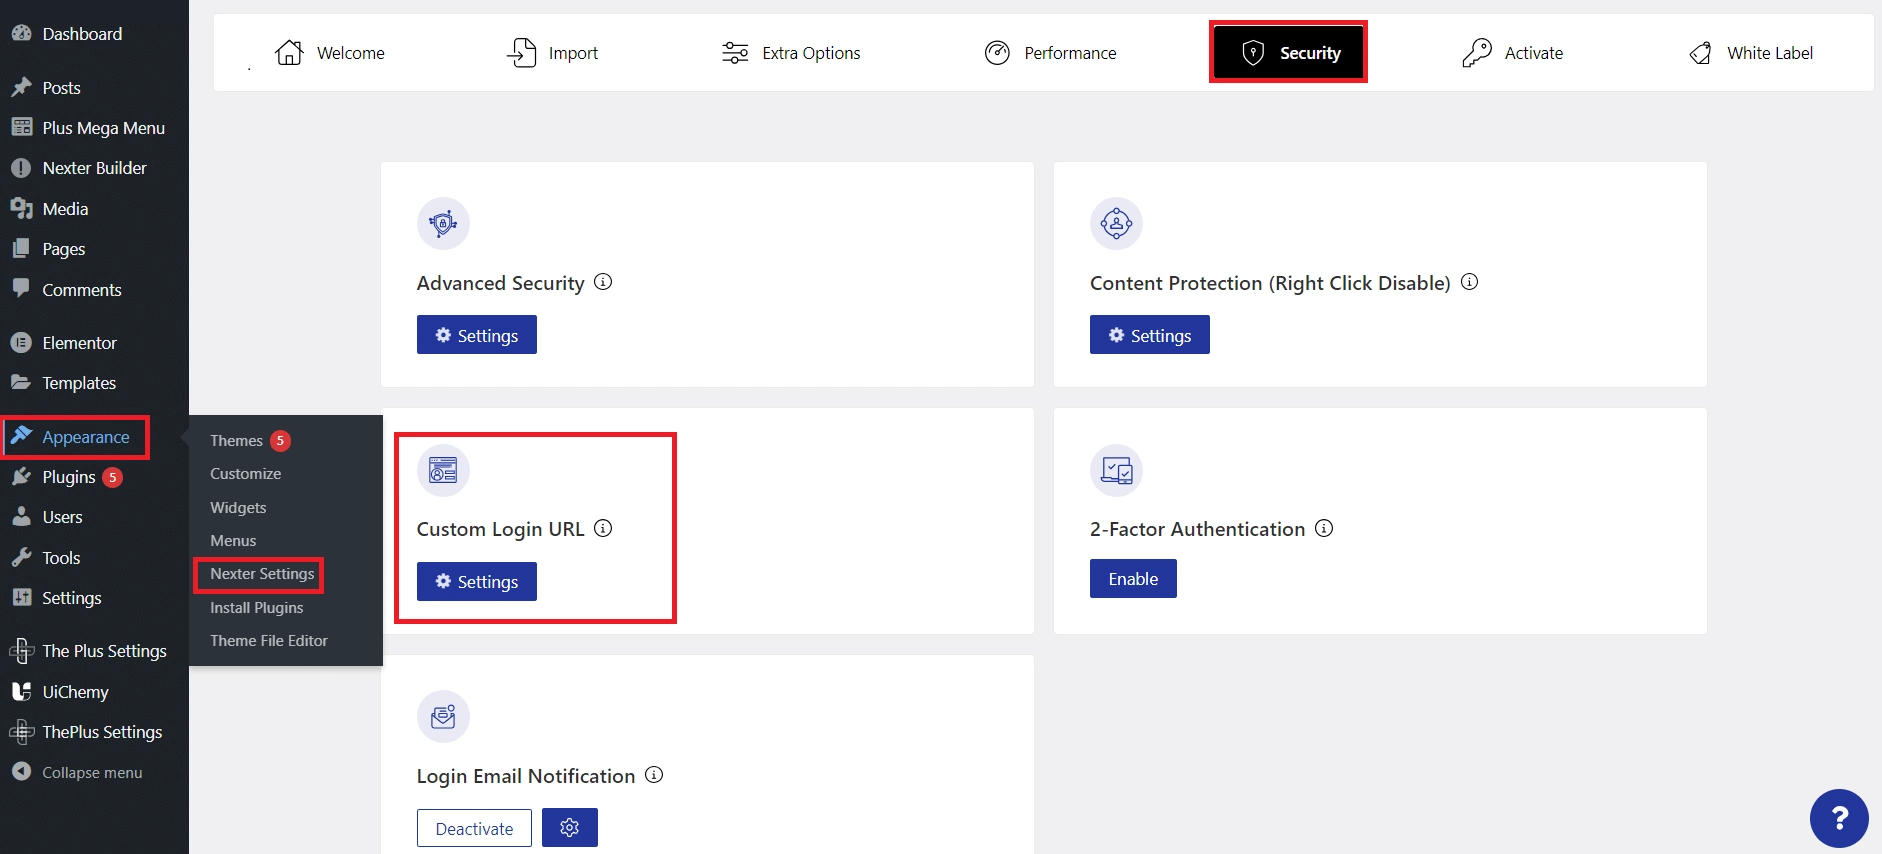
2. Under Custom Login URL, click on Settings
3. In the popup that appears, you will see two options: Change WP Admin Login Path and Login URL Behaviour.
4. Under Change WP Admin Login Path, add your custom URL in the field
5. Hit Save to change your login URL
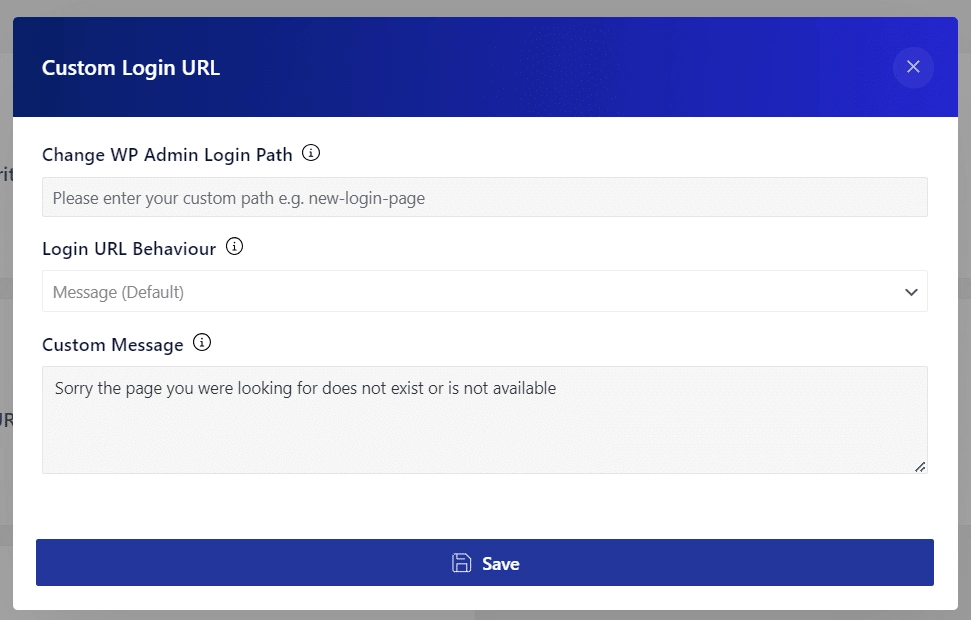
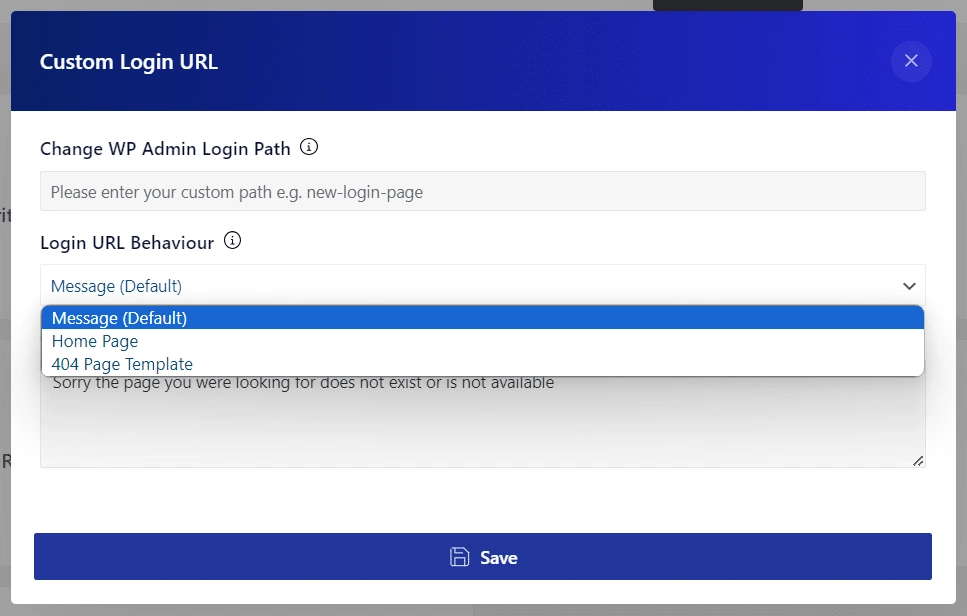
Additionally, under Login URL Behaviour, you can choose particular actions if someone tries to access your old login URL.
In the dropdown, you can choose from three options-
- Message (default): You can show a custom message when a user tries to access your old login
- Home Page: With this, you can redirect the user to your home page
- 404 Page Template: Here, you can redirect the user to a 404-error page
Choose the appropriate login URL behavior and click Save to make the changes.
Did you know, you can completely customize your WP admin login page with custom branding? Here’s how:
2. Use Strong and Unique Passwords
A strong and unique password makes it harder for hackers or bots to identify it, strengthening your WordPress login page security.
Rather than using basic passwords based on names, birthdays, or pets, consider creating one that combines uppercase and lowercase letters, symbols, and numbers.
Here are a few ways in which you can build a strong password-
- Use a password generator: A password generator is an excellent tool for creating strong passwords that are a mix of letters, numbers, and special characters and are difficult to crack.
- Use built-in password tool: WordPress offers a built-in password tool that will suggest and encourage you to keep strong passwords.
- Password manager: Employ a good password manager to generate and manage your passwords so you don’t have to remember them.
- Ensure optimal length: Using longer passwords, typically 12 characters and more, is an easy way to secure WordPress login, as they can be harder to crack.
- Frequent updates: Update your WordPress passwords every few months to ensure the highest security.
3. Add Google reCAPTCHA
Google CAPTCHA is an advanced challenge-response test to identify human and bot users.
Since most WordPress website attacks are initiated using bots, adding reCAPTCHA to your WordPress login page can help block automated traffic to your website and protect it from spam and attacks.
A common type of Google reCAPTCHA involves entering a series of letters/numbers that wouldn’t be easily recognized by a bot. It offers an added layer of security against WordPress force login.
You can add Google reCAPTCHA to your WordPress login page with the Nexter Extension.
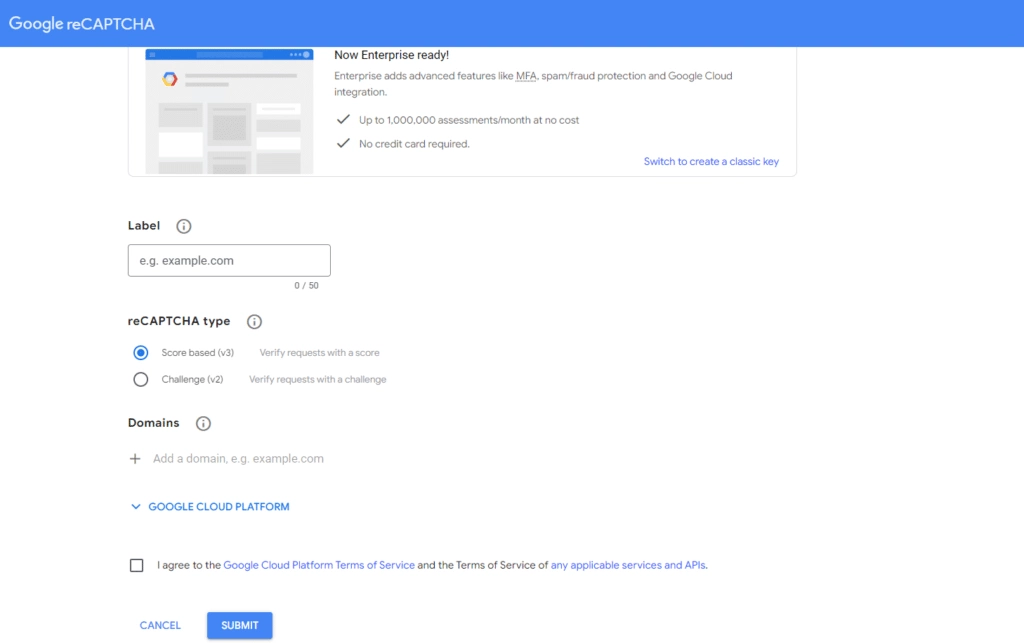
For this, you’ll need to Google the reCAPTCHA site key and secret key. Log in to your Google account and go to the Google reCAPTCHA admin page.
Add a label and your website domain name (without http/https) here. You can also add multiple domain names.
In the reCAPTCHA type, select your suitable reCAPTCHA type and click on Submit.
On the next page, you’ll find your reCAPTCHA site key and Secret key.
Now, to add Google reCAPTCHA using Nexter Extension,
- Go to Appearance > Nexter Settings > Extra Options from the WordPress dashboard
- Navigate to Google reCAPTCHA, click on Enable, and then click on the Gear icon
- In the popup that appears, select the reCAPTCHA version
- Enter your Site key and Secret key in the respective fields
- In the Enable reCAPTCHA section, choose where you want to enable reCAPTCHA on your website
- Hit Save
This will add Google reCAPTCHA to your selected locations on the website for added security.
Looking to enhance the Elementor website’s security for audience forms? Learn How to Add reCAPTCHA to Elementor Form.
Did you know you can add Google reCAPTCHA to various forms on your site? Here’s how:
4. Limit the Number of Login Attempts
Since WordPress allows unlimited login attempts, bots can enter your website using various username and password combinations.
One way to stop this is by limiting the number of login attempts made from a single IP address.
Use a plugin like Limit Login Attempts to limit the number of attempts from one IP. Within the plugin settings, you can specify the maximum number of attempts a user can make before they are locked out and how long until they are locked out.
Further, many web hosts offer this feature built-in. You can also employ website security plugins like Brute Force Login Protection to protect your website against brute force attacks.
Recommended: You can even block certain IP Addresses in WordPress, here’s how:
5. Password Protect your Login Page
While you can secure WordPress login by changing the login URL, hackers might be able to figure out if the wp-admin folder is still accessible and enter your website.
As a result, it is a good idea to add an extra layer of protection by password-protecting the wp-admin folder. You can easily do this with the cPanel of your web host.
Log in to your hosting account and access the cPanel. Go to the Directory Privacy folder and navigate to the public_html/wp-admin file.
There, you’ll find a checkbox- “password-protect this directory.”
Check this box and create a username and password to access the folder.
Save the changes.
If you have moved the location of your login page from wp-admin to another folder, follow the same process and password-protect the folder where your login page is.
6. Add a Security Question to Your WordPress Login Form
Another way to enhance your WordPress login security is by adding a security question to the WordPress login form.
This can make it difficult for hackers to gain access to your website.
For this, use a plugin like No-Bot Registration. On your WordPress dashboard, go to Plugins > Add New to download and activate the plugin.
After activating, go to Settings to set up the plugin and configure where you want to use the security question on the website. For instance, on login, registration, or forgot password pages.
Users will now also have to answer a question after entering the username and password, making your website login more secure.
7. Add Two‑Factor Authentication to WordPress
Two-factor authentication is one of the most secure ways to secure your website, as it requires two steps of identification before granting access to any user.
This method works in addition to your website login credentials. Once you have entered your username and password, a code is generated and sent through an SMS or email that you’ll need to enter before accessing the website.
Two-factor authentication offers added login protection and secures the website from brute force attacks, as bots cannot determine the second key.
A simple way to enable two-factor authentication is to use a 2FA plugin for your website.
Alternatively, you can also enable two-factor authentication from Nexter Extension. Simply go to Appearance > Nexter Settings > Security and enable 2-Factor Authentication to get started.
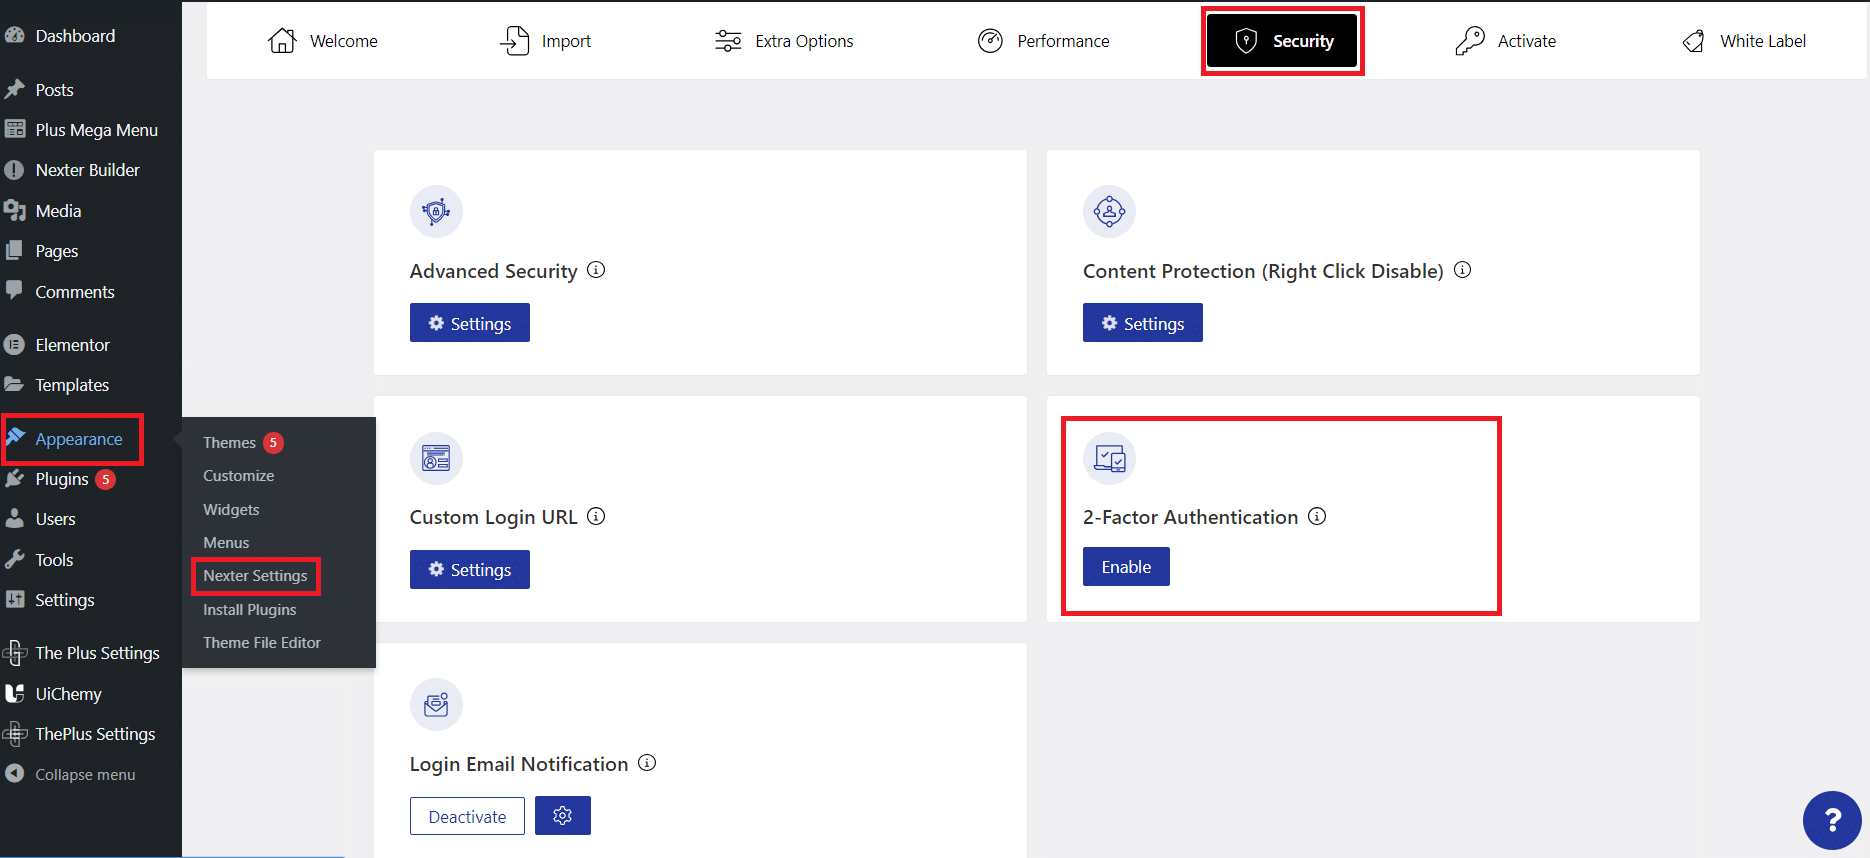
In case you’re a visual learner, here’s a quick tutorial:
8. Send Login Email Notification
If you’re using the Nexter Extension theme for your website, you can also enable login emails to ensure authorized access only.
To enable this feature, go to Appearance > Nexter Settings > Security on your WordPress dashboard.
Scroll down to the Login Email Notification section, select Enable, and click on the Gear icon that appears.
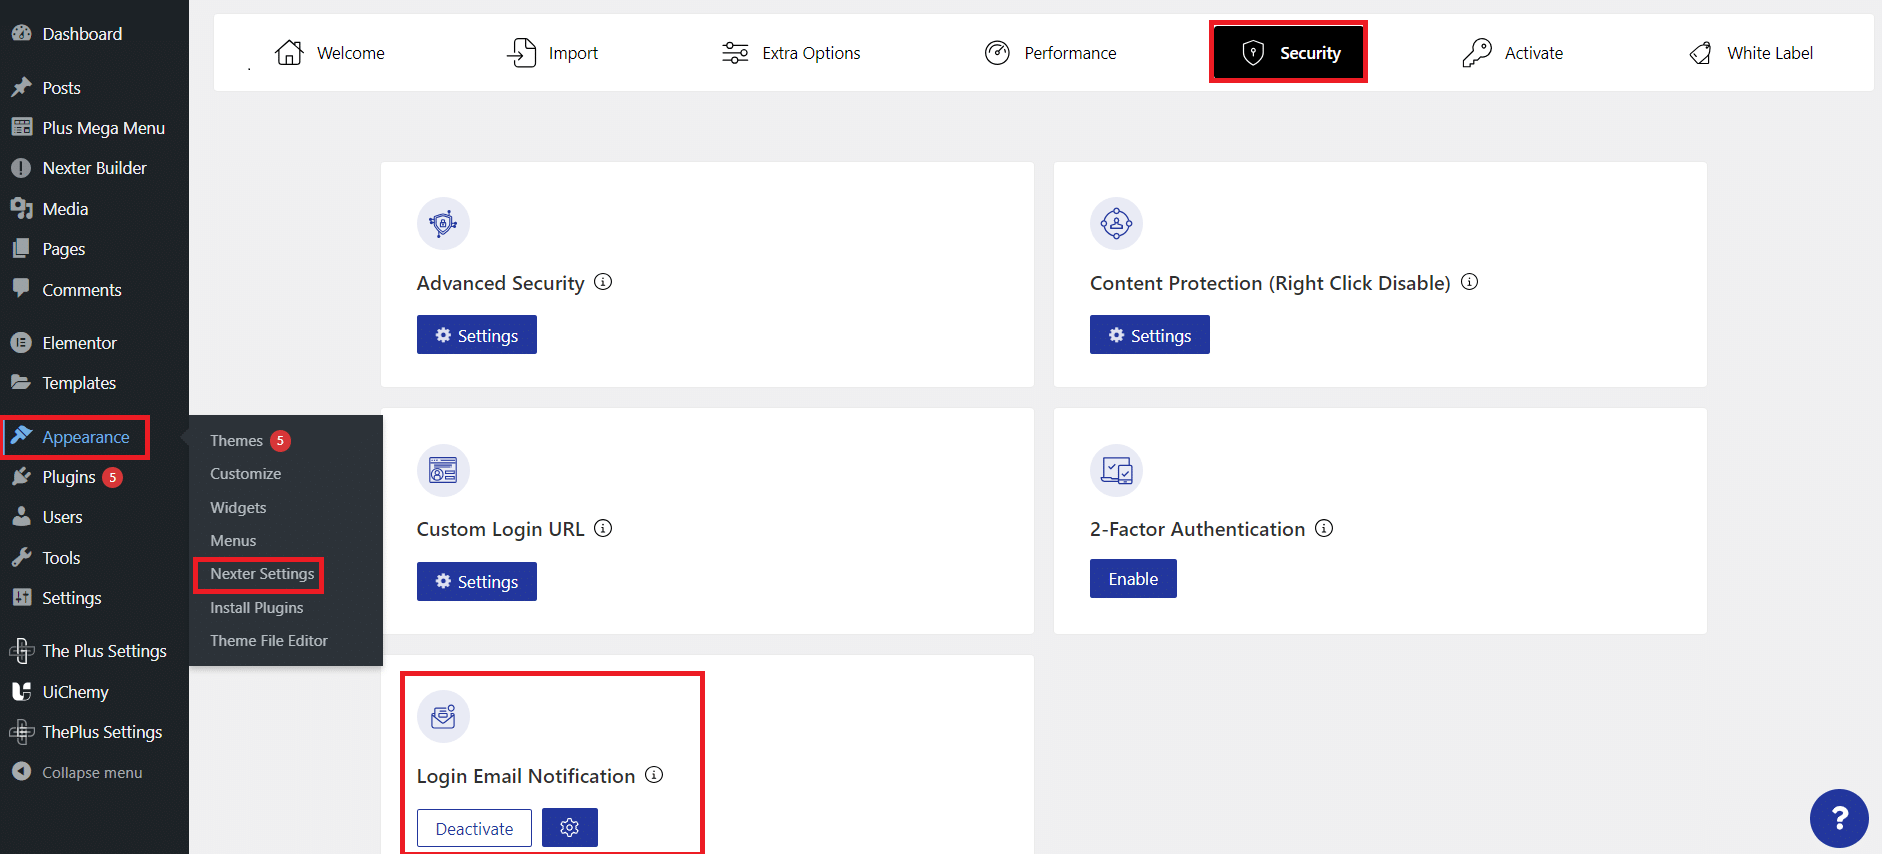
In the popup, select the users by user role who will get the email notification under the Who Get Alert section.
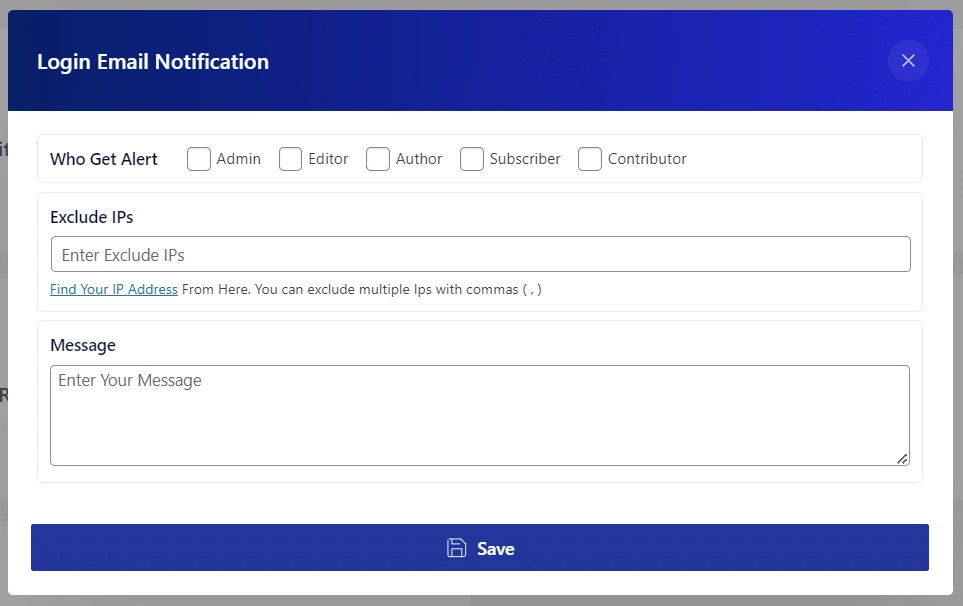
Next, in the Exclude IPs field, you can exclude specific IPs from getting the email and add a custom email message in the Message field.
Click on Save once done.
With this feature, the selected users will receive an email notification whenever someone logs into the website.
Here’s a video tutorial if you prefer to learn visually:
9. Disable WordPress Login Hints After Failed Login Attempts
If you’ve enabled login hints on your WordPress website, they can be useful if you get the username or password wrong.
When a wrong username is entered, you typically receive an error message that reads, “The username is not registered on the site. If you are unsure of your username, try your email address instead”.
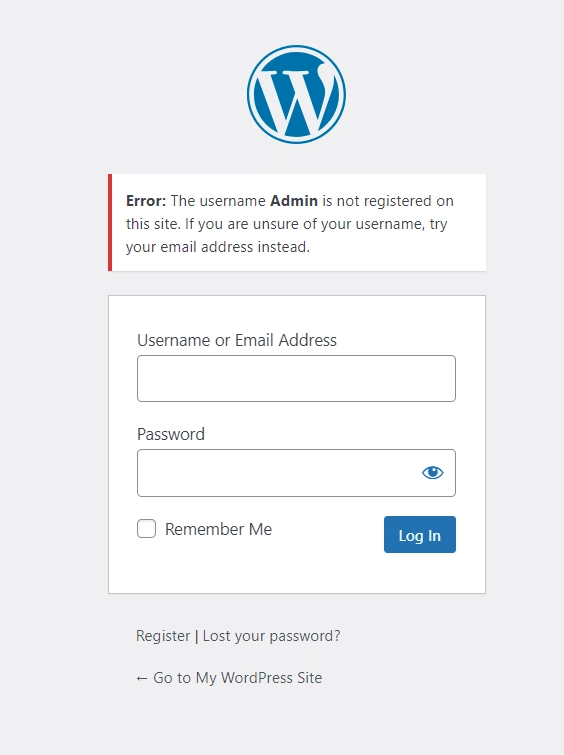
Similarly, if you type in the wrong password, it will show another error message that the password is incorrect for the username.
These hints can give a lot of information to hackers about your website credentials.
To remove these login hints, you need to add the following lines of code to your website’s functions.php file-
function no_wordpress_errors(){

return 'There is an error.';

}

add_filter( 'login_errors', 'no_wordpress_errors' );
Now, when someone enters the wrong username or password to the website login, it will show a “There is an error” message instead of the default message.
10. Delete and Remove Unused Plugins and Themes
While plugins and themes are essential to enhance your website’s functionality, using outdated ones can open your website to attack.
Even the deactivated themes and plugins pose a potential risk as the code still resides on the server, and the hackers can use this information to gain access to your website.
As a result, delete any unused themes and plugins and update them regularly to enhance the website’s security.
Here’s how you can find and delete unused themes and plugins on your website-
- Make a backup of your website files and database
- Log in to your WordPress dashboard and go to Plugins
- Check the list of installed plugins in your WordPress environment and identify the ones that are not in use
- Click Deactivate and then Delete to remove unused plugins
- Also, look for any plugins that need to be updated
- Follow this process for the WordPress themes
Doing this will help you ensure that your website is always up-to-date and safe from potential security attacks.
PRO TIP ✅
Disable Elementor widgets that are no longer in use to improve website performance. Learn How to Disable and Hide Unused Elementor Widgets.
11. Use a WordPress Security Plugin
A high-quality WordPress security plugin should be able to manage all your website security concerns with ease.
A comprehensive security plugin should be able to scan your site for malware, prevent any attacks, offer login security tools, and create a firewall against unauthorized access.
You can find various security plugins from the WordPress repository that can offer you all these features and more to protect your website and WordPress login page from malicious attacks.
Want additional tips on how to secure your WordPress website? Check this quick tutorial:
Wrapping Up
Running a WordPress website requires you to stay on top of the potential security threats and vulnerabilities affecting your website.
Since the WordPress login page is one of the most common entry points to your website, securing it with a strong password, using two-factor authentication, and limiting the number of login attempts are great starting points.
You can also secure your WordPress login with a custom admin login URL, Google reCAPTCHA, and login notifications to your email using the Nexter Extension.
All the methods mentioned in this article are extremely simple and will take only a few minutes to set up and secure your WordPress login page.
Once you have successfully secured your WordPress login, download and install The Plus Addons for Elementor to take your Elementor website functionality to a new level.
