Social media has become an integral part of our lives and businesses, and integrating social media feeds into your website can bring several benefits. Not only does it add social proof, but it also provides fresh and relevant content to your website, increasing engagement and keeping visitors informed about your social media activity.
The Social Feed widget from The Plus Addons for Elementor can help you add feeds from Facebook, Instagram, X (formerly Twitter), YouTube, and Vimeo to your Elementor website.
Check the Live Widget Demo
Required Setup
- Elementor FREE Plugin installed & activated.
- You need to have The Plus Addons for Elementor plugin installed and activated.
- This is a Premium widget, and you need the PRO version of The Plus Addons for Elementor.
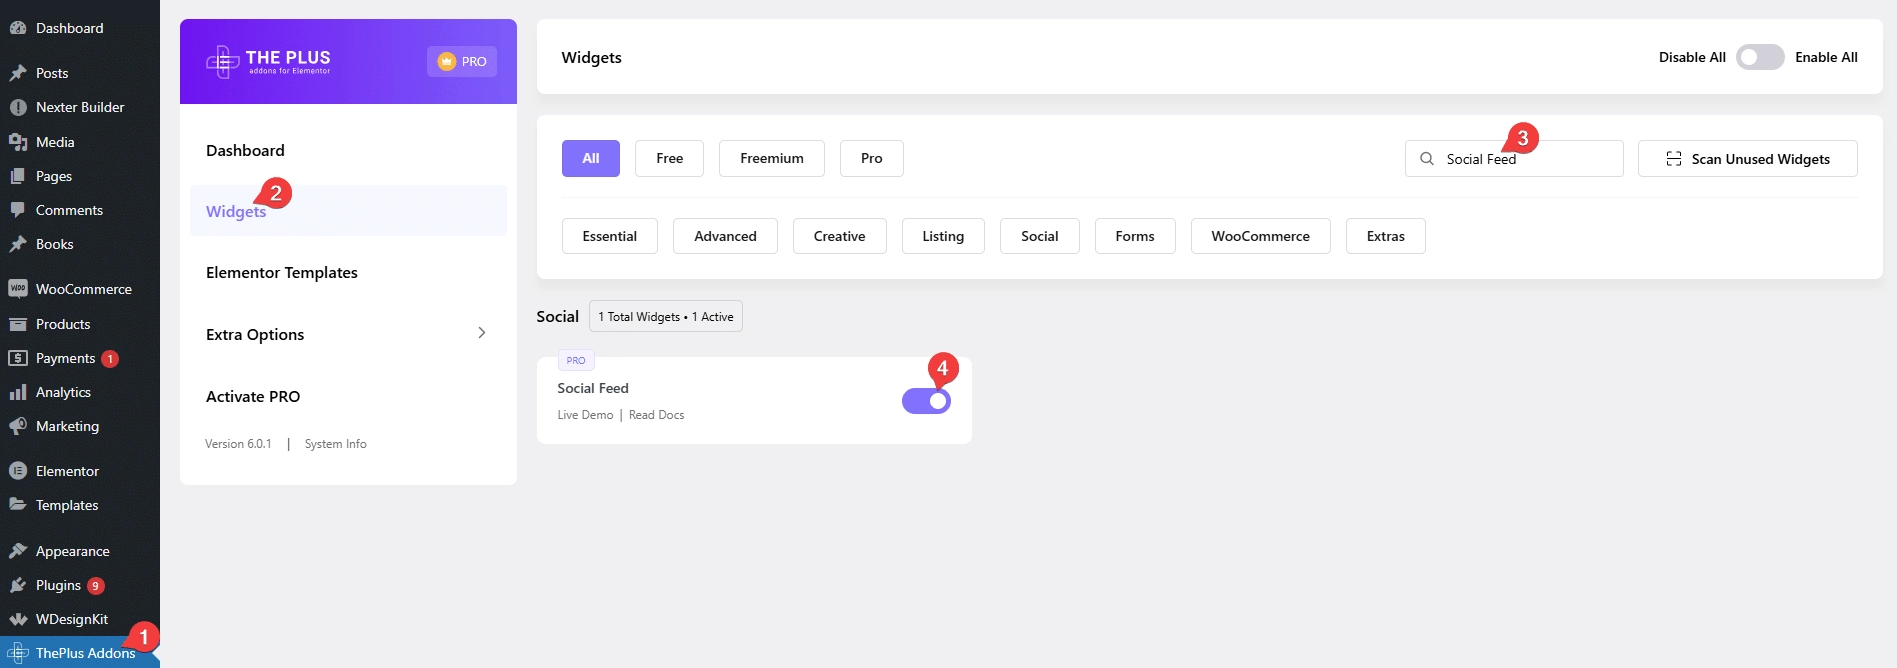
- Make sure the Social Feed widget is activated, to verify this, visit The Plus Addons → Widgets → and Search for Social Feed and activate.
Learn via Video Tutorial:
How to Activate the Social Feed Widget?
Go to
- The Plus Addons → Widgets
- Search for the widget name and turn on the toggle.
Key Features
- Multiple Layout and Style – You’ll get three different layout options, Grid, Masonry and Carousel with multiple layout style options.
- Facebook Feed – You can show the feed from a Facebook account and page.
- Instagram Feed – You can show feeds from Instagram Personal and Business accounts.
- X (formerly Twitter) Feed – You can show the X (formerly Twitter) feed.
- YouTube Feed – You can show the feed from a YouTube channel, handle, playlist, user feed and search.
- Vimeo Feed – You can show the feed from a Vimeo user, channel, showcase, search and more.
- Multi Social Media Feed – You can show feeds from multiple social media channels together.
How to Use the Social Feed Widget?
Once you add the Social Feed widget on the page, you’ll have to select the layout from the Layout dropdown under the Content Feed tab. Here you’ll find three options –
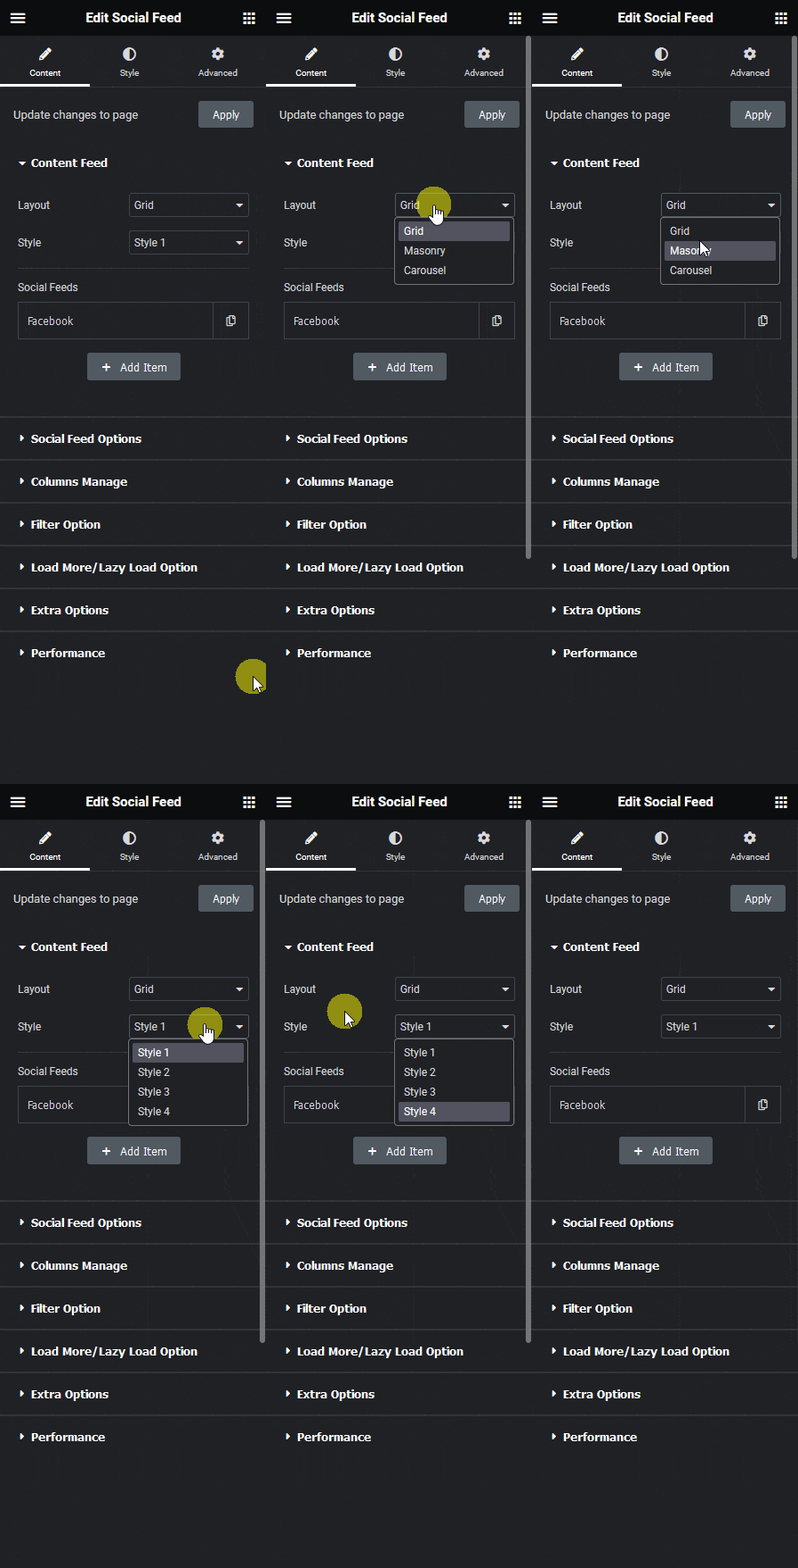
Grid – To create a grid style layout of the social feed.
Masonry – To create masonry style layout of the social feed.
Carousel – This option will turn your social feed into a carousel.
Once you select your layout you’ll get the relevant layout preset style under the Style dropdown.
Then under Social Feeds, you’ll get an item. Once you open the item, you’ll find different social media options under the Source dropdown.
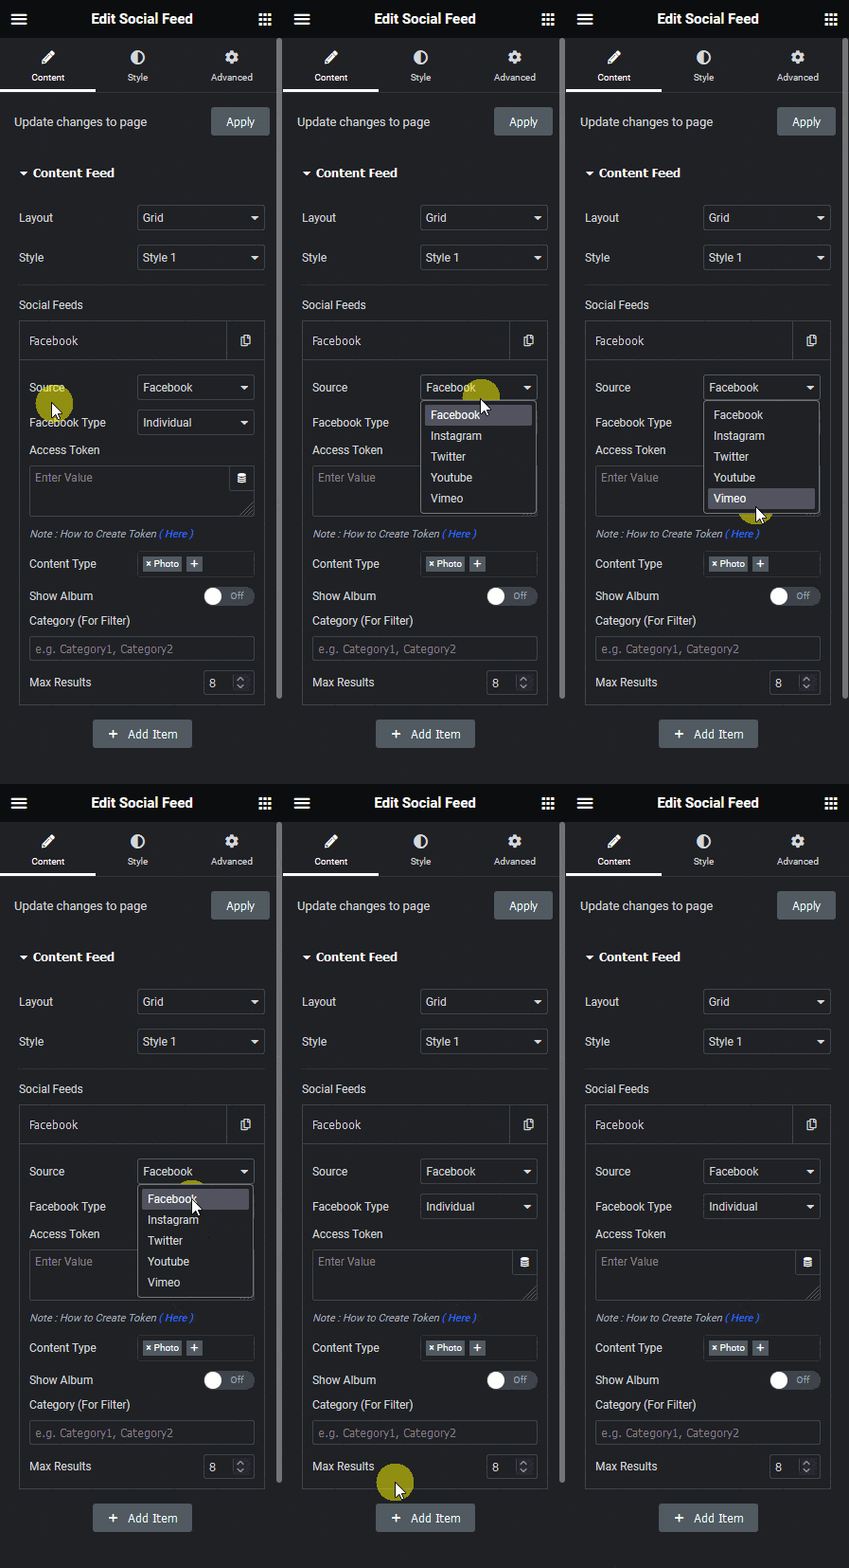
Facebook – For showing live Facebook feed.
Instagram – For showing live Instagram feed.
X (formerly Twitter) – For showing live X (formerly Twitter) feed.
YouTube – For showing live YouTube video feeds.
Vimeo – For showing a Vimeo channel feed.
Based on the selected source you’ll get relevant settings.
You can click on the + Add Item button to add additional social media feeds to show feeds from multiple social media channels together.
Social Feed Options
In the Maximum Posts field, you can mention the number of posts to be displayed in the feed.
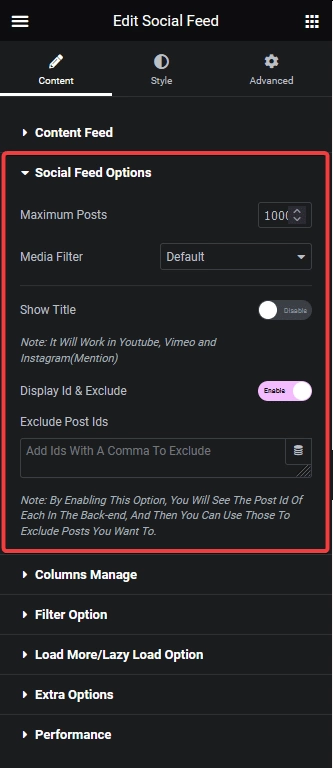
In the Media Filter dropdown, you’ll get three options –
Default – This will show all types of posts.
Only Media Posts – This will show the posts with images or videos only.
Hide Media Posts – This will hide the posts with images or videos.
From the Show Title toggle you can show the post title for YouTube, Vimeo and Instagram(Mention) feeds.
Then you’ll find the Display Id & Exclude option, from here you can exclude posts by ID from the feed.
Once you turn on the toggle it will show the post ID of each post in the Elementor editor, just copy the post ID that you want to exclude and paste it in the Exclude Post Ids field, and that specific post will be excluded from the feed.
You can add multiple post IDs separated by a comma.
Columns Manage
This option is available for Grid and Masonry layouts only. From here, you can manage the number of columns in the layout and column gap for different devices.
Filter Option
This option is available for Grid and Masonry layouts only. From here, you can set a filter option based on the content source.
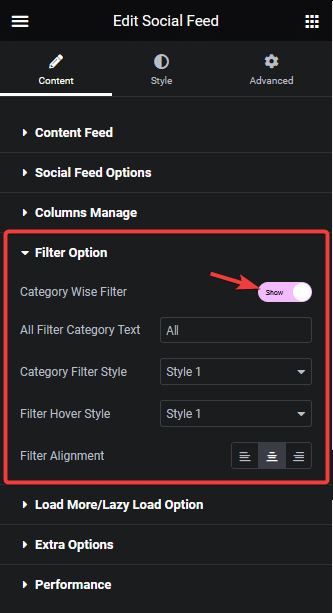
Once you turn on the Category Wise Filter toggle, you can select from different styles and hover styles for the category filter. You can also align the category filter from the Filter Alignment section.
Load More/Lazy Load Option
For the Grid and Masonry layouts, you can add a load more or a lazy load option from this tab. In the More Post Loading Options dropdown you’ll find two options –
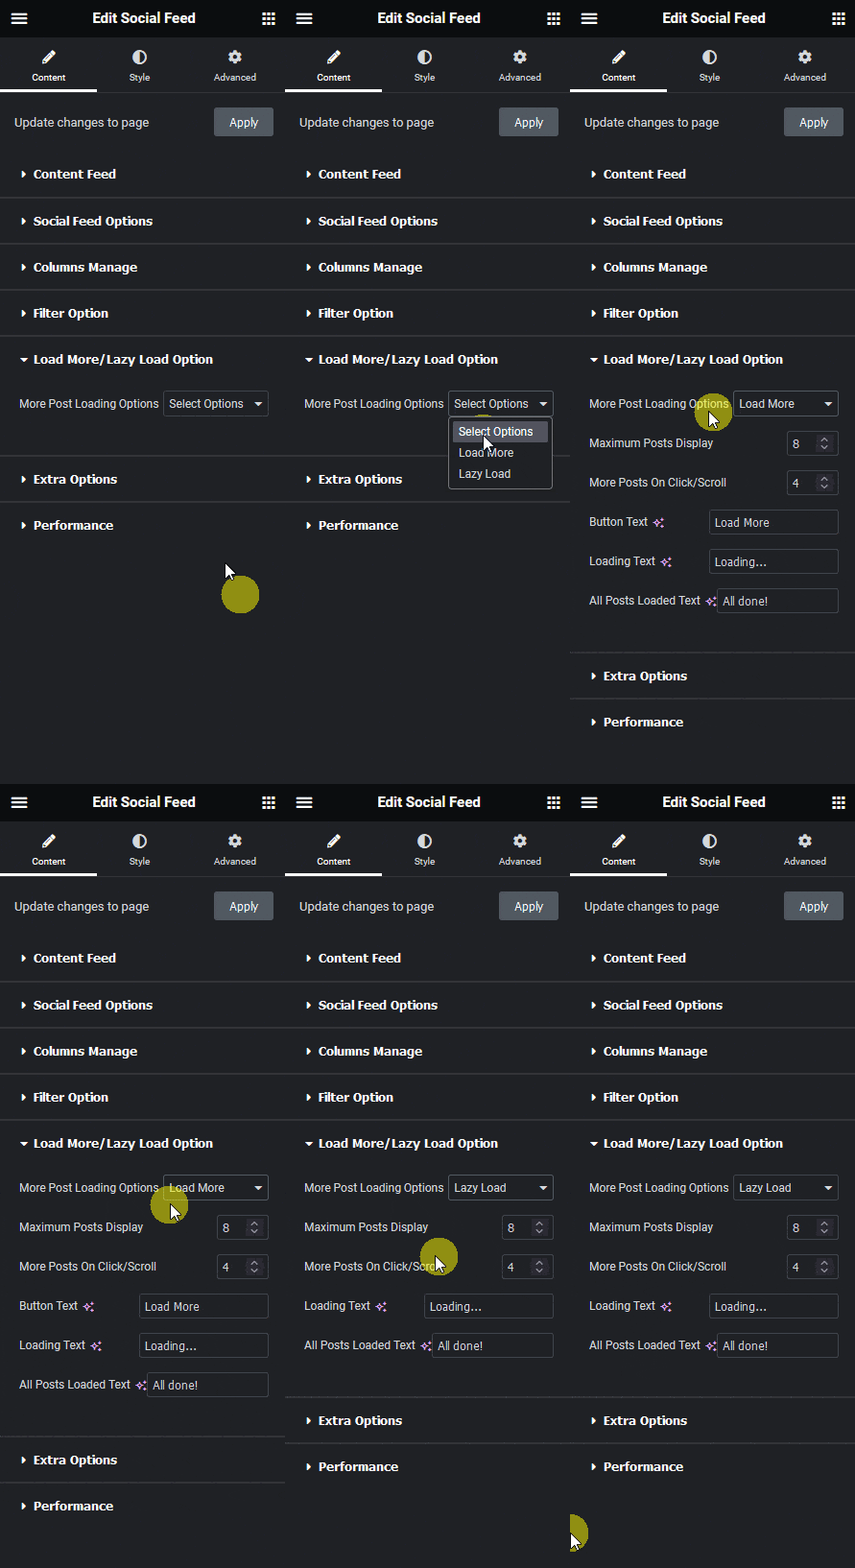
Load More – By enabling this option, a Load More button will be added to your feed. You can specify the maximum number of posts that appear before the button displays and set the number of posts to load when the button is clicked. Additionally, you can customize the button text, loading text, and text displayed once all posts have loaded.
Lazy Load – To add a lazy load feature to your feed, select this option. You can specify the maximum number of posts that load initially and set a number for how many posts to load on scroll. Additionally, you can customize the loading text and the text displayed once all posts have loaded.
Extra Options
In this tab, you’ll find some additional options.
From the Refresh Time dropdown, you can set how often the feed will refresh. Based on your selection it will load new posts from your social media channels.

Then from the Text Limit toggle, you can set a text limit on your posts. You can set the limit by character or word. You can also add dots at the end of the text by enabling the Display Dots toggle.
If you have a long post you can add a scroll bar to them by enabling the Content Scrolling Bar toggle. Once you turn on the toggle you’ll get an option to set a height to your posts.
From the Fancybox Scrolling Bar toggle you can add a scroll bar in the fancy box if you are showing the content in a fancy box. You can also set the height of the fancy box.
Then you can set what will happen when someone clicks on the post from the On Post Click dropdown, here you’ll find three options –
Do Nothing – On clicking the post nothing will happen.
Go To Website – It will redirect the users to the post website. Like if the post is from Facebook it will redirect users to Facebook.
Open Fancy Box – This will open the post content in a fancy box.
In case you are using a local host or non SSL website (non HTTPS) then turning on the Curl SSL Verify Peer toggle, will help you securely connect with social media accounts. Many social media accounts don’t allow insecure connections.
The Facebook Transient option will allow you to store a copy of your Facebook feed in the local database, so it doesn’t send requests to Facebook every time to show the feeds.
This transient is a temporary database file that gets deleted after an interval and new files are stored again based on the Refresh Time settings.
Performance
In the Performance tab, you’ll find some options to improve the performance of the widget. Generally, whenever the feeds are displayed it sends a request to the respective social media account to get the data. This process can be time consuming especially if you have a lot of feeds.
To improve the performance you can turn on the Performance toggle, this will save all the feed into the local database as a transient. So every time a visitor visits the page it will get the data from the local database making the process a lot faster.
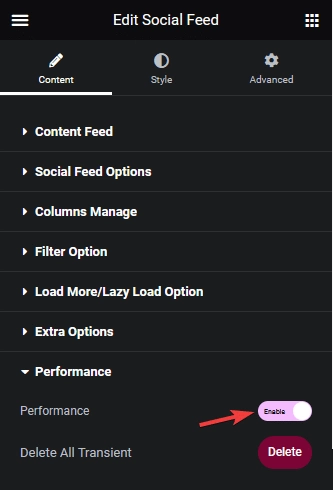
Based on the Refresh Time settings under the Extra Options tab these transient files will be deleted and new files will be stored.
Then from the Delete All Transient option you can delete the transient by clicking on the Delete button. This will clear the local database.
If you make any changes in the feed settings of any social feed like changing the feed from an Instagram Personal account to a Business account, you have to delete the transient. Then you have to disable the Performance toggle and then enable it again to save the new feed in the local database.
How to Style the Social Feed Widget?
If you want to style your feeds you can do that from the Style tab.
Universal – From this tab, you can give a standard style to all your feeds from different social media accounts. You can manage the typography of the description, name, time, footer area, color of description, name, time, URL, Hashtag, icon color, size, and much more.
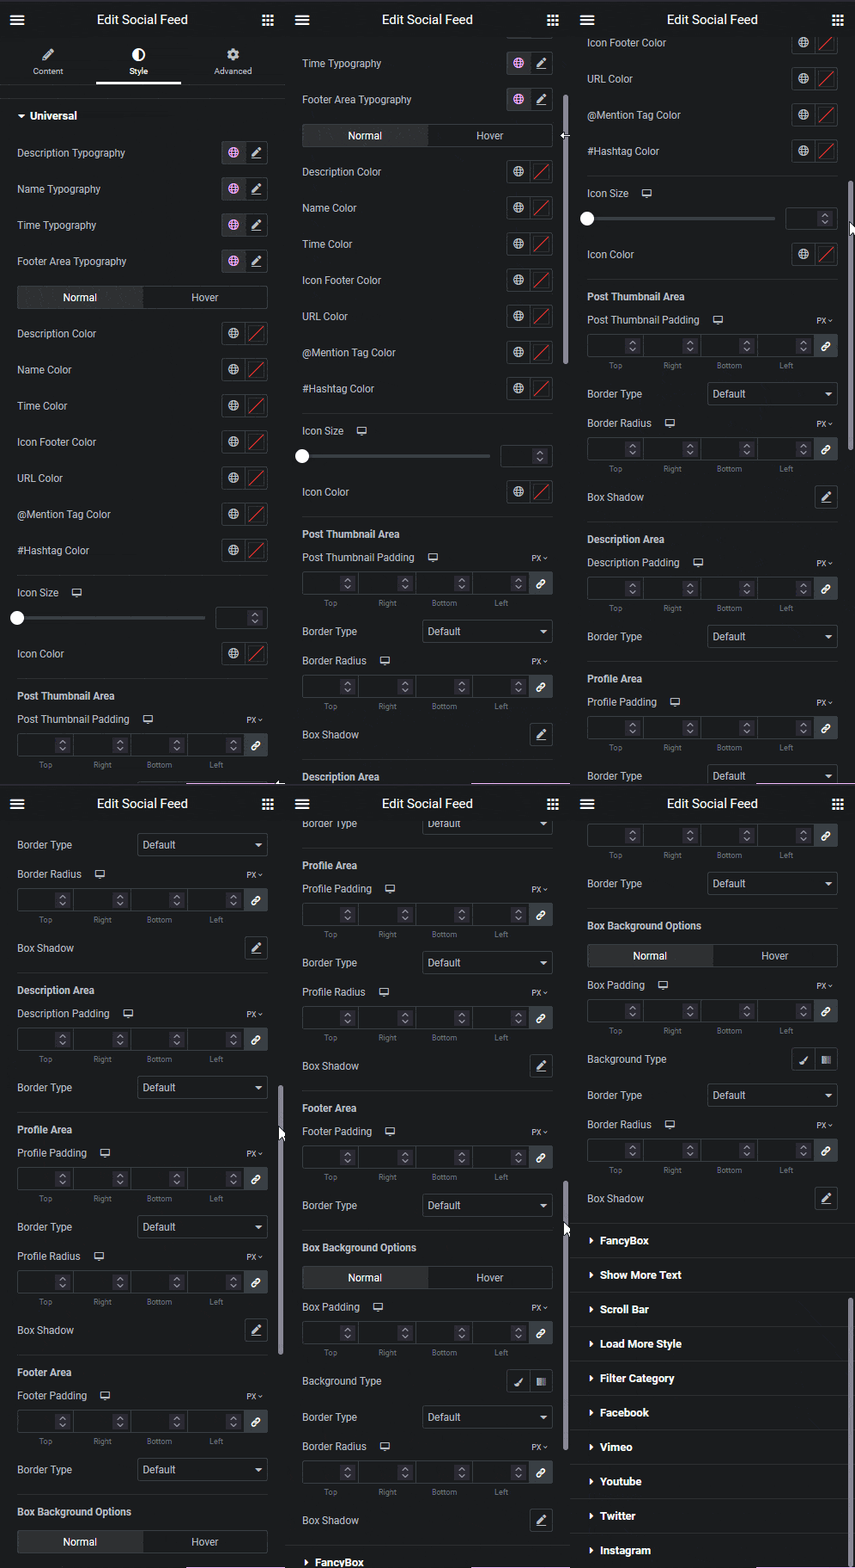
FancyBox – From this tab, you can select different styles for fancybox. Within this tab, you’ll find two tabs Option and Style. You can manage different fancybox settings like features, effects etc. from the Option tab. From the Style tab, you can manage the background and backdrop filter.
Show More Text – From here, you can manage the style of the Show More text within the post and fancybox.
Scroll Bar – If you have a scrolling bar in your posts then you can manage the scroll bar style from this tab.
Load More Style – From this tab, you can manage the load more text typography, color, loading spinner color and size.
Filter Category – If you are using the Filter Option, then you can manage the style from here. You can manage the filter typography, color, hover color, background and more.
Carousel – If you are using the Carousel layout for your feed then you’ll get this option. From here you can manage slider mode, speed, column for different devices and much more.
Facebook – If you don’t want a universal style for Facebook feeds then you can style them from this tab.
Vimeo – From this tab, you can manage the Vimeo channel feed style.
YouTube – To manage the YouTube feed style you can use this tab.
X (formerly Twitter) – From this tab, you can style the X (formerly Twitter)feed.
Instagram – To style the Instagram feeds you can use this tab.
Advanced options remain common for all our widget, you can explore all it options from here.
How to Show Social Feed as a Carousel?
If you want to show your social feed as a carousel, then select Carousel from the Layout dropdown.
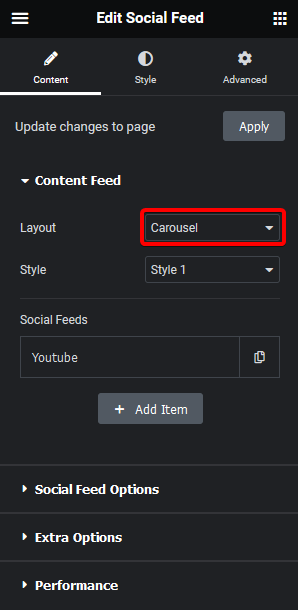
From the Style dropdown, you can select different styles for your carousel layout.
Now just set your social media feed from the Social Feeds section and it will display as a carousel.
From the Carousel tab under Style you’ll get many options to customize your carousel.

Note: These options work similarly as in the Carousel Anything widget, we have covered these options in detail there.
Slider Mode – From here you can choose your slider orientation Horizontal or Vertical.
Slide Speed – Control your slide transition speed from here.
Now you’ll find various device-dependent options.
Columns – You can set multiple columns for the slide. Learn more about the process.
Next Previous – You can set the behavior of your next/previous slide movement from here. You can either move one column at a time or move all visible columns (depending on the number of columns set in the Columns dropdown).
Slide Padding – From here you can adjust the padding of your slider.
Draggable – Make your carousel draggable or non-draggable from here.
Infinite Mode – You can turn your carousel into an infinite loop slider from here.
Pause On Hover – Allow the users to pause the slider on mouse hover.
Adaptive Height – If you have slides with uneven height with this option the carousel navigations will adjust its position automatically according to the height of the slide.
Animation Type – From here you can choose the animation type for your slider.
Autoplay – Make your Elementor carousel slider autoplay from here and adjust its speed as well.
Show Dots – From here you can add slider navigation dots and you can style them as well. Learn more about the process.
Show Arrow – You can also add navigation arrows for your carousel slider and style them from here.
Center Mode – From here you choose the center position of your slider. You can learn more about the process here.
Number Of Rows – From here you can select the number of rows that will display in the carousel feed.
Unique Carousel ID – With this option, you can control the carousel navigation with the Remote Carousel widget using a unique ID.
