Introduction
If you encounter issues with The Plus Addons plugin widgets and features, We recommend following this step-by-step troubleshooting process to solve the issue on your end.
1. Check if you have the Latest Version & Right System Requirements
Make sure you are using the latest versions of the following:
- WordPress
- PHP Version: Latest or at least 8.0.0
- Elementor
- The Plus Addons for Elementor – Pro & Free Latest Versions
2. Clear Cache
2.1. Clearing Browser Cache:
Clearing the browser cache ensures that each webpage loads as if the user is visiting it for the first time. This is particularly helpful when something loaded incorrectly initially and was cached, as clearing the cache allows for a fresh and correct load.
CTA: Refresh the browser cache by adding /?a=b at the end of the URL and do a hard reload by pressing CTRL/CMD + SHIFT + R.
Example:
Normal URL: https://qa.theplusaddons.com/
For Cache Clearance: https://qa.theplusaddons.com/?a=b
Note: Follow this process after each step and open the URL in incognito mode to refresh the page and check the issue.
2.2. The Plus Addons ‘Performance’ option to clear the plugin cache:
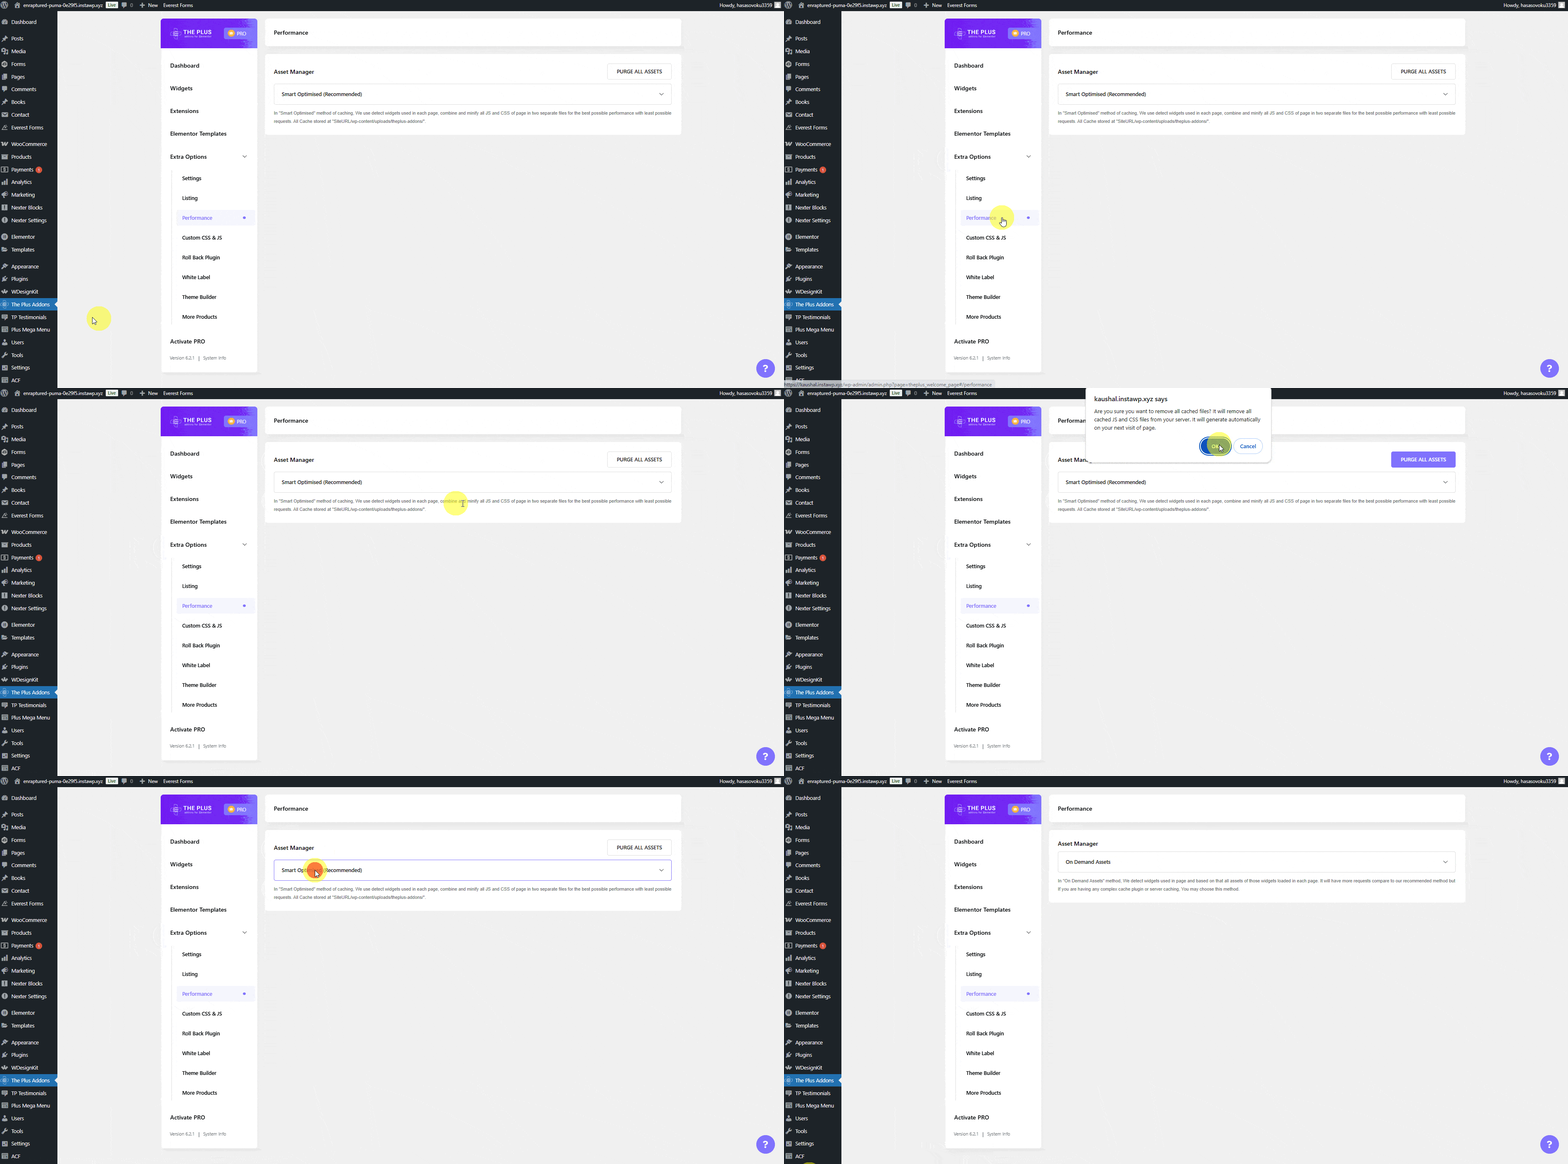
- Navigate to Dashboard > The Plus Addons > Extra Options > Performance > Asset Manager.
- Select Smart Optimised.
- Click “PURGE ALL ASSETS.”
Refresh the page and check the issue. If it persists, try the alternative method below or if there is any 3rd party caching plugin.
- Navigate to Dashboard > The Plus Addons > Extra Options > Performance > Asset Manager.
- Select ‘On Demand Assets‘.
Refresh the page to check the issue. If it persists, proceed to the next step.
2.3. Deactivate the 3rd party speed optimizer/ cache plugin and check the issue.
If using Cloudflare, disable Rocket JS. For other CDNs like Rocket CDN or KeyCDN, we recommend turning them off temporarily. After doing so, recheck the website’s load to diagnose any issues effectively.
3. Regenerate CSS and Data through Elementor
Regenerating CSS and data can be necessary in certain issues. Over time, cached files and data may become outdated or corrupted, resulting in issues like broken layouts, missing styles, or unresponsive elements. By regenerating these CSS files and data, you ensure that Elementor has the most up-to-date and accurate information, ensuring your website displays correctly.
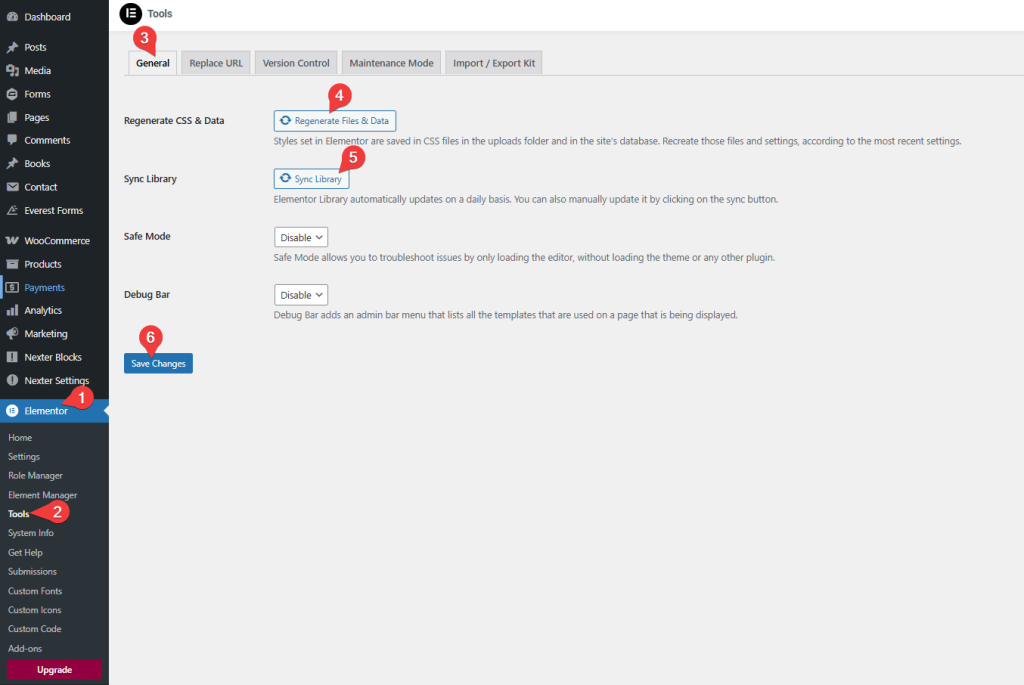
- Navigate to Dashboard > Elementor > Tools > General.
- Click on ‘Regenerate files & Data’ and ‘Sync Library.’
- Save changes.
- Refresh the page and check the issue. If it persists, proceed to the next step.
4. Check for Custom CSS or JS Codes
Check for any custom CSS or JS codes that have been added to the page or site. If you find any, remove them and recheck the issue.
5. Add the Widget to a New Page.
Add the widget/block from scratch to a new page and try to achieve a similar design/functionality.
- If the issue persists here, it may indicate a 3rd party plugin conflict.
- If the issue does not persist, then try to add the widget from scratch again on the problematic page.
- If the issues persist, it could conflict with any other widget or settings. To troubleshoot, remove all sections/ Containers/ widgets and check.
- Once identified, adjust settings or seek alternative solutions. If the widget is crucial, inform the support team for further guidance.
6. Troubleshooting using the Health Check –
When encountering errors on your website, whether in the admin area or on the frontend, you can utilize the Health Check & Troubleshooting plugin to pinpoint which plugin or theme is causing the issues you are experiencing. This tool assists in diagnosing and troubleshooting potential conflicts, aiding in a more efficient resolution of problems. Using this plugin you can easily test in the backend without affecting any change on the live website.
Detailed Guide – https://make.wordpress.org/support/handbook/appendix/troubleshooting-using-the-health-check/
7. Identify the Conflicting Plugin
Note: Before proceeding with this task, which may impact the live site, it is advisable to create a backup of the site or perform the task on a staging site.
- Disable all plugins except Elementor and The Plus Addons.
- Check if the issue persists. If it does, please contact the support team. If the issue does not persist, proceed to the next step.
- Enable each plugin one by one.
- After enabling each plugin, check the functionality of the Widget/Block.
- Continue this process until you identify the plugin causing the conflict.
Once identified, adjust settings or seek alternative solutions. If the plugin is crucial, inform the support team for further guidance.
8. Identify the Conflicting Theme
Activate the default WordPress Theme and check. If the issue persists, connect with us via the helpdesk.
9. Common Issues
9.1. Images Not Loading: Dynamic Listing & Woo Product Listing Widgets
If images are not loading, it might be due to a third-party Image Optimization plugin
Solutions:
- Deactivate the Image Optimization plugin and check.
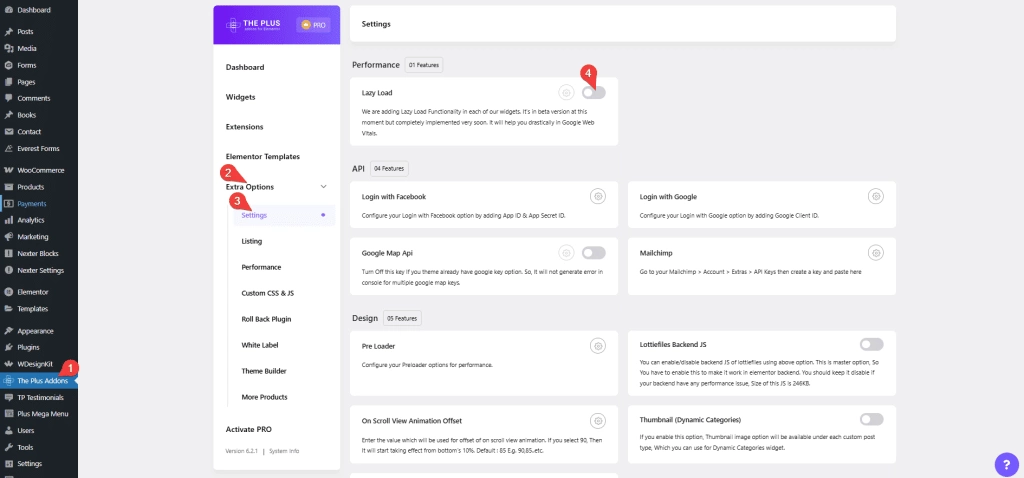
- Turn the toggle off Lazy Load from Dashboard > The Plus Addons > Extra Options > Settings.
9.2. Missing Elementor Icons
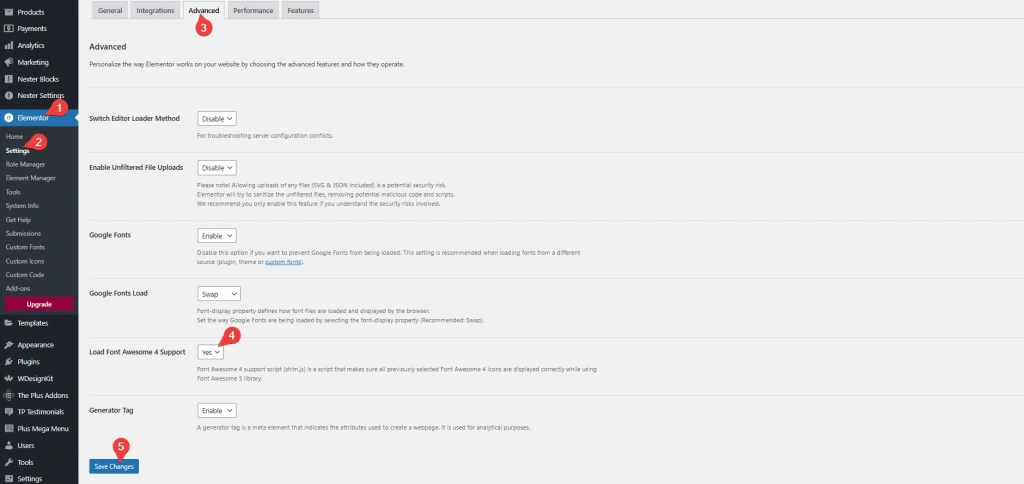
If icons are not visible, it could be because ‘Load Font Awesome 4 Support’ is disabled in Elementor Settings.
Solutions:
- Navigate to Dashboard > Elementor > Settings > Advanced and enable ‘Load Font Awesome 4 Support.‘
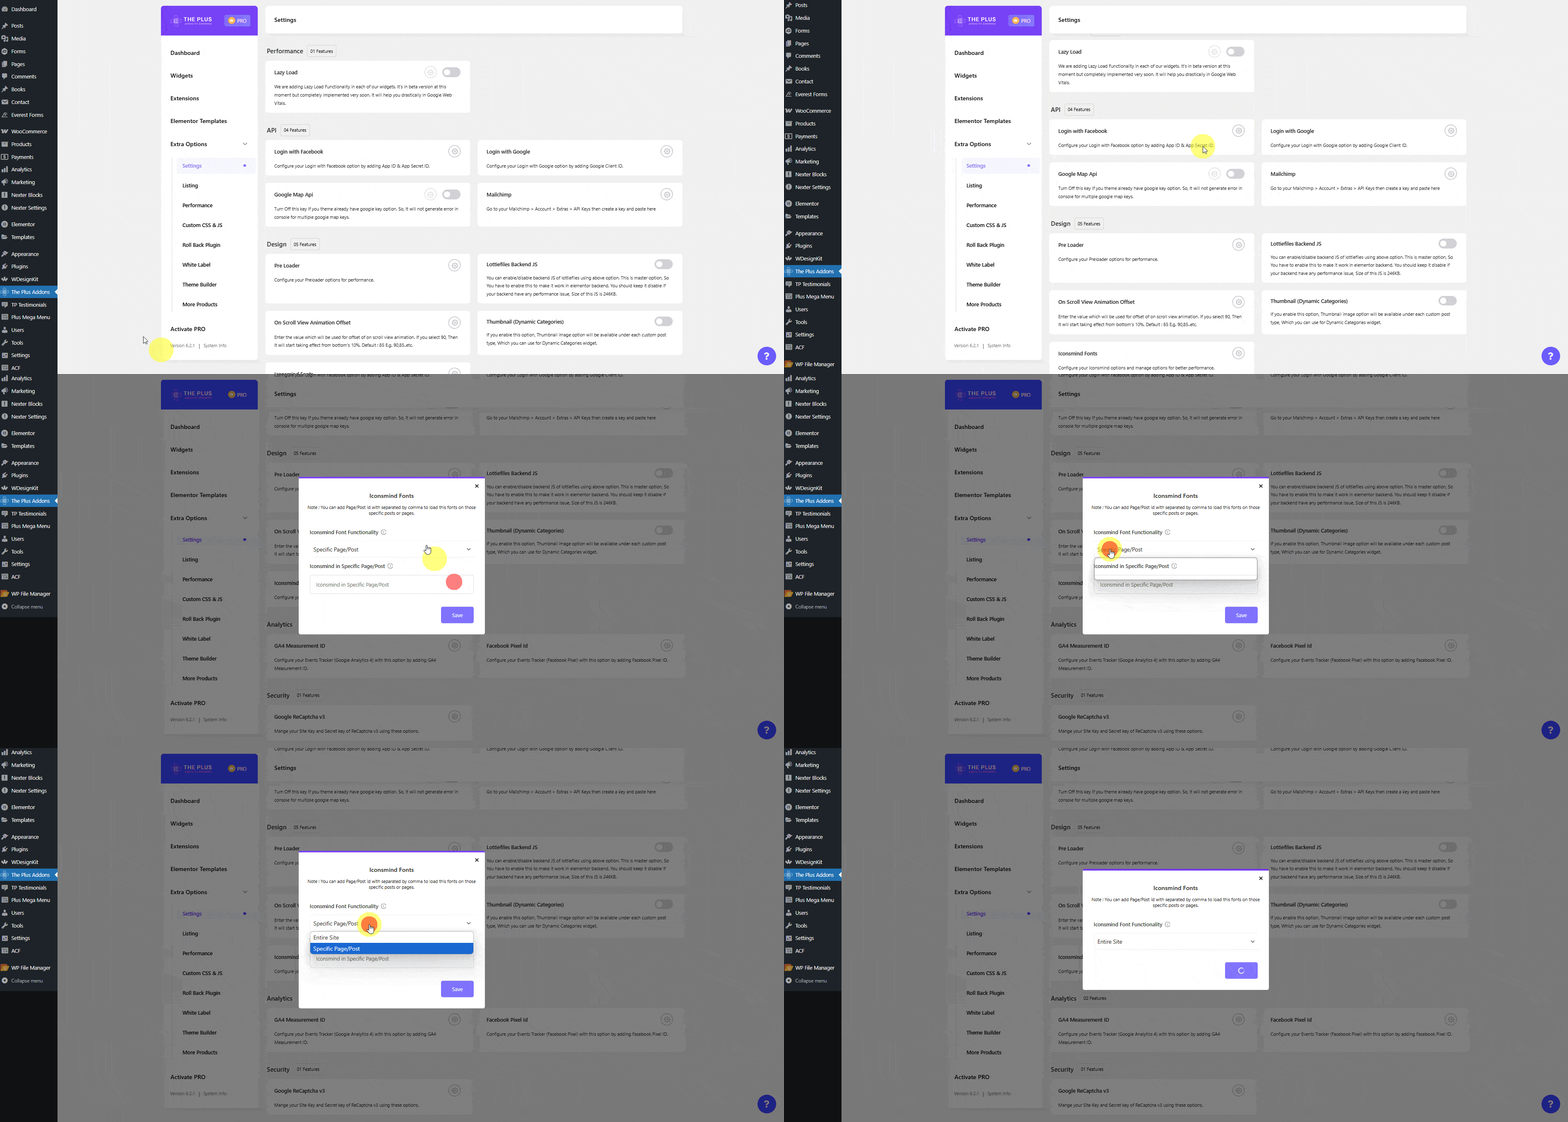
- If the icons are from IconsMind, navigate to Dashboard > ThePlus Addons > Extra Options > Settings, then scroll down to find the “Iconsmind Fonts” section. Click on the settings icon to open the Iconsmind Fonts settings, where you’ll see two options:-
- Iconsmind Font Functionality – This allows you to load icons for either a Specific Page/Post or Entire Site.
- Iconsmind in Specific Page/Post – If you choose to load icons on specific pages or posts, enter the Page/Post IDs in this field, separated by commas, to apply the fonts only to those selected posts or pages.
Then, click the Save button to apply the changes.
Click here for more detailed guide -> https://qa.theplusaddons.com/docs/fix-elementor-icons-not-loading/
9.3. Cross Domain Copy-Paste Not Working.
Solutions:
Confirm the following:
- Confirm that the widget you’re trying to copy is turned on.
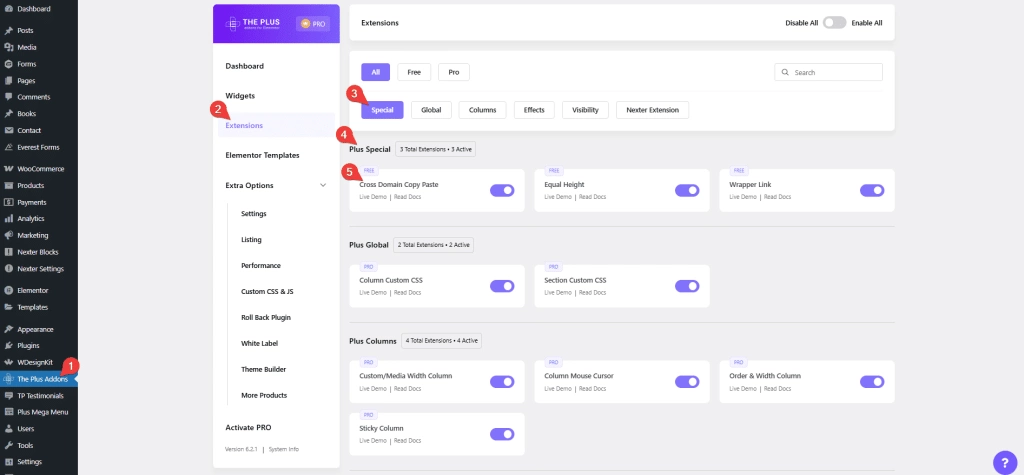
- Navigate to Dashboard > ThePlus Addons > Extensions > Special > Plus Special and make sure that the ‘Cross Domain Copy Paste’ feature is enabled.
- If the content has a sub-Elementor Template, copy it separately.
- Perform the copy-paste in the same normal browser window (Not a private tab).
- Verify that you’re using the latest version of the Plus Addons.
If the issue persists,
- Navigate to Dashboard > ThePlus Addons > Widgets and enable all the widgets.
- Try the copy-paste process again.
- If it works, scan the unused widgets and disable them.
If the issue persists,
Navigate to Dashboard > Elementor > Settings > Features and make sure ‘Container‘ is enabled/Active. Some of the demos are created using the container, so enabling this setting is crucial for the copy-paste functionality to work seamlessly.
Additionally, you can right-click and inspect elements within the Elementor editor to check for any errors that might occur while using this feature.
Learn via Video Tutorial
For more information check this Doc -> https://qa.theplusaddons.com/docs//cross-domain-copy-paste-for-free-in-elementor/
9.4. Elementor Editor Stuck on Loading Screen
Solution – https://qa.theplusaddons.com/docs/fix-elementor-editor-stuck-on-loading-screen/
9.5. Plus Mega Menu – Edit with Elementor Not Loading
Solution:
Ensure that the WP memory limit is allocated to 768M or 1024M.
Permalink Settings:
- Navigate to Dashboard > Settings > Permalinks
- Ensure that the Permalink structure is set to ‘Post name’.
- Try editing the Mega Menu with Elementor again.
- If the issue persists, inform to support team.
9.6. The Preloader is not working
Solution:
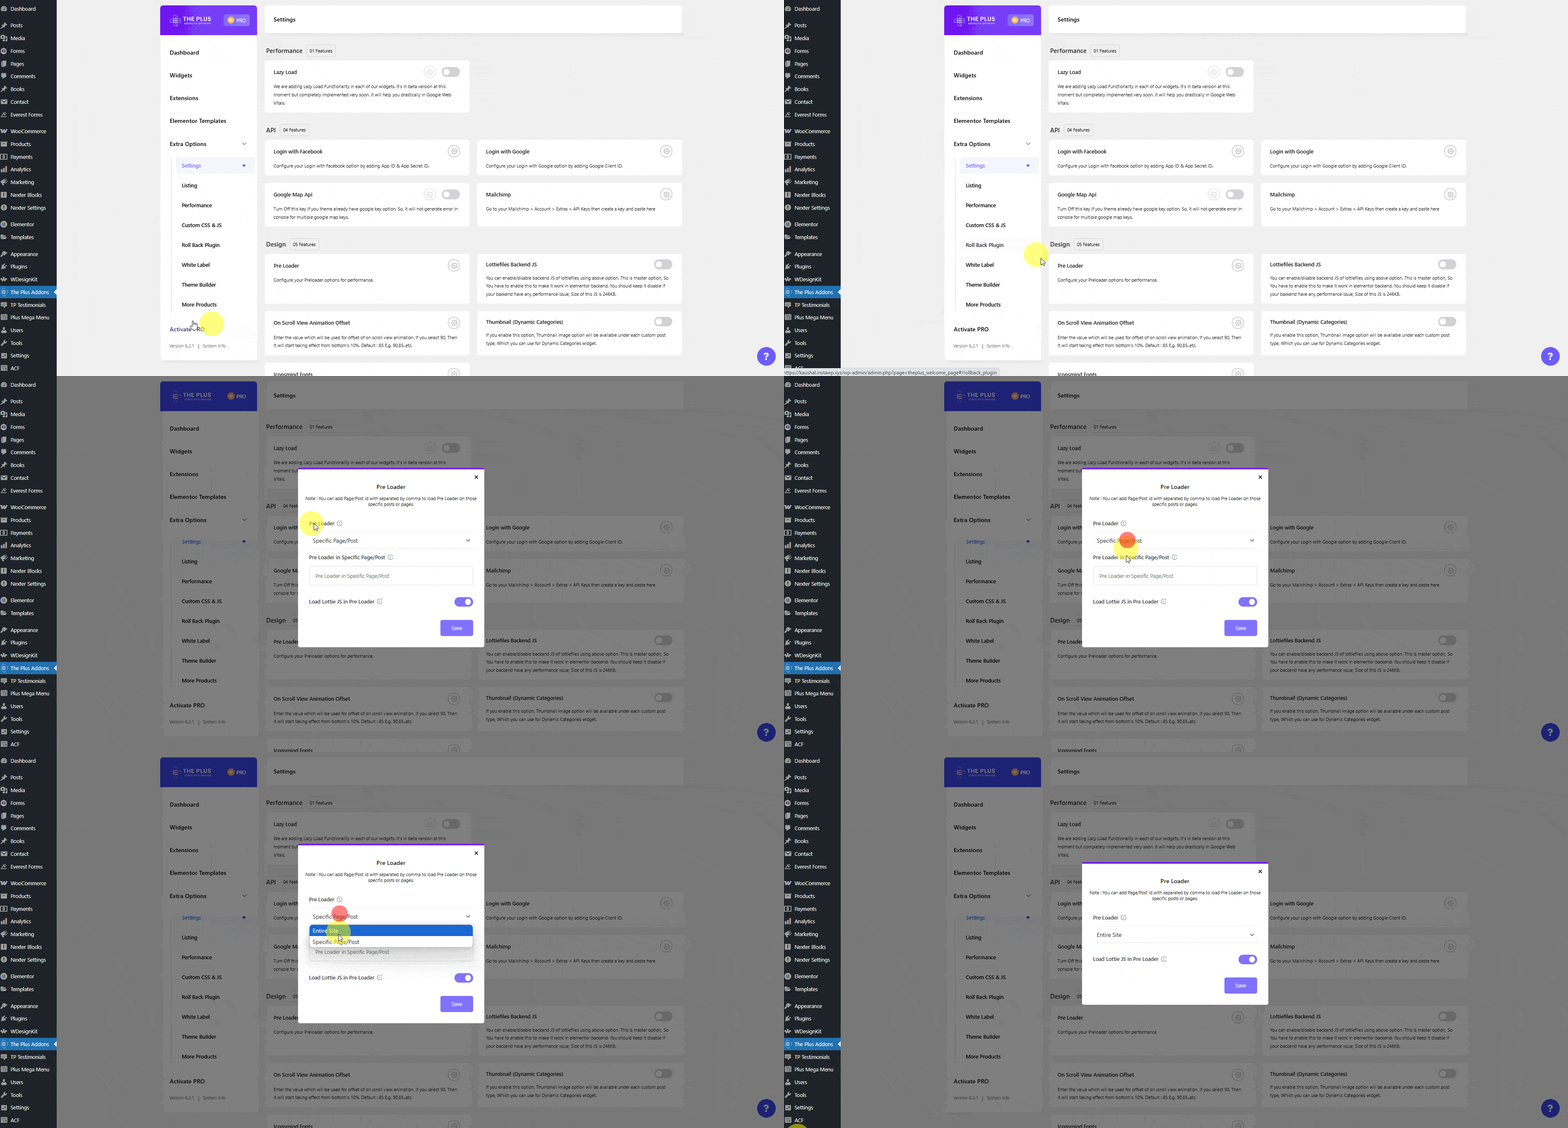
- Navigate to Dashboard > ThePlus Addons > Extra Options > Settings
- Then, scroll down to find the “Pre Loader” section. Click on the settings icon to open the Pre Loader settings.
- Then, you’ll see where you want to load the preloader, either for a Specific Page/Post or the Entire site.
- If you choose to load the preloader on specific pages or posts, enter the page/post IDs in this field, separated by commas, to load this on those selected posts or pages.
- Then, you’ll find the Load Lottie JS in Pre Loader option. Enabling this option will load Lottie JS.
- Then, click the Save button to apply the changes.
- If the issue persists, inform to support team.
9.7. Not using Google Maps on the site, it still appears in the Browser Console
Solution:
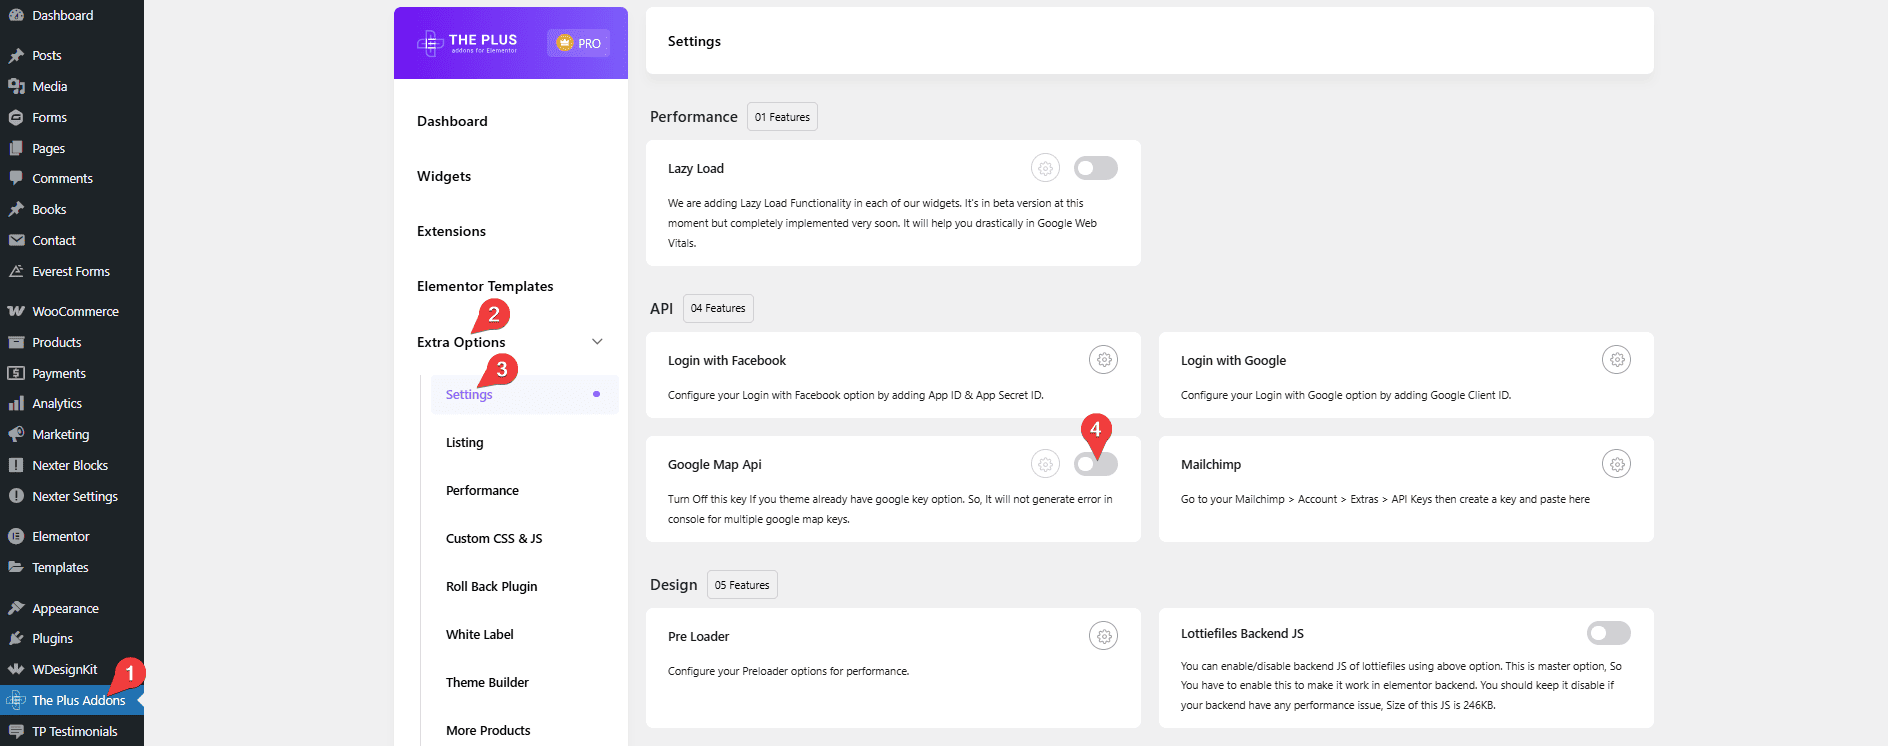
- Navigate to Dashboard > ThePlus Addons > Extra Options > Settings
- Turn off the toggle in the ‘Google Map API’ section.
9.8. The Plus Extra options do not appear in the Advanced options of widgets.
These Plus Extra options exclusively work with The Plus Addons widget and may not function with 3rd party widgets.
9.9. Fixing Site Frontend Issues in Maintenance Mode with Elementor.
If you’re using the Maintenance mode feature from Elementor and the site frontend is not loading correctly, follow these steps after editing the Elementor page.
- Update the page.
- Navigate to Dashboard > ThePlus Addons > Extra Options > Performance > Asset Manager.
- Select Smart Optimized.
- Click “PURGE ALL ASSETS.”
- Navigate to Elementor > Tools and regenerate the CSS there as well.
- Hard reload the page by pressing CTRL/CMD + SHIFT + R.
10. Contact to Support Team
Following these troubleshooting steps should help resolve the issues. If the issues persist, feel free to reach out for further assistance. Our team will help you in every possible way.
Consider sharing all the following relevant details with the support team. This information enables us to investigate the issue efficiently and offer a prompt solution.
- Your live site and page URLs that show the issue.
- Your WordPress site login access. You may use a temporary login without a password plugin. In this recommended secure method, share your access using just one link with an expiry time. It will ask you for an email address add [email protected]. Using this URL, we can get access to your website as an admin and quickly solve the issue for you.
Follow this doc guide – https://qa.theplusaddons.com/docs//how-to-share-login-access-with-helpdesk-team/
- Share your console errors (You will get this by clicking on F12 from your browser and clicking on the console tab) and upload the screenshot at the helpdesk.
- System info Screenshot. You can get that from Elementor > System Info.
- A specific browser or device involved if applicable – Operating System version( Windows 10, Mavericks, etc), the model of the device( iPhone 11, Samsung Note, etc.), browser version( Safari 12.1.2, Chrome 85.0), etc., and screen resolution 1920/720 1440/900, etc.
- Detailed information describing the issue, as well as steps to regenerate at our end.
- Possible screenshots or Screen Recording of the issue. You may use our free screen recording tool from the browser – POSIMYTH Record.
- We want to resolve your issues as quickly and effectively as possible, So please provide us with the maximum information to help you properly. Check our Support Policy.
Please be assured that we are committed to delivering an excellent user experience, and our support team will address your query as quickly as possible.
